Tamiya 1/35 Willys Jeep
| KIT #: | 219 |
| PRICE: | $20.00 |
| DECALS: | Three optionse |
| REVIEWER: | Joe Essid |
| NOTES: | Could be habit forming |
| HISTORY |
 Willys Jeep
was more than a useful military vehicle, it birthed a legend. What more can be
said here about a little 4x4 that Dwight D. Eisenhower counted among the most
significant contributors to the Allies’ victory? For me, it’s the mystique of a
mechanically simple, reliable, lightweight transport that no other nation quite
matched. War correspondent Ernie Pyle called the Jeep
a “divine instrument of wartime locomotion.”
Willys Jeep
was more than a useful military vehicle, it birthed a legend. What more can be
said here about a little 4x4 that Dwight D. Eisenhower counted among the most
significant contributors to the Allies’ victory? For me, it’s the mystique of a
mechanically simple, reliable, lightweight transport that no other nation quite
matched. War correspondent Ernie Pyle called the Jeep
a “divine instrument of wartime locomotion.”
Fans of “The Rat Patrol” in the 1960s agreed. Many went on, like my friend (and fellow modeler) Paul, to be part of today’s Jeep Cult. Though I’ve resisted the siren song, Paul owns an early 2000s LJ (Long Jeep, so the story goes) with a manual transmission (yes!) that I hope he’ll sell me one day, as well as a WW2-era Willys he drives to shows. I asked Paul more than a few questions about his experience with his classic (he’s a fastidious restorer who took his 1944-built Jeep to mil-spec) while building and detailing this kit.
| THE KIT |
 Tamiya’s
Jeep proved to be a little gem packed in a big sturdy retro white box. I’d
bought it at an LHS with plans to do a diorama set in the Pacific, along with an
M3 Stuart. As fate had it, that project is still waiting since an Italeri Hetzer
floated to the top of the stash first. I decided to build that AFV as a
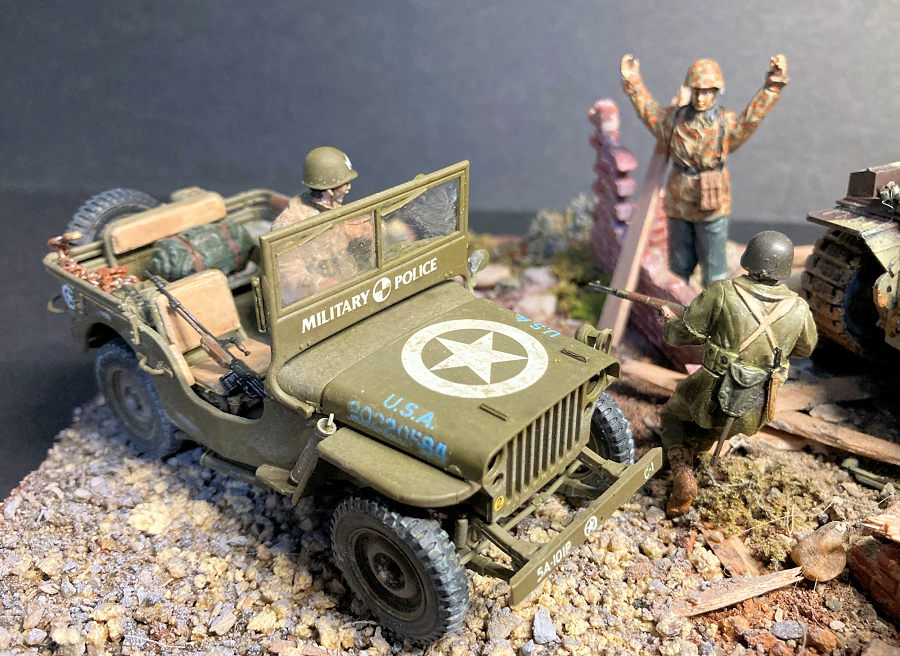
knocked-out example in Italy, early 1945, amid rubble. The Jeep would be parked
nearby, with the MP driving it overseeing the surrender of an SS trooper. A
couple of GIs who had arrived to check out the Hetzer for souvenirs, one leaving
his BAR in the Jeep’s passenger seat. Suddenly, as they heard a stranger yell “Kamerad!”
the dogfaces found they had real work to do.
Tamiya’s
Jeep proved to be a little gem packed in a big sturdy retro white box. I’d
bought it at an LHS with plans to do a diorama set in the Pacific, along with an
M3 Stuart. As fate had it, that project is still waiting since an Italeri Hetzer
floated to the top of the stash first. I decided to build that AFV as a
knocked-out example in Italy, early 1945, amid rubble. The Jeep would be parked
nearby, with the MP driving it overseeing the surrender of an SS trooper. A
couple of GIs who had arrived to check out the Hetzer for souvenirs, one leaving
his BAR in the Jeep’s passenger seat. Suddenly, as they heard a stranger yell “Kamerad!”
the dogfaces found they had real work to do.
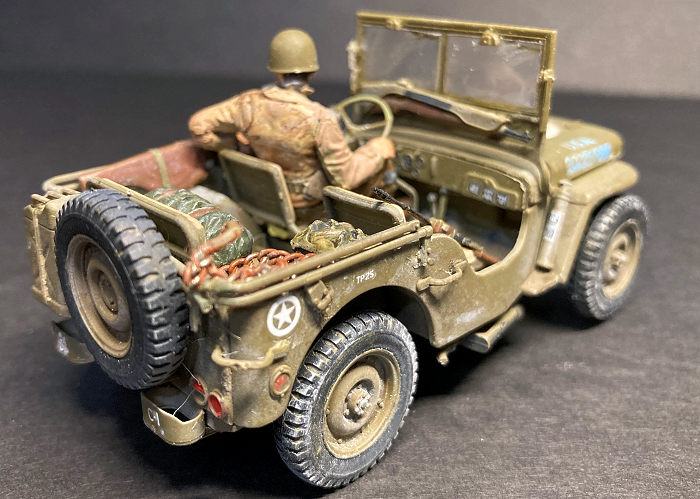
Tamiya’s MB gets moding in (guess what) OD green, on two sets of sprues plus a clear sprue for the windshield and headlights. I found minimal flash. The kit offers a builder five options, one with a .50 MG. All use a nicely sculpted driver figure. Engine, suspension, skid-plates, pioneer tools, and tires are all well molded. One can pose the thin, clear windshield up or done. It seemed a shame to smear that clear plastic with grime, but Jeeps don’t stay clean in the field, especially in an Italian late-winter rural setting.
Jeep fanatics can correct me here, but I see nothing inaccurate about Tamiya’s kit. The aftermarket for this kit also appears impressive.
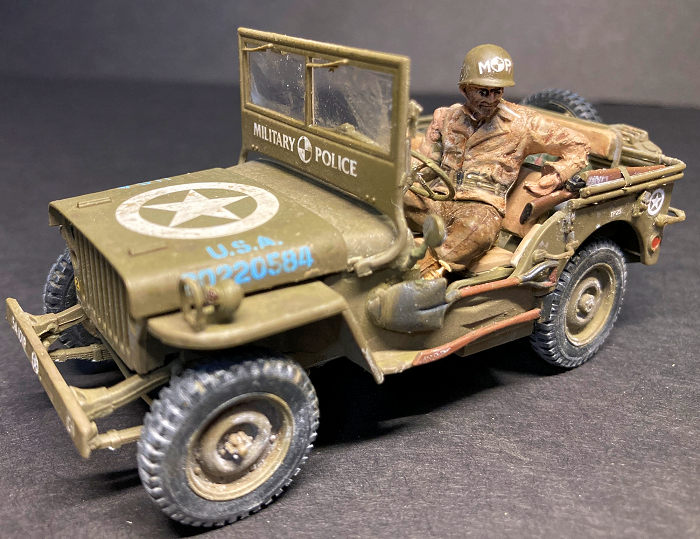
The kit’s options for building a Red Ball Express jeep or one packing Ma Deuce tempted me, but I went for a 5th Army 101st Military Police vehicle as it served in Italy at war’s end.
| CONSTRUCTION |
I began with the engine, after I had painted the entire works with a leftover can of Model Master Olive drab that I’m using up sparingly before it’s gone forever. It’s still the best rattle-can paint around. Yes, Rustoleum, I’m looking at you.
I didn’t bother to prime the parts. Paul coached me on washing the engine with a darker green, which I did with oils. The kit offers a detailed engine compartment that would not appear in my diorama, but I finished it anyway. I left the hood attached with a couple of small blobs of Handi-Tac putty so I could remove it in the future.
 The kit
fell together, though nibs on the parts did need sanding and I pre-fit
everything. Two thin parts broke and needed repairs: the rearview mirror and one
of the windshield supports. Other parts are tiny, so a young builder or novice
might struggle. Tamiya’s instructions are very clear, though I did commit the
radical act of following them, to quote Tom Cleaver’s maxim. I like, in
particular, the small fire extinguisher. It’s painted gold with decals, and it
sits by the driver’s left knee.
The kit
fell together, though nibs on the parts did need sanding and I pre-fit
everything. Two thin parts broke and needed repairs: the rearview mirror and one
of the windshield supports. Other parts are tiny, so a young builder or novice
might struggle. Tamiya’s instructions are very clear, though I did commit the
radical act of following them, to quote Tom Cleaver’s maxim. I like, in
particular, the small fire extinguisher. It’s painted gold with decals, and it
sits by the driver’s left knee.
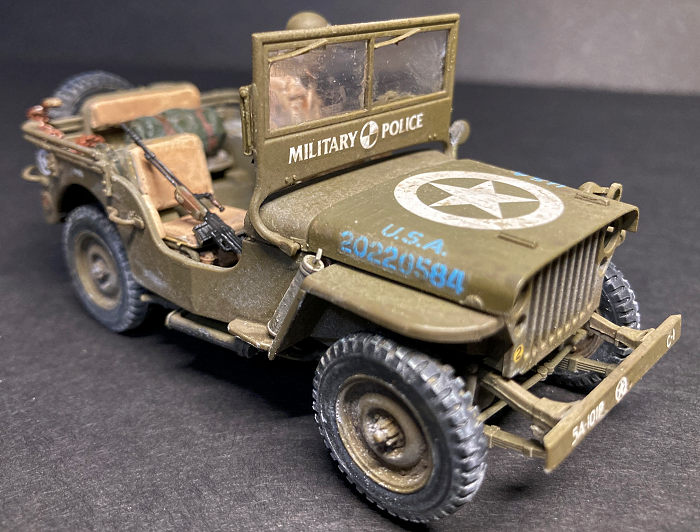
A few areas proved nebulous, but only a few. Another larger gray extinguisher on the passenger fender made it hard to mount a Thompson SMG in a scabbard there, as the instructions show. I put the weapon by the driver’s left elbow, adding a strap of OD-painted masking tape to hold it to the bed-rail. Now it’s ready for a quick-draw.
Another wrinkle emerged when I had the driver in his seat, as the instructions advise. I then tried to set the angle of the steer wheel. This took some time and patience to get correct. Finally, a had issues aligning one corner of the railing that frames the bed of the MB; here it was my fault. I got it aligned but it looked rough, so I used a length of costume-jewelry chain, suitably weathered and with a fabricated tow-hook, to cover the bad spot on the railing.
On the positive side, the kit’s two-part tires come cleverly molded so the seam shows on the back faces. If you weather the underside a bit, you won’t need to sand down anything for a realistic looking appearance.
| COLORS & MARKINGS |
 The kit
decals behaved masterfully, going down without any complaints. I used a little
Microset for all but the extinguisher decals, where Microsol helped them conform
to clear surfaces. Those got Future on top; the rest got sealed with more flat
spray.
The kit
decals behaved masterfully, going down without any complaints. I used a little
Microset for all but the extinguisher decals, where Microsol helped them conform
to clear surfaces. Those got Future on top; the rest got sealed with more flat
spray.
I did no painting of the Jeep save for the tires, which I brushed in Tamiya rubber black, and seat cushions which I brushed with Tamiya Deck Tan and washed with sepia oil paint. Everything received a topcoat of Tamiya Flat, then Flory and oil-paint washes. The tires got a final rub of gray artists’ pastels to add dust. I didn’t use the kit headlights, instead putting a drop of Testor’s clear-parts maker into the headlight buckets, which I’d painted silver.
I like vehicles with figures, to show scale. Tamiya’s slouching, easygoing driver makes this kit. He got primed with Mission black primer first, then I built up his skin, uniform, and gear with a variety of Mission, Vallejo, and Tamiya paints. I mixed the browns for his MP uniform tunic and trousers with a few different hues of tan and brown. I finally washed him down with thinned sepia brown, did some dry-brushing, and stuck a cigarette of stretched sprue in the corner of mouth.
Smoke ‘em if you got ‘em, boys. Tell Jerry to behave and we’ll give him a smoke too before we run him back to Headquarters.
I had to fiddle with the driver to get the right pose. His two-part left arm would not sit casually on the Jeep’s bed beside him, so I filled a gap on his inner and outer elbows with CA Gel, carefully sanded, as he was seated and the steering wheel in place, then touched up his paint.
The MB and driver were ready to pick up the POW.
| CONCLUSIONS |
Highly recommended. Younger builders will struggle with removing some of the smaller parts from the sprues so lend a hand.
Prices have gone up in the few years that my MB sat in the stash. That said, I would pay more to build another Tamiya Jeep in a heartbeat. An SAS Jeep calls me, as does a Red Ball Express leading a Deuce-and-a-Half truck, plus another jeep for that Pacific diorama.
That makes three Jeeps! Four, if Paul sells me his 1/1 scale LJ.
11 August 2025
Copyright ModelingMadness.com. All rights reserved. No reproduction in part or in whole without express permission from the editor.
If you would like your product reviewed fairly and fairly quickly, please contact the editor or see other details in the Note to Contributors.