Tamiya 1/35 M60A1
| KIT #: | ? |
| PRICE: | $ |
| DECALS: | none |
| REVIEWER: | Robert Myers |
| NOTES: |
| HISTORY |
This was an older kit from the stash. Due to a basement flood years ago the box and decals were destroyed.
 The
M60A1 replaced the original M60 Main Battle Tank. The hull looked the same as
the M60 Main Battle Tank, but that is where the similarity ended. While still
being designated an M60 series tank, the A1 had a totally new turret, new
controls, new seating, increased armor and a three ton weight gain. The main gun
was a 105mm M68. The M60 series of tank is interesting to me because the M60 had
an 48 style turret, the M60a1 had a totally new turret and the M60A2 had a
totally different turret and main gun.
The
M60A1 replaced the original M60 Main Battle Tank. The hull looked the same as
the M60 Main Battle Tank, but that is where the similarity ended. While still
being designated an M60 series tank, the A1 had a totally new turret, new
controls, new seating, increased armor and a three ton weight gain. The main gun
was a 105mm M68. The M60 series of tank is interesting to me because the M60 had
an 48 style turret, the M60a1 had a totally new turret and the M60A2 had a
totally different turret and main gun.
After visiting the US Army Ordinance Museum at Aberdeen, Maryland, I got the tank bug. After getting home, I went down to the spider webbed darkest reaches of the stash to see what I had. There in all of its glory was the M60A1 with some color photos and notes from my time in the Army at Fort Hood, Texas. I glued the missiles and drop tanks on the 3 Phantoms left on the work bench and started the new project. As luck would have it an M60A2 came up for auction on ebay. Had to have it and started building it while the glue dried on the A1.
| THE KIT |
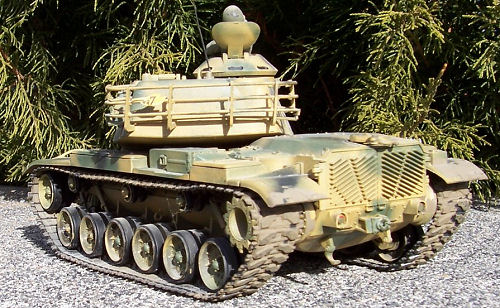
This is the oldest version of the M-60A1. Since the box, decals and instructions were destroyed in a basement flood I can’t comment on the decals or instructions. The plastic was molded in Tamiya’s shade of olive drab. The molding was crisp with no flash. This is the kit with the electric motor, so there are cutouts on the bottom of the hull that can be filled. I say can be filled, because I installed the motor and switches. It drives the cats crazy to have a model chase them. I think it reminds them to stop swatting at the stretched sprue antenna!
| CONSTRUCTION |
Since I usually build aircraft or heavy trucks, I
started this tank the same way and broke the assembly down into
subassemblies....turret, hull road wheels and track. I built up the hull first.
I remember from the old days that most hulls have a gap
 at the front or rear. So I
figured that if I did it first, I could putty everything up and let it dry while
I built the rest. WRONG. There were no gaps at the front or back, the hull
assembled nicely. I used a little to much glue on the seams so that when I
squeezed them together a little seeped out. The suspension, minus the road
wheels, and small parts were added. The hull was set aside to let the glue dry.
at the front or rear. So I
figured that if I did it first, I could putty everything up and let it dry while
I built the rest. WRONG. There were no gaps at the front or back, the hull
assembled nicely. I used a little to much glue on the seams so that when I
squeezed them together a little seeped out. The suspension, minus the road
wheels, and small parts were added. The hull was set aside to let the glue dry.
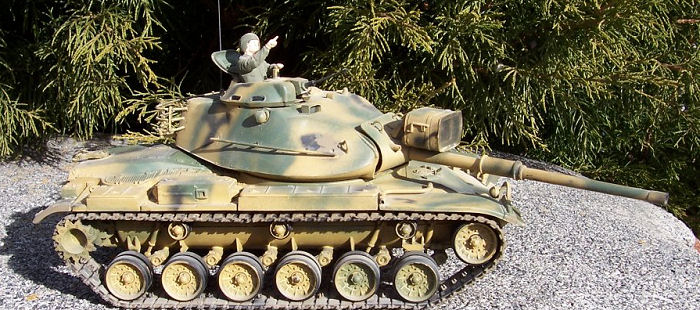
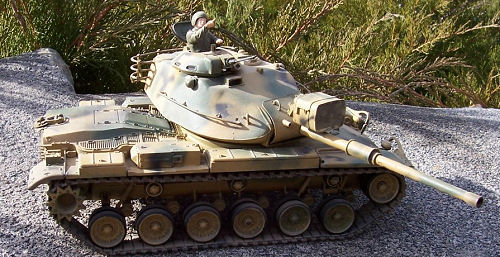
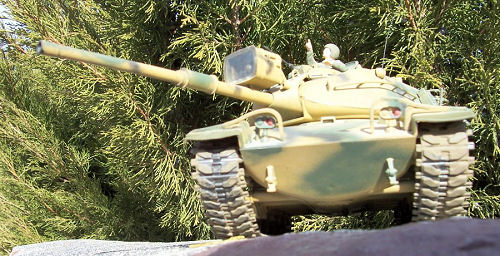
Next was the turret. Okay, I remembered that the turrets of old also had a gap where the top and bottom were glued together. Wrong again, the turret halves mated up beautifully! Again I used a little extra glue so that some seeped out of the seam. Why? Well, because it is easy to sand. I did a light sanding of the hull and turret seams. It left a slightly visible line. On the real tanks there is a slightly visible line in the same places. My only problem with the turret was the main gun tube. It glues together very nicely and everything lines up, but there is a long pesky seam that should not be there. I gave it some sanding and hoped for the best. I thought about replacing it with an aftermarket metal barrel, but since I was in the middle of a building frenzy I didn’t. The commander’s cupola was assembled and placed on the turret.
| COLORS & MARKINGS |
For me painting a camouflage scheme has always been a
challenge! I have had several different airbrushes and poor luck. So I took the
airbrush apart, cleaned it well and practiced. Then I practiced a little more.
Now, I have to stop here to tell a story. I was
 stationed at Fort Hood when
the M60A1s where there. It was the mid 1980s and the tanks had been around for a
while. I was allowed to photograph them and take notes on the colors. The main
thing I noticed was that the tanks didn’t match each other. They were very
close, but each was slightly different in the camo pattern. The crewman showing
me his tank said the reason was simple. While the Technical Manual showed
specific patterns, the crews that maintained their tanks were not expert
painters. Damage was touched up and the patterns changed over time. Plus, they
were expecting deliveries of the new M1 Abrams to start shortly, so no tanks
were going to the maintenance depot for paint or rebuilds.
stationed at Fort Hood when
the M60A1s where there. It was the mid 1980s and the tanks had been around for a
while. I was allowed to photograph them and take notes on the colors. The main
thing I noticed was that the tanks didn’t match each other. They were very
close, but each was slightly different in the camo pattern. The crewman showing
me his tank said the reason was simple. While the Technical Manual showed
specific patterns, the crews that maintained their tanks were not expert
painters. Damage was touched up and the patterns changed over time. Plus, they
were expecting deliveries of the new M1 Abrams to start shortly, so no tanks
were going to the maintenance depot for paint or rebuilds.
To make a long story short, I sprayed everything tan, then masked and sprayed the two different greens in approximately the same pattern as my pictures. A few little lines were sprayed in flat black. I was happy! No my camo is not perfect, but it does represent a late in life tank with lots of touch-ups.
| FINAL CONSTRUCTION |
Now it was time for the final assembly. The track had
been painted dull steel with black pads. I know most of the steel tracks are
painted OD green and the road wheels usually have over spray on the rubber. I
like the steel for contrast. To me it makes the tank look a little more
used.....like the paint has been worn off. The rubber on the road wheels was
painted "rubber". Why paint the road
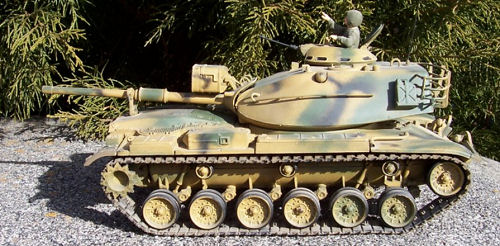 wheels rubber and the rubber
track pads black? I don’t have a clue! Brain fart? I decided to give the track a
wash of Texas tan mud before installation. The track and road wheels were
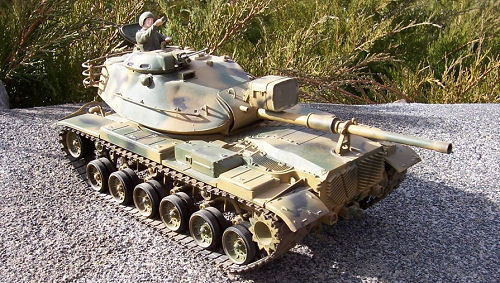
installed and the turret was set into place. The tank commander was given some
basic paint. He looks like a ghost with no personality. That is my fault, he is
molded well as is the driver figure who is also included. The radio antenna was
made from stretched sprue. The antenna length is not exact. It is the height
that will fit on my shelf without breaking off on the bottom of the shelf above
it.
wheels rubber and the rubber
track pads black? I don’t have a clue! Brain fart? I decided to give the track a
wash of Texas tan mud before installation. The track and road wheels were
installed and the turret was set into place. The tank commander was given some
basic paint. He looks like a ghost with no personality. That is my fault, he is
molded well as is the driver figure who is also included. The radio antenna was
made from stretched sprue. The antenna length is not exact. It is the height
that will fit on my shelf without breaking off on the bottom of the shelf above
it.
Small details such a painting the viewports black were done with a fine brush. I will put a thin film of Testors clear glue on each one to make them look more like glass. I thought I would take the photographs first, just in case there could be a flash reflection from the shiny ports. The lens on the searchlight is just scotch tape that was trimmed after smoothing it over the opening. The eagle eyed among you will notice there are no washes or decals. On the cold snowy nights, I will decal and detail the tank and commander.
| CONCLUSIONS |
I enjoyed building this tank! It was an easy and not too fiddly build. There were no unpleasant surprises or problems on this model. The small parts are sturdy enough to cut from the sprue with no damage. I would recommend it to young or advanced modelers. The molding is crisp and sharp with a lot of detail. It still ranks up there with the best of what is available today. Even better is that these show up on ebay cheap! I bought the M60A2 for $11.00. The kit is bagged, but who cares about the box!!
| REFERENCES |
 Motor pool at Fort Hood, Texas
Battletanks.com
A real M60A1 on display at our National Guard Armory
U. S. Army Tech. Bulletin TB43-0209, Color, Markings and Camouflage, Oct 1976
February 2006
Copyright ModelingMadness.com If you would like your product reviewed fairly and fairly quickly, please contact the editor or see other details in the
Note to
Contributors.