| KIT #: | 6271 |
| PRICE: | $25.00 MSRP |
| DECALS: | Two options |
| REVIEWER: | Ryan Koschatzky |
| NOTES: | Limited Reissue |
| HISTORY |
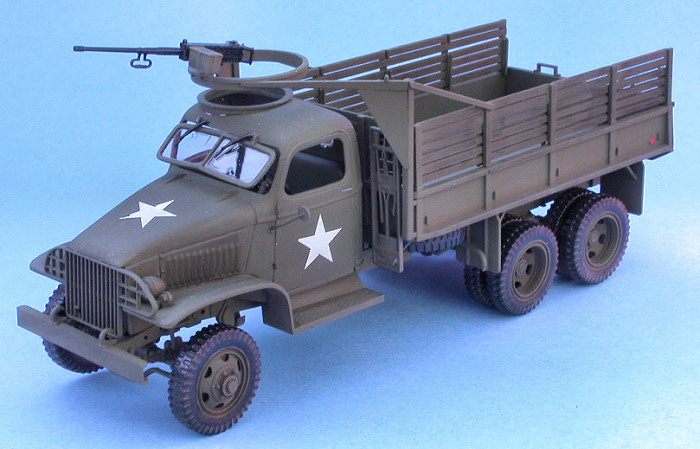
The one thing that is crucial to the winning of any conflict is the ability to supply the army in the field. A super tank is no good without fuel. Soldiers also need to be fed and supplied with ammunition and so on. When the US entered the war against Germany, it developed several tactical cargo vehicles of varying load carrying capabilities. The 2.5 ton truck in its various versions represents the typical and most widely used vehicle of its type. Thanks to its robust and simple construction, it became the standard truck of the Allies during the latter part of WWII.
| THE KIT |
For a look at what comes in the box, please visit the preview
By using part 8 , 58 and 59, you can build a hard Cab
CCKW 353 A1, split axles, cargo body (w/o winch), or a CCKW 353 B1, split axles,
cargo body (w/winch).
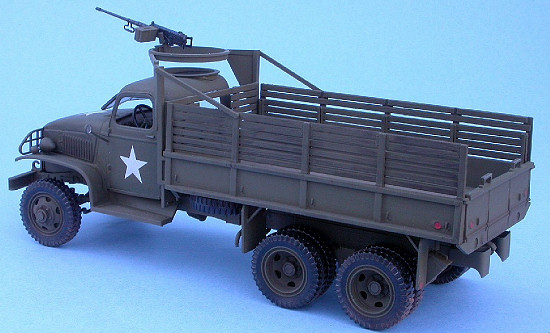
What I built was the CCKW 353 A1, split axles, cargo body (w/o winch).
| CONSTRUCTION |
 As with my SU-122 review, let me start by saying I think of myself as a beginner
modeler. I have started lots of kits but very few make it to completion for one
reason or another (operator error mostly). Since my background mainly consists
of building tanks, I broke the kit down into 4 stages: tires (track),
chassis/frame (lower hull), cab (upper hull), and bed (turret).
As with my SU-122 review, let me start by saying I think of myself as a beginner
modeler. I have started lots of kits but very few make it to completion for one
reason or another (operator error mostly). Since my background mainly consists
of building tanks, I broke the kit down into 4 stages: tires (track),
chassis/frame (lower hull), cab (upper hull), and bed (turret).
Tires: my kit had them all off the sprue already (I don't think it originally
came that way). I cleaned up the attachment points and shot them with a coat of
Olive Drab (FS 34087) from an enamel rattle can. I assembled the two halves,
sanded them and hand painted them Polly ScaleNATO Black. All eleven of them.
(Yippee!). I set them aside to attach and weather later.
Chassis/frame: I cut all pieces off the sprue, and cleaned them up a little bit.
I put the bumpers (parts 12 and 13) on second to last and part 14 was the last
to go on in step 2. In step 3, I put parts 37 and 38 in first, but forgot about
35 and 36, so I had to trim them to fit right. Now this where I ran into trouble
without even knowing it. I did look over the parts and they seemed straight and
looked ok when assembled , but when you look at
![]() the right side, you can see it
is higher off the deck. I thought it was because of the transmission case, but
once I put the tires on the front right was even higher. I believe that the
frame is causing this problem by warping the axle slightly and I didn't see it
until the wheels were on. This is just not a warping in the front, but I believe
it led to problems in attaching the bed. I haven't been able to put my
finger on the exact reason for the misalignment. To get around this, attach the
truck to a base and you should be able to contour the ground in your favor.
the right side, you can see it
is higher off the deck. I thought it was because of the transmission case, but
once I put the tires on the front right was even higher. I believe that the
frame is causing this problem by warping the axle slightly and I didn't see it
until the wheels were on. This is just not a warping in the front, but I believe
it led to problems in attaching the bed. I haven't been able to put my
finger on the exact reason for the misalignment. To get around this, attach the
truck to a base and you should be able to contour the ground in your favor.
 Exterior chassis/fender area: I painted the radiator
and grill OD first, and then painted the inside area of the radiatorNATO Black.
None of this is visible in the finished model, but I get satisfaction from
knowing it is there. For the left headlight (3 holed side), the square for the
headlight is correct, but it's at an angle, so I glued it in at the angle and I
gently rotated it to look right. The headlights were painted silver inside
before I attached the clear pieces.
Exterior chassis/fender area: I painted the radiator
and grill OD first, and then painted the inside area of the radiatorNATO Black.
None of this is visible in the finished model, but I get satisfaction from
knowing it is there. For the left headlight (3 holed side), the square for the
headlight is correct, but it's at an angle, so I glued it in at the angle and I
gently rotated it to look right. The headlights were painted silver inside
before I attached the clear pieces.
Cab:
Exterior: I glued the doors on to the cab top first, followed by the bottom rear
portion, then the engine walls. I had to glue this a few times before it finally
set the way I liked it. I had a sink mark on the right side hood area to fill
in. I left off the windows by choice and left the sink marks onthe inside of the
door. When closed you can't see it anyway, except for the two (four total) by
the window. Oh well it, isn't contest material anyway.
Interior: It went together with out a hitch, or so I thought. More later on
that. You want to use the curved dash board, as the flat dash board is for the
canvas top cab. I painted the gaugesNATO Black. You can't really see itwhen
built up, either. I didn't install
 part 91, which looks like half of a sun visor
as it didn't look like the drawing, which shows a full visor. This could be
because of the hole cut for the turret, but I am not 100% sure. Just like having
double numbering of jerseys is bad in college football, so is it in the modeling
world. With part 86, the steering column, you get two different parts. Very
little difference between the two. I have used both. I test fit the
exterior/interior section together and both made it seem like the steering wheel
would poke through the windshield. After numerous tests, the end result was made
to insure that part 88 is parallel to the deck. I had planned to have the
windshield open to avoid the problem, but when the cab was finally complete it
was a non-issue. The Twilight Zone, I guess. I did have an issue with attaching
the windshield to the frame with the glue, as I was using a toothpick and
somehow glue leaked onto the windshield. I have not used sanding sticks on clear
plastic before so I left it alone. The one side mirror is molded backwards, so I
cut it at the bottom. Of course l lost the bottom part to the carpet monster, so
I threw down some glue and attached the mirror at a "good" angle. I painted the
mirror silver to make it shiny.
part 91, which looks like half of a sun visor
as it didn't look like the drawing, which shows a full visor. This could be
because of the hole cut for the turret, but I am not 100% sure. Just like having
double numbering of jerseys is bad in college football, so is it in the modeling
world. With part 86, the steering column, you get two different parts. Very
little difference between the two. I have used both. I test fit the
exterior/interior section together and both made it seem like the steering wheel
would poke through the windshield. After numerous tests, the end result was made
to insure that part 88 is parallel to the deck. I had planned to have the
windshield open to avoid the problem, but when the cab was finally complete it
was a non-issue. The Twilight Zone, I guess. I did have an issue with attaching
the windshield to the frame with the glue, as I was using a toothpick and
somehow glue leaked onto the windshield. I have not used sanding sticks on clear
plastic before so I left it alone. The one side mirror is molded backwards, so I
cut it at the bottom. Of course l lost the bottom part to the carpet monster, so
I threw down some glue and attached the mirror at a "good" angle. I painted the
mirror silver to make it shiny.
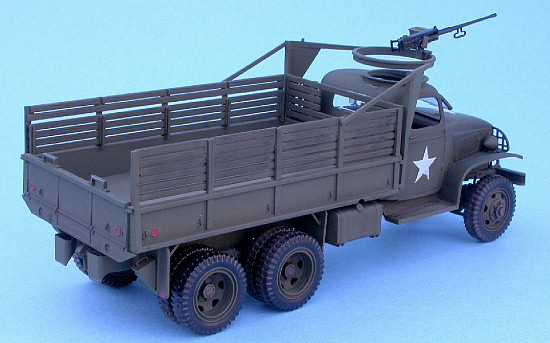
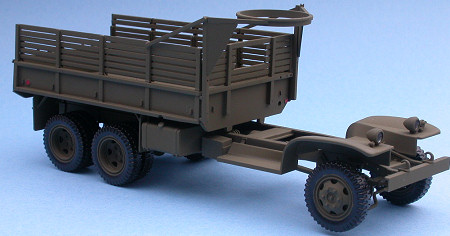
Bed: I shot the parts with one coat of Olive Drab while still on the sprue. I
built the four walls first, and then added the benches and turret assembly. One
point of concern is the mud guards. Make sure to keep track of what parts go
where as I think Italeri got them wrong. The mud guards with the reflectors
(raised circles on them) go in the rear of the bed, not in the front as shown in
the instructions. After assembly I sanded and filled the side wall and turret
brace ejector pin marks. It's not perfect but it looks better now than before
(it's something I try to make better on each and ever model I build -- like I
said I am a beginner).
| FINAL BITS |
 I had tried to rush the finish one Sunday morning for the club meeting, which is
never a good idea. I had to reglue the bed multiple times as it never seemed to
sit right. Even now it leans a little too much to the drivers side. I had the
stars on before I attached the cab to the chassis, and I need filler at the
engine/fender area. I repainted the area with Olive Drab from a spray can. I
taped over the stars first but used too big a piece of tape so the star up to
the window is faded differently. The wash hides the driver side, but not the
passenger side. When attaching the bed to the chassis, I couldn't get the
exhaust pipe (part 41) to fit forward of the mud guards so I trimmed about an
1/4 inch off the pipe at the muffler. It seemed to work better. I attached the
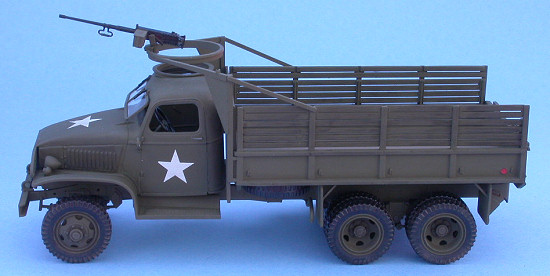
tires and .50 cal and started the weathering. I used oils first, then chalk
pastels to weather it a bit. Next time after the wash I am going to dry brush
some to get a better effect before the pastels go on. Once done with it all, I
glued on the windshield. I bent the tabs on top to make it look good. I left off
the brackets (part 96) because they looked too big in scale and it is too hard
to get your hands to place it correctly. I painted the wipers NATO Black and
attached them.
I had tried to rush the finish one Sunday morning for the club meeting, which is
never a good idea. I had to reglue the bed multiple times as it never seemed to
sit right. Even now it leans a little too much to the drivers side. I had the
stars on before I attached the cab to the chassis, and I need filler at the
engine/fender area. I repainted the area with Olive Drab from a spray can. I
taped over the stars first but used too big a piece of tape so the star up to
the window is faded differently. The wash hides the driver side, but not the
passenger side. When attaching the bed to the chassis, I couldn't get the
exhaust pipe (part 41) to fit forward of the mud guards so I trimmed about an
1/4 inch off the pipe at the muffler. It seemed to work better. I attached the
tires and .50 cal and started the weathering. I used oils first, then chalk
pastels to weather it a bit. Next time after the wash I am going to dry brush
some to get a better effect before the pastels go on. Once done with it all, I
glued on the windshield. I bent the tabs on top to make it look good. I left off
the brackets (part 96) because they looked too big in scale and it is too hard
to get your hands to place it correctly. I painted the wipers NATO Black and
attached them.
| COLORS & MARKINGS |
I used Olive Drab (FS 34087) all over. Polly Scale NATO Black was used for all black parts and Polly Scale red for the reflectors. Polly Scale gun metal was used for the .50 cal. I used Archer dry transfers for the stars, just because I like using them. I left off the rear star due to me forgetting about it till after the wash. Oops -- too late to add it.
| CONCLUSIONS |
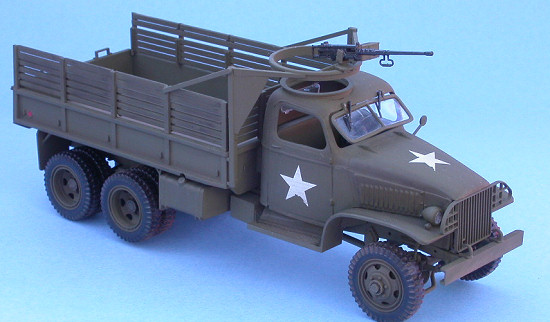 I am happy I built the kit and it was not as bad as I thought. I tried new
techniques for weathering using a wash and the results were good enough for me.
I would recommend this kit to anybody that has built a few kits with unassembled
chassis, because if you don't get the chassis right on the first go-round, it
makes completion a lot harder. I have to say, though, that only the need to
write this review got me to finish this kit. Sometimes a commitment and a
deadline makes for determination to finish, no matter what problems are
encountered.
I am happy I built the kit and it was not as bad as I thought. I tried new
techniques for weathering using a wash and the results were good enough for me.
I would recommend this kit to anybody that has built a few kits with unassembled
chassis, because if you don't get the chassis right on the first go-round, it
makes completion a lot harder. I have to say, though, that only the need to
write this review got me to finish this kit. Sometimes a commitment and a
deadline makes for determination to finish, no matter what problems are
encountered.
I would to thank Scott for the kit and Lee Kolosna for the pictures. Also Norm
Samuelson for letting me bend his ear about the 2.5 ton truck and Archer
Dry Transfer. The guys at the club (IPMS Eagle Squadron) -- Tracy, Spanky
and others for helping me with weathering and asking the same questions over and
over again.
Ryan Koschatzky
February 2006
Thanks to
 for the review kit. You can find Italeri kits at your favorite hobby shop
or on-line at
www.testors.com
for the review kit. You can find Italeri kits at your favorite hobby shop
or on-line at
www.testors.com
If you would like your product reviewed fairly and fairly quickly, please contact the editor or see other details in the Note to Contributors.