
| KIT #: | 7023 |
| PRICE: | AUD$14.00 |
| DECALS: | Four options |
| REVIEWER: | Peter Hobbins |
| NOTES: | Comes with full suspension and simplified wargaming set. |
| HISTORY |
Designed as a fast armored reconnaissance vehicle, the M8 ‘Greyhound’ rose to fame as the spearhead of General Mark Clark’s rush to reach Rome in June 1944, after it was declared an open city by the retreating Germans. Its top speed of 56 mph (90 kph) and decent armament of a 37 mm M6 cannon and two 50 caliber machine guns made it a valuable tactical supplement for armored divisions, although clearly it wasn’t intended to slug it out with tanks. After its introduction to service in Italy in 1943, the M8 went on to serve throughout Europe and the Pacific, both with the US Army and its Free French ally. After World War II, the Greyhound was also seen in Korea and was used extensively by the French in Indo-China, in addition to being exported to various African and Latin American nations. A related command car, the M20, lacked the distinctive turret but was in most respects the same basic vehicle.
| THE KIT |
It’s great to see Italeri continuing to release new Braille-scale amour kits. This is a subject that has cried out for a mainstream release for the last 30 years – particularly when you consider there are now four different kits of the SdKfz 234/2 Puma out there (Matchbox, Roden, Italeri, Hasegawa). We’re still waiting for an injection-molded M18 or an M26 …
The model itself is
nicely molded, with minimal ejector pin marks (except some on the tires and
a few on the suspension and inside of the mudguards/fenders). There is no
flash, as you’d expect from a new mould, and detail is crisp. While I’m not
a fan of molded-on tools, the axe, pick and so on are well executed and
once painted don’t look too unrealistic. The level of d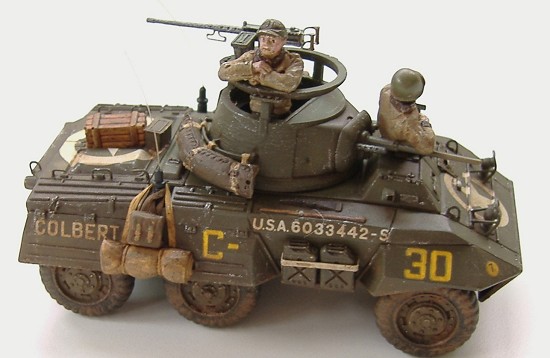 etail
on the main cannon and machine guns is excellent and the interior is also
well rendered, although not much is seen once the turret is on as the
hatches are molded shut. Italeri have also made an effort to replicate the
headlight guards, tow rings and fuel can racks, but these are a little
chunky so I replaced them with photoetch parts from Extratech (set 72085).
The wheels feature a nice level of detail but are marred by having
unrealistic hollows in the rear faces. A set of 6 resin replacement wheels
is now available from Caliber 72 (set 72004) and Extratech (set 72022). For
my model I just filled in the offending space with Tamiya putty and added a
little extra detail with plastic card. A nice touch is the stowage (packs
and bedrolls) that adorn the turret ring; they need some filler at the back
but I wish more manufacturers would include such items, which were
ubiquitous on all WWII AFVs. It’s a shame Italeri haven’t also kept up
ESCI’s habit of including a few nice crew figures, but hey … the only other
obvious thing missing is the tow cable which was frequently seen on these
vehicles.
etail
on the main cannon and machine guns is excellent and the interior is also
well rendered, although not much is seen once the turret is on as the
hatches are molded shut. Italeri have also made an effort to replicate the
headlight guards, tow rings and fuel can racks, but these are a little
chunky so I replaced them with photoetch parts from Extratech (set 72085).
The wheels feature a nice level of detail but are marred by having
unrealistic hollows in the rear faces. A set of 6 resin replacement wheels
is now available from Caliber 72 (set 72004) and Extratech (set 72022). For
my model I just filled in the offending space with Tamiya putty and added a
little extra detail with plastic card. A nice touch is the stowage (packs
and bedrolls) that adorn the turret ring; they need some filler at the back
but I wish more manufacturers would include such items, which were
ubiquitous on all WWII AFVs. It’s a shame Italeri haven’t also kept up
ESCI’s habit of including a few nice crew figures, but hey … the only other
obvious thing missing is the tow cable which was frequently seen on these
vehicles.
As with several other new Italeri releases (e.g. the DUKW), this model includes both standard full suspension and a simplified hollow set for wargaming. It’s probably a reasonable idea although not being a gamer I stuck with the full deal – all this means is some extra bits for the spares box. It’s clear from the breakdown of parts that an M20 version will also be released sometime in the future. The instructions are a 6-page booklet with very clear diagrams, including details of four color schemes: US Army 91st Cavalry Reconnaissance Group, Cassino area, Italy, March 1944; Free French Army, Germany, February 1945; US Army 82nd Armored Battalion, 2nd Division, France 1944; US 3rd Army 2nd Cavalry Company C, Belgium, January 1945. Three are standard olive drab, but the final vehicle is in a winter whitewash scheme.
All in all, what you get in the surprisingly robust end-opening box is a small but (almost) perfectly formed start for your M8.
| CONSTRUCTION |
 This isn’t a hard kit to
build and all of the main parts fit together very well, requiring little in
the way of filing or filler. I removed the cross-brace piece from over the
top of the fighting compartment and shaved down the undersides of the top
insert, so that this area would fit a little more flush. The fenders needed
a little work to fair into the undersides, while to hide the join lines on
the top I painted on a little Gunze Mr Surfacer and then removed the excess
with a Q-tip dipped in Gunze Mr Color Thinner. The cannon comes with an
incorrect muzzle brake so I simply snipped it off and drilled out the
barrel.
This isn’t a hard kit to
build and all of the main parts fit together very well, requiring little in
the way of filing or filler. I removed the cross-brace piece from over the
top of the fighting compartment and shaved down the undersides of the top
insert, so that this area would fit a little more flush. The fenders needed
a little work to fair into the undersides, while to hide the join lines on
the top I painted on a little Gunze Mr Surfacer and then removed the excess
with a Q-tip dipped in Gunze Mr Color Thinner. The cannon comes with an
incorrect muzzle brake so I simply snipped it off and drilled out the
barrel.
Most of the work involved in making this kit was of my own doing, mainly to incorporate the Extratech photoetch set (which arrived after I had already begun work on the interior). This includes a decent basket for the turret, detailed handles for the jerrycans, replacement fuel can racks, headlight guards and tow rings, plus various other handles and some resin mines. It also includes hatch covers, so I opened up the left (driver’s) compartment to show off the photoetch steering wheel and instrument panel. Probably the most time-consuming aspect of the model was scratchbuilding the stowage racks that run around the outside of the turret – very fiddly work with some fine plastic strip. Once the kit was built – leaving the turret and wheels separate – I was ready for painting.
| COLORS & MARKINGS |
OK, my model is too dark.
I’m still learning to get my colors right for 1:72 vehicles, so even though
this is US Army olive drab, it should be a lot lighter. Next time …
Anyways, painting overall OD isn’t too hard, so I then went back and
post-faded the  centers of
panels and the upper surfaces, and painted some basic colors for the
suspension and tires. I then added the decals before weathering, which
makes more sense to me than having shiny new markings over a muddy vehicle.
I sprayed a coat of Future (rare as hen’s teeth in Australia, but a friend
imported a batch) and they settled down very well over that with a spot of
Gunze Mr Mark Softer. It is worth trimming away the excess decal film, and
while the white is opaque enough to go over a dark green finish, the yellow
(on the prominent ‘C-30’ number I used) is a little out of register and
needed to be touched up with yellow paint. At this point the wheels and
turret were attached for weathering.
centers of
panels and the upper surfaces, and painted some basic colors for the
suspension and tires. I then added the decals before weathering, which
makes more sense to me than having shiny new markings over a muddy vehicle.
I sprayed a coat of Future (rare as hen’s teeth in Australia, but a friend
imported a batch) and they settled down very well over that with a spot of
Gunze Mr Mark Softer. It is worth trimming away the excess decal film, and
while the white is opaque enough to go over a dark green finish, the yellow
(on the prominent ‘C-30’ number I used) is a little out of register and
needed to be touched up with yellow paint. At this point the wheels and
turret were attached for weathering.
I mixed up a gunk of Tamiya putty and dark brown paint from the same brand, which I then applied as lumps of mud inside the fenders and on the wheels, keeping the road rims of the tires clear. I’m still undecided about how realistic this looks, but it was something I wanted to try; it’s probably more suitable for a tank as Greyhounds preferred to stay on the road rather than go cross-country. A wash of thinned burnt umber artist’s oil was run into the panel lines and over areas of detail, with some attempt to replicate the vertical ‘runoff’ streaks that are often seen down the sides of US AFVs of this period. The model was then drybrushed with various shades of olive drab and brown, and scratched over with a silver pencil before a final light coat of brown ‘dust’ was misted on.
| FINAL CONSTRUCTION |
The stowage from the kit was cleaned up and filled, then I made copies in resin (including plenty for the spares box). The packs and bedrolls then had strips of dental floss superglued to the back. When painted, these straps were wound over the stowage rack and glued down. Various other boxes and packs were also added without trying to overdo the effect, and a little more wash added to blend them in. The whole vehicle had been carefully assembled in specific positions so that I could add the two US tankers from AB Miniatures in their fairly relaxed poses. I really like their range of figures and think they add a lot of character to a vehicle.
| CONCLUSIONS |
 This
is a long-overdue and nice little kit. You could build it very quickly out
of the box, just correcting a few problems like the wheels, cannon barrel
and overscale detail parts. I think the Extratech set added some nice fine
details but obviously this complicated the build. This kit has lots of
potential for conversions, including vehicles with the fenders left off,
and versions operating in the many post-WWII conflicts. Italeri should be
lauded for coming out with new and interesting kits of neglected AFVs, and
if they could ditch the molded-on tools and add some crew figures I’d be
even happier. Definitely a thumbs up.
This
is a long-overdue and nice little kit. You could build it very quickly out
of the box, just correcting a few problems like the wheels, cannon barrel
and overscale detail parts. I think the Extratech set added some nice fine
details but obviously this complicated the build. This kit has lots of
potential for conversions, including vehicles with the fenders left off,
and versions operating in the many post-WWII conflicts. Italeri should be
lauded for coming out with new and interesting kits of neglected AFVs, and
if they could ditch the molded-on tools and add some crew figures I’d be
even happier. Definitely a thumbs up.
December 2005
Copyright ModelingMadness.com
If you would like your product reviewed fairly and fairly quickly, please contact the editor or see other details in the Note to Contributors.