| KIT #: | 01323 |
| PRICE: | $ |
| DECALS: | One option |
| REVIEWER: | Peter Hobbins |
| NOTES: | Aftermarket details, personnel and stowage added. |
| HISTORY |
One of the great unsung heroes of World War II – and a stalwart of the surplus scene in the postwar years – was the GMC 6 x 6 truck (and its Ford and Studebaker equivalents). Churned out in the hundreds of thousands, these trucks hauled freight, petrol, water, spare parts, ammunition and personnel in every theatre. Supplied liberally to the US forces and their allies, the GMC CCKW established a reputation for reliability and ruggedness that belied its status as the epitome of wartime mass production.
| THE KIT |
For a breakdown of what’s in the box, and a comparison between this kit and CCKW offerings from other manufacturers, see my comparison article here.
| CONSTRUCTION |
 This is one of the nicest
small-scale vehicle kits I’ve come across in some time, and it’s a shame that
Airfix/Heller went through such turmoil almost as soon as it was released (we
can’t blame the kit for that!). In general, the pieces went together pretty
easily, although as always with these truck kits the cab is the most fiddly
element to assemble. Cleanup of most parts was straightforward, partly on
account of the new moulds, and partly because of sensible engineering. I must
admit to initially blaming the kit for some serious alignment issues until I
realised that I’d installed the rear springs upside down!
This is one of the nicest
small-scale vehicle kits I’ve come across in some time, and it’s a shame that
Airfix/Heller went through such turmoil almost as soon as it was released (we
can’t blame the kit for that!). In general, the pieces went together pretty
easily, although as always with these truck kits the cab is the most fiddly
element to assemble. Cleanup of most parts was straightforward, partly on
account of the new moulds, and partly because of sensible engineering. I must
admit to initially blaming the kit for some serious alignment issues until I
realised that I’d installed the rear springs upside down!
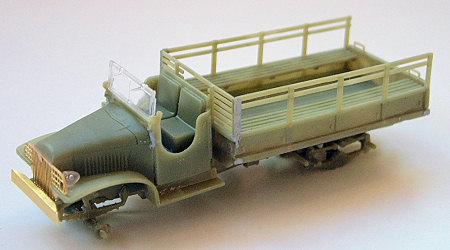 The
level of moulded-on detail is very nice and quite adequate in most places. In
fact, the Extratech photoetch set that I’d set aside for the kit contributed
relatively few pieces to the final model. The brass was most useful for
replacing the grille, forward fender and mudflaps (the kit fender comes supplied
with a winch but this was not fitted to the particular truck I was modelling, so
I removed it). The cab is a little simplified – especially the seats which are
somewhat unconvincing – but the rear tray, wheels and engine louvres came out
very nicely. As always, moulded plastic canopies never look realistic, no matter
how hard you try, so in the end I discarded it. The best solution to this
problem I’ve seen is to drape polythene shopping bags over a wire framework.
The
level of moulded-on detail is very nice and quite adequate in most places. In
fact, the Extratech photoetch set that I’d set aside for the kit contributed
relatively few pieces to the final model. The brass was most useful for
replacing the grille, forward fender and mudflaps (the kit fender comes supplied
with a winch but this was not fitted to the particular truck I was modelling, so
I removed it). The cab is a little simplified – especially the seats which are
somewhat unconvincing – but the rear tray, wheels and engine louvres came out
very nicely. As always, moulded plastic canopies never look realistic, no matter
how hard you try, so in the end I discarded it. The best solution to this
problem I’ve seen is to drape polythene shopping bags over a wire framework.
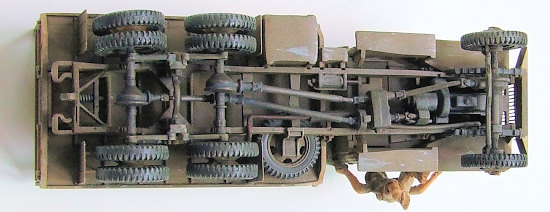
 A widely noted problem with
this kit is the supply of five-slotted wheels for the forward position, when in
fact they should be six-slotted. I deliberated on this for ages before realising
that I could just use the six-slotted inner rear wheels instead. This did mean
that I had to chop down the hub a little, but that was just a quick snip. I then
used the five-slotted wheels as replacements for the inner rear set; you can’t
see the detail through the slots of the outer wheels, so the problem is very
neatly solved. The only other construction hassle I had was the typical issue
with a multi-wheeled vehicle, namely ensuring all of the tyres sit squarely on
the ‘road’. A lot of subtle ‘persuading’ was required to achieve that feat!
A widely noted problem with
this kit is the supply of five-slotted wheels for the forward position, when in
fact they should be six-slotted. I deliberated on this for ages before realising
that I could just use the six-slotted inner rear wheels instead. This did mean
that I had to chop down the hub a little, but that was just a quick snip. I then
used the five-slotted wheels as replacements for the inner rear set; you can’t
see the detail through the slots of the outer wheels, so the problem is very
neatly solved. The only other construction hassle I had was the typical issue
with a multi-wheeled vehicle, namely ensuring all of the tyres sit squarely on
the ‘road’. A lot of subtle ‘persuading’ was required to achieve that feat!
| COLORS & MARKINGS |
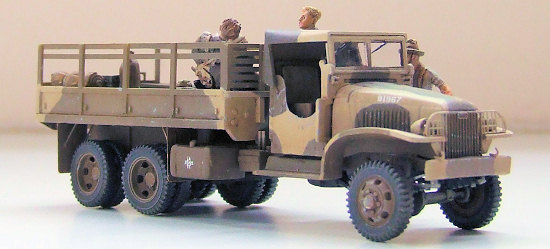
As most CCKWs
came in a monotone Olive Drab finish, I wanted something that had a little more
colour (but not quite as loud as a fire engine!). I came across some photos of
an Australian Army vehicle which had areas of a sandy colour applied over the
drab (the exact tones were unclear as it was a black and white photo, so I had
to use an approximation). The canvas of the tilt darkened
 the shade of the colours
noticeably, so I tried to replicate this when airbrushing. The vehicle I was
modelling seemed to be in a dusty rather than muddy environment, so once the
base colours were on, I sprayed progressively lighter mists over the upper
surfaces, then hand-painted varying shades of grey, black and brown under the
chassis. A few of the kit stencil decals were used – they sat down nicely over
little dabs of Future – and then I was ready to add the crew.
the shade of the colours
noticeably, so I tried to replicate this when airbrushing. The vehicle I was
modelling seemed to be in a dusty rather than muddy environment, so once the
base colours were on, I sprayed progressively lighter mists over the upper
surfaces, then hand-painted varying shades of grey, black and brown under the
chassis. A few of the kit stencil decals were used – they sat down nicely over
little dabs of Future – and then I was ready to add the crew.
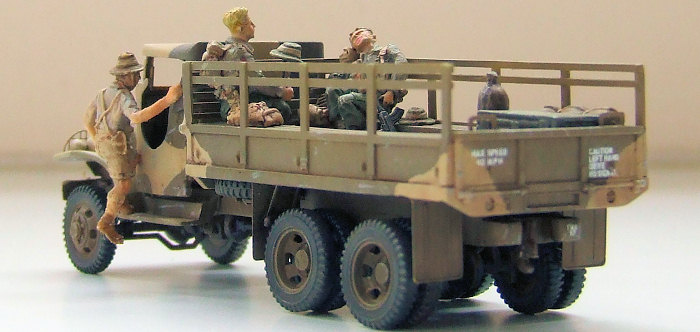
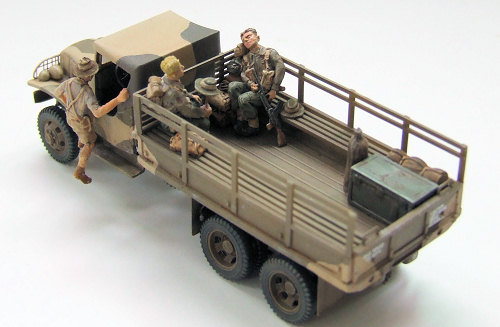
I’m a big fan of adding figures to armour kits, and this was no exception. The driver supplied with the model was abysmal, so I ditched him and scrounged up a few extras. The driver is actually a World War I ANZAC from HAT; I sliced away his rifle and repositioned his arms a little, and he looked quite the part hopping into the cab. The two weary troopers in the back are some of the exquisite AB Miniatures line – they are technically British troops but the addition of a few spare Aussie slouch hats and some judicious painting soon sorted that out. Finally, a few pieces of stowage from aftermarket railway and armour sets made sure there was a little extra content in the tray. When they were all snuggled down, I ran a brown oil wash over all of the details and flatted the appearance with a final spray of Testors Dullcote.
| CONCLUSIONS |
 This is a nice little kit
that goes together reasonably quickly. It really doesn’t need an aftermarket
set, but if I were to make another I would think about replacing the cab seats
and creating a more convincing tilt and canopy over a scratchbuilt framework.
The nice thing about trucks is that they can be positioned in just about any
setting, and that wide open tray in the back gives you the option of filling
your model with all sorts of interesting loads. A little Gem from Airfix – let’s
hope they can gear up to produce a few more!
This is a nice little kit
that goes together reasonably quickly. It really doesn’t need an aftermarket
set, but if I were to make another I would think about replacing the cab seats
and creating a more convincing tilt and canopy over a scratchbuilt framework.
The nice thing about trucks is that they can be positioned in just about any
setting, and that wide open tray in the back gives you the option of filling
your model with all sorts of interesting loads. A little Gem from Airfix – let’s
hope they can gear up to produce a few more!
April 2007
If you would like your product reviewed fairly and fairly quickly, please contact the editor or see other details in the Note to Contributors.