Academy 1/72 US 2 1/2 Ton Cargo Truck
|
KIT #: |
13402 |
|
PRICE: |
$19.00
|
|
DECALS: |
Two options |
|
REVIEWER: |
Tim Gillis |
|
NOTES: |
|
In brief: What is now commonly known as the GMC CCKW "duece and a half"
origanaly began as the ACKWX
A 1940 model year
C conventional cab layut
K front driven axle
W Both Tandem axles rear axles driven
X Non standard Driveline, Timken supplied
353 being the chassis code
This early series was basically a warmed over civilian version. October of
1940 saw the introduction of a fully developed production model and the "A"
was replaced with a "c" to denote the 1941 Model year, and remained as such
throughout it's production. During the production runs of both the ACKWX and
the CCKWX both the long and short wheel based trucks carried the Chassis
code 353 and it wasn't until the introduction of the CCKW that the short
wheel based versions were known as the "352".
In late February, 1941, the CCKW went into production. The lack of an X
denotes the introduction of a "standard", or GM produced, drive line,
commonly known as the Banjo type. Prior to this the only available 6X6
driveline was supplied by Timken, and was known as the split type. After
february 1941 production was split evenly between both the CCK
W and the
CCKWX, however, from that point onwards, the X was dropped, and it became
documented as the CCKW regardless of the which driveline it was produced
with.
The Black out lamp, which was the reason for the introduction of the
asymmetrical bush guard, which was first introduced as a field installation
kit in july of 1942, was introduced on the production line around february
of 1943. A point of interest relating to this is that in the summer of 1942
it was ruled that Manufacturers had to delete all external trade marks from
army contract vehicles, so only a small amount, Approximately 10,000 trucks,
had the asymmetrical bush guard with the CMC logo attached, both open and
closed cab. Most of these can be found in pictured in Italy.
The one of the most noticeable changes to the CCKW was from the closed cab
to open cab models. A less noticeable, yet equally significant change was
the elimination of the all steel cargo box to the wooden version, which was
introduced in september of 1942. These were transitional changes, The open
cab commenced production in august of 1942, and the last closed cab rolled
off the line in late april of 1943 at the same time as the all steel cargo
box.
One of the lesser known changes which has it's own significance, is the
different versions of steering wheels introduced during the production of
the CCKW. There was the original 3 spoked hard black rubber version produced
from the 1940 ACKWX until september 1942, which was then supplanted by a 4
spoked thick wooden rim version with a one piece cast hub and spoke
assembly. This was only produced for 4 months and was replaced by a cheaper
thin wooden rim with stamped steel spokes that were riveted to the hub. This
last version remained the standard for the rest of production.
There are many many other changes that occurred throughout the production
run of the CCKW, many of which are not visually obvious.
The GMC CCKW, or as it's more commonly known, Deuce and a half, played a
significant role in the supply chain during WWII and korea, it also served
in various other roles such as fuel/water tanker, dump truck, maintenance
vehicle, fire engine, and surgical unit to name a few.
 The kit comes in four sprues, 3 molded in dark green and 1 in clear, with
one decal sheet offering 2 options. The molding is reasonably good, having a
minor seem to be removed from all the parts, and some sink marks. The
ejector pin marks being strategically located so as to be easily cleaned up
if they can be seen at all. The clear pieces for the windows, while smooth,
are somewhat concave. Three of the sprues, including the clear one, are
dedicated to the construction of the truck, and the forth one is for the
cargo. There are all the pieces to construct the truck with, or without
either the ring mounted machine gun and the winch, how ever one so chooses.
The cargo sprue contains a rather nice array of parts, 3 fuel drums, 2
different types of jerrycans 3 of each, 9 wooden boxes in 3 different sizes,
4 machine guns in 2 types with 2 folded and 2 extended mounts, and 3 bomb
supports, without bombs.
The kit comes in four sprues, 3 molded in dark green and 1 in clear, with
one decal sheet offering 2 options. The molding is reasonably good, having a
minor seem to be removed from all the parts, and some sink marks. The
ejector pin marks being strategically located so as to be easily cleaned up
if they can be seen at all. The clear pieces for the windows, while smooth,
are somewhat concave. Three of the sprues, including the clear one, are
dedicated to the construction of the truck, and the forth one is for the
cargo. There are all the pieces to construct the truck with, or without
either the ring mounted machine gun and the winch, how ever one so chooses.
The cargo sprue contains a rather nice array of parts, 3 fuel drums, 2
different types of jerrycans 3 of each, 9 wooden boxes in 3 different sizes,
4 machine guns in 2 types with 2 folded and 2 extended mounts, and 3 bomb
supports, without bombs.
The decal sheet contains 2 options, one from the 369th Field Artillery, 98th
Infantry Division which apparently was stationed in Hawaii until it moved to
Japan after hostilities ended, and the other for a truck in the Red Ball
express. Both are apparently accurate.
As for accuracy I can only say that it measures out well to the actual wheel
base.
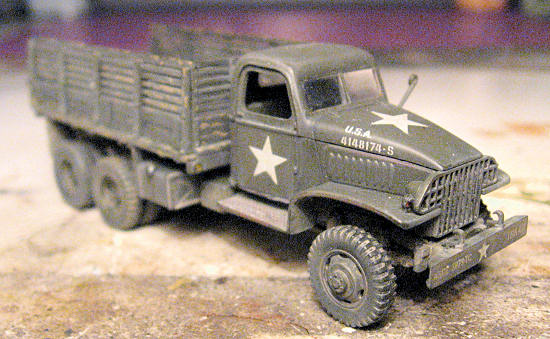
Once I opened the box and began to examine the parts a few issues with the
details became obvious, first, there is no representation of the lug nuts
that hold the wheels on, secondly, the Asymmetrical grill is reversed with
the black out lamp on the wrong side, and last but not least, the windshield
is molded with squared off corners. This last thing is the one that really
detracts from the over all appearance. As I had bought this kit as a test
bed to practice new ideas/techniques I decided to not to worry so
much about
these and just go with it to see what the end result would be. The details
are crisply molded, but a bit clunky, and the cargo box has what should be a
representation of the steel strips holding the wood flooring in place raised
quit predominantly, but for the most part things are presentable for this
scale.
The sink marks were limited to being smaller ones on the frame and in the
cargo bits, however there was a couple that happened to be in the rear
springs right between the tires. These proved impossible to correct
completely, but a little weathering did go a long way to covering this up.
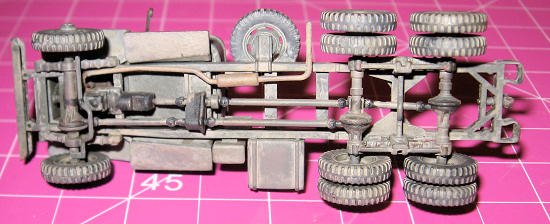
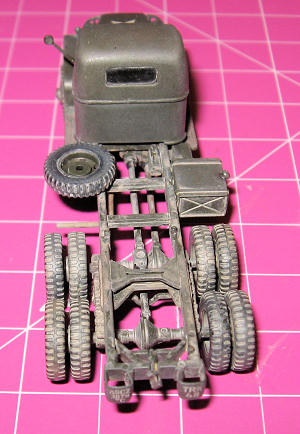
The chassis assembly went together without any difficulty, the entire
driveline, without the engine/transmission, being molded in one piece, with
the exception of one half of one differential cover. The parts for the winch
are separate, and require no modification wether or not they are used, just
glue them to the front of the chassis. I had decided I just wanted to build
this as a basic truck so I left them off. A nice touch is that a prominent
frame cross member has it's upper portion molded as a separate piece while
the bottom is molded into the frame, keeping it 3 dimensional and at the
same time keeping things simple.
This is not a curbside kit, the engine looks the part and has an adequate
level of detail for the scale, it consists of 3 pieces, the block, the
intake/exhaust, and the fan pulley assembly, with the oil pan/transmission
being molded as part of the frame. The only issue here is that the hood is
molded as a part of the cab, however if one wished to one could open it up
and add a bit of detail and be quit satisfied with the result.
Once the frame was assembled I moved on to the cab. The interior detailing
as quit well executed, with a very nice dash board which by all appearances
is fairly accurate, in fact it is almost a shame no decal for the
instrumentation was supplied. The seat is more then adequate, although the
levers are a bit oversized, if one wanted to these could be replaced. In
fact, if one wanted to go to the trouble to open up one or both doors there
is no real need to add anything as it is very nice right out of the box. The
engineering is such that opening the doors would not be that difficult
should one chose to do so. There are a few ejector pin marks in the floor of
the cab, 2 of which are covered by the seat, the other 2 are easily removed.
Where things start to fall apart is with the windows, these are very thick
and distorted. In fact I sanded them down quit significantly to eliminate as
much of the distortion as I could and there was still a fair amount of
plastic left, almost to much. Also the protrusions are smaller then the area
in which they were designed to fit, not significantly, but enough to be
easily noticed. I did decide not to install the door windows, however not
because of any of the issues I had with them, as that was adequately dealt
with for my taste, but because I felt I wanted to expose the interior.
The cab assembly itself consists of 6 pieces, excluding the windows,
including the radiator, which is nicely represented. It is a bit fiddley but
not to difficult to piece together, the lower back of the cab being a
separate piece which allows for the body line of the cab to be well
represented. I first added the seat and levers to the cab flooring, then the
dash board to the upper cab. Once tis was all in place I added the lower
back piece to the cab being very careful to keep the door jam straight. Then
I painted all the interior details, and then added a bit of weathering.
After I had finished cleaning up and futureing the clear bits, I added the
front and rear windows and then the steering wheel. The flooring was then
glued to the fender assembly along with the radiator, which helped keep
things ridged. At this point I added the sides to the upper cab assembly. On
test fitting the upper cab to the lower fender assembly every thing fit
together very well, and I set the upper cab aside and went to work on the
fender light assembly. This is another place that has some issues. Each side
is molded as one piece with the signal light, headlight, and, on one piece
Black out lamp molded on a strip. the slot in which this fits is much to
large and require filling, not an easy task. Also the Black out lamp is
molded to go on the right side when it should be on the left, and it is
undersized. There are a number of ways this could be dealt with, however I
chose to leave things as they are and used a couple of coats of Mr. Surfacer
to fill the gaps. Looking at the way the grill is molded, turning it around
could be done, but a bit of work would be required to scrap the bars down to
a presentable appearance given the slight bevel to the molding and the very
flat inside of the grill. I left the grill off until final assembly, the
last thing glued to the cab was the rear view mirror. At this point I masked
off the windows, filled the cab with kleenex and set it aside for painting.
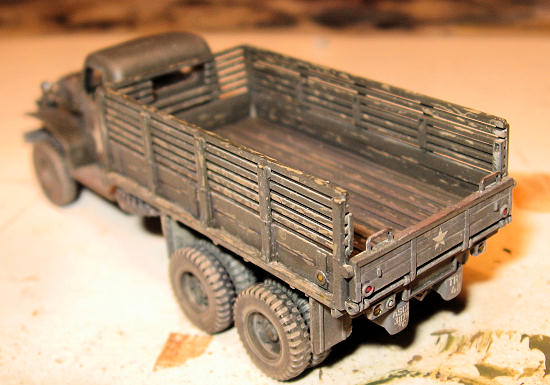
There is no canvass covering supplied for the cargo box, and the cover
supports are molded as one piece, which could be separated if one desired. I
just left them off although on a test they fit vey well. There is the option
to have the seats folded down, and the tail gate can be open and closed
after assembly, which is a nice touch. All the parts are there for the ring
mounted machine gun, and there is a circle scribed on the inside of the cab
to cut out if one choses this option, however the raised lip for the hole in
the cab is not included, but easily scratched if one desired to add it. The
Machine gun is nicely molded and going by the fit of the rest of the kit
should present no problems if one desired to install it. The box itself went
together without any issues, and it was time to paint.
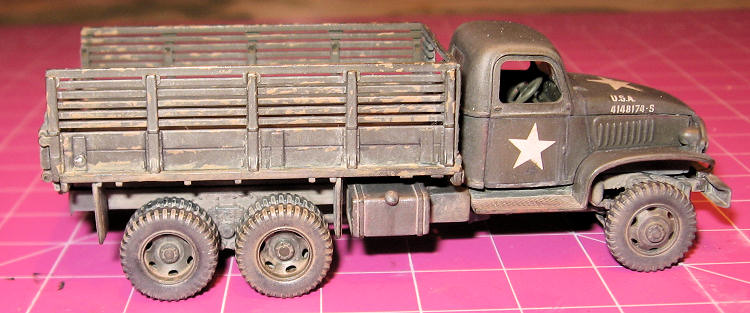
I admit I'm a color freak, I've done all the internet research on Olive drab
that I can. Tamiya Olive drab XF-62 seems to be the color of choice, so
that's what I went with. although olive drab tended to fad rather quickly I
opted to just go straight form the bottle. Painting was easy as the whole
thing is all the same color, which is not a bad thing. Next I gave it a
clear coat and applied the decals. These are actauly very good, and nothing
at all like their earlier ones. They are very thin and quit opaque, they
laid down quit well and really didn't require a softening solution although
I used one anyway. I then covered these in a clear coat. I chose to
use the
stars without the circles, but to my mind the one on the hood looked a bit
to large so I ended up cutting out the one in the circle and used that one
instead.
Next I painted some testors silver onto all the lights and the rear view
mirror, and added some clear yellow and red to the marker and signal lights.
I then applied a matt coat and moved into the weathering stage. I've been
trying some ideas using pastels, dry brushing and mixing with water, clear
coats and other colors of paint. I think this is reasonably effective in
1/72. First I randomly painted the chassis in rust, after which shaved a
bunch of medium grey pastel from the stick and mixed up a concoction of
pastel and polyscale flat base with a little polyscale mud to no great
precision. In order to get a bit of texture to this I would dab the brush
into the pile of pastel and dab this onto the chassis and under the fenders.
Next I dry brushed some grey pastel over this then applied a flat coat. With
the upper surfaces I did a bit of a "panel line" wash to bring out the door
and hood joints and the planking. At this point I decided to try out some
Vallejo paint to see if I could create a more worn look to the cargo box so
I started carefully dabbing and streaking some of the wood color I had on
hand. An then I dry brushed some rust on the metal strips in the box and
then dry brushed Vallejo steel over that, and did another panel wash. Once
all that was finished I gave it a flat coat and removed the masking and
Kleenex. I am personally quit pleased with the results.
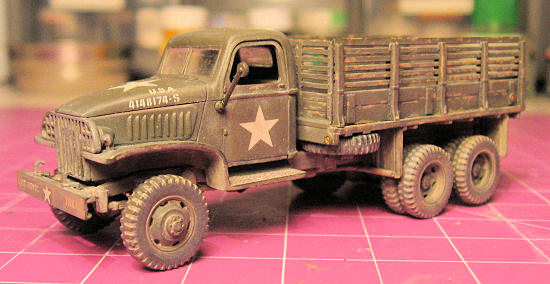
To finish it off the grill was added to the cab which was glued to the
chassis and the cargo box was glued to that after which an imaginary tour of
Europe was embarked upon.
All in all I would have to say that this kit is a nice Kit that could have
been a great kit. The chassis alone is really well done and could easily be
used to enhance other kits. Setting aside the lack of lug nut detail, and
even the reversed grill, the representation of the front cab/windsheild is
it's greatest failing. Eduard has an etch set for this which would probably
go a fair ways to resolving that, if one cared to spend the money, but at
this time I cannot say how well. It's just to bad that the folks at academy
did not spend a little extra time to improve these things. The fit is
excellent, it is a very well engineered kit, and I have to say that all in
all I really enjoyed building it.
From what I've found as mentioned in the history section, this truck
represents one that was built in around september of 1942, with the Timken
split drive line, a field installed Black out lamp/grill, and the wooden
cargo bed.
A PDF copy of "The CCKW in detail and the Collectors Syndrome" By Bryce J.
Sunderland, as found on the internet, and various other internet sources.
Tim Gillis
October 2011
If you would like your product reviewed fairly and fairly quickly, please contact the editor or see other details in the Note to
Contributors.
Back to the Main Page
Back to the Review
Index Page