| KIT: | Ki |
| KIT #: | 82424 |
| PRICE: | $47.99 MSRP |
| DECALS: | Two options |
| REVIEWER: | Greg Ewald |
| NOTES: | A lot of detail, vinyl tracks. |
| HISTORY |
To replace the somewhat ineffectual Sherman tank, the U.S. decided to build an
even more ineffectual M26 Pershing “heavy tank”. Underpowered and out-gunned
from the conception point, the Pershing was a stop-gap measure in the field of
main battle platforms.
The axis was developing more and more dependable gun/cannon platforms, which far
outpaced the allies efforts. Luckily, they did not have the material reserves to
commit to such überpanzers, and so the numbers of the T-34’s and M-4’s
overwhelmed the superior German vehicles.
The Pershing was, however, necessary for the United States, at least in a field trial role. It taught the designers quite a lot of lessons, while not doing much on its own accord. It was underpowered, and overweight for the gun that it carried, easily able to bog down in snow or mud, and with a limited ability to ford rivers. Hey, at least it led the teams to the much better M60 main battle tank.
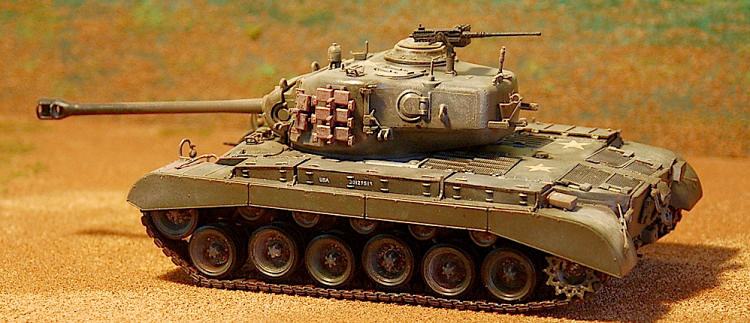
| THE KIT |
Every part of this kit is extremely well molded, from the nice styrene to the
perfectly crisp photo-etch. It is truly superb, though I do wish the injection
molding areas were a little less visible. You will need some putty
and sandpaper to finish the kit off
correctly.
The instructions are typical “blow up” diagrams, done on two sheets of white paper, which is nice instead of the now-norm newsprint junk. Also included is a very nice colour profile board of two tanks, so you can keep the jmn’s at bay if you need some backup.
| CONSTRUCTION |
 The first
thing to do is prepaint just about everything (see below)
The first
thing to do is prepaint just about everything (see below)
Wheels: The fourteen main wheels go
together without a hitch at all. I am still addicted to using sharpie permanent
markers for rubber road wheels, I like the bit of “shine” that shows with marker
color.
I was not too thrilled with the drive gear housings that go on the rear of the
tank, but a fair amount of psr helped to make them manageable. The torsion
bars/shocks are amazing wonderful, but if you are going to pose the tank in a
diorama, you will want to fit these onto the wheels after the base is done for a
realistic look. You know “why is the middle road wheel off of the ground, Dad?”
thing.
The Gun: Once again, we are left
with a somewhat ill-fitting barrel made up of four pieces.
If you have a milling machine, make a new one out of aluminum. Every
plastic cast barrel comes out slightly elliptical. I don’t know why
manufacturers are still making plastic parts for barrels…maybe they have a deal
with the aftermarket guys?
The Tracks: Nicely molded, and with
zero flash at all, the tracks are a real bugger to put together. I ended up
using a wooden mallet and a cutting board (don’t tell my wife) to knock the
ends/pins/holes to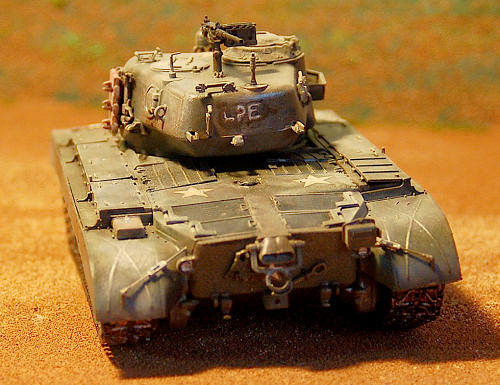 gether,
and then gluing the living hell out of it with hot glue. I used my wife’s
crafting glue gun for this, please don’t mention this either.
The seam is nasty, so plan on positioning it underneath one of the
fenders when you go to put them on the wheels.
gether,
and then gluing the living hell out of it with hot glue. I used my wife’s
crafting glue gun for this, please don’t mention this either.
The seam is nasty, so plan on positioning it underneath one of the
fenders when you go to put them on the wheels.
The Engine: It’s is really nice to
see a manufacturer start giving engines to basic tank kits. The engine is a
little complex to fit into the chassis, so a lot of test fitting is in order,
not to shave or sand, but just try to figure out why the heck the engineers who
made this tank put stuff where they did?
The parts go together easily, with a minimum amount of psr. The compartment
however, can be a little stressful. Be sure to glue the living
“H” out of the radiators, or you will
snap yours off time and time again like I did.
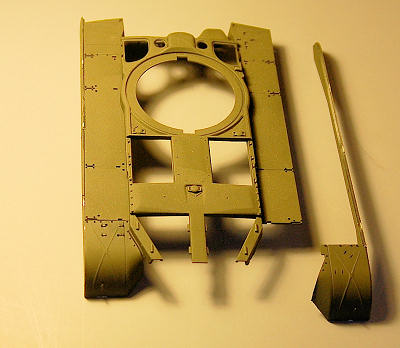
Upper Hull: With the lower part all
ready to roar, begin on the upper deck. I like to not attach all of the widgets
and doo-hickeys until final assembly, so I left a bunch of the crapola off. When
it does come time to put on the side skirts, make sure you have already put on
the rear drive fender, and align the skirt with it. This way, you can glue it up
in stages. Have a drink, or watch some tv for a bit, this has to dry well.
I attached the front of the hull first, as I could see that other end was going
to need some filler, and I would rather it was the rear.
The lower and upper assemblies mated well after a bit of sanding and some
finagling. Hey, this paragraph
really sounds a bit off, doesn’t it? I left off the ammo/ storage boxes for the
time being. The vents that go above the engine compartment do not fit at all,
and you will need to carefully sand these down to fit. I used a flat bastard
file, and really screwed up one of them before switching to a triangular fine
file. Thank the heavens for putty.
 The
Turret: Ignore the instructions completely. Glue the upper turret half to the
bottom first off, and begin any repair work you need to. Mine was extensive, and
you would always see a seam line if you did it the way the instructions call out
for. Or, you could do it they way they want you to, and be cursing the carpet
monster about every three seconds as you snap off another bit.
The
Turret: Ignore the instructions completely. Glue the upper turret half to the
bottom first off, and begin any repair work you need to. Mine was extensive, and
you would always see a seam line if you did it the way the instructions call out
for. Or, you could do it they way they want you to, and be cursing the carpet
monster about every three seconds as you snap off another bit.
The Gun Pt. II: The mantlet itself is a
bit of a nightmare. I recommend going outside (if it is warm enough) and
assembling this over a bare stretch of concrete. If you have kids in school,
perhaps you request the use of their gymnasium. You have to hold a few bits in
perfect place whilst gluing on the interior and exterior mantlet pieces. If you
look like Shiva or Khali, you might be able to do it without swearing too much.
The gun and mantlet mate to the turret the same way that a pit bull does to a
cat. Not really well. Lots and lots
of filler here, as well as some sanding. (this is for the model, not the
animals) The fifty cal that sits up
top is actually well formed for a plastic piece, though purists will want to use
a brass molding.
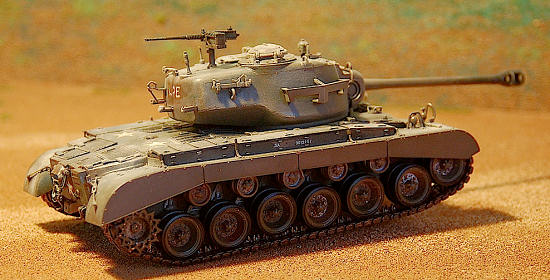
The turret fits snugly onto the hull, and VIOLA ! You have yourself a battle tank from the 40’s sitting proudly on your shelf. Now, we just have to finish it off a bit…
| COLORS & MARKINGS |
I started out with my traditional chrome/black/field colours. I like to prepaint
on the sprues, and then do any weathering and touch up after final or at least
sub-assemblies.
The sprues were painted in silver/chrome (I like to mix them up) and set aside
to dry. Then they were spritzed with a bit of lark’s vomit (you can use a spray
bottle) or water, and salted with
kosher table salt. Don’t use the iodized stuff, it makes star patterns.
Once this is dry, you can spray the whole mess with flat black, just be gentle.
This will need to dry for at least 24 hours (or a day).
 Gently
remove the salt granules with an old toothbrush and some warm water, if you want
a war-weary tank, use an electric toothbrush. I like to let this whole thing set
up for another day or so prior to a light satin clear coat, and then, in this
case, a rattlecan application of Krylon’s new O.D. Camo spray paint !
I held the can about 16 inches away from the sprues, and just misted the
paint on…to be honest, Krylon has my business ! Neat stuff.
Gently
remove the salt granules with an old toothbrush and some warm water, if you want
a war-weary tank, use an electric toothbrush. I like to let this whole thing set
up for another day or so prior to a light satin clear coat, and then, in this
case, a rattlecan application of Krylon’s new O.D. Camo spray paint !
I held the can about 16 inches away from the sprues, and just misted the
paint on…to be honest, Krylon has my business ! Neat stuff.
Once the tank is assembled completely, it is time for the touch up and
weathering process. I just used Model Master OD for my touch up areas, and the
weathering…well…hmmm. To be honest, I used makeup. It brushes on easily, takes a
set from clear coat, and is readily available in just about any colour (you have
noticed what the girls are wearing, right?). It
doesn’t smudge like chalk or pastels do, it doesn’t overcoat like
washes…for weathering, I love the stuff. I just sneak into my wife’s cabinet now
and again and make off with what looks to be a good colour. It’s o.k., it gives
her another excuse to go shopping.
A quick clear coat of satin, and it was time for the decals. Man, those Americans really liked to put big white stars on their camouflaged tanks ! I dirtied mine up with a bit of a wash, then ran a coat of clear over the whole thing.
| CONCLUSIONS |
A very well engineered model of a mediocre tank. A crew figure or two would have
been nice, as well as a turned barrel. I was surprised by the level of detail in
this kit, anyone who has built a kit or two could make this into a contest
winner.
I spent about 20 hours total on it, and I have to say, I am most pleased with the results. A four star kit, for sure, despite some of the problematic fits.
| REFERENCES |
http://en.wikipedia.org/wiki/M26_Pershing
May 2010
Thanks to Squadron Products for the review kit. You can get this and many
other nice Hobby Boss kits at your favorite shop.
If you would like your product reviewed fairly and quickly, please
contact
me or see other details in the
Note to
Contributors.