| KIT: | Tamiya 1/48 Su-122 |
| KIT #: | 48093 |
| PRICE: | 1700 yen at www.hlj.com |
| DECALS: | Three options |
| REVIEWER: | Tom Cleaver |
| NOTES: |
| HISTORY |
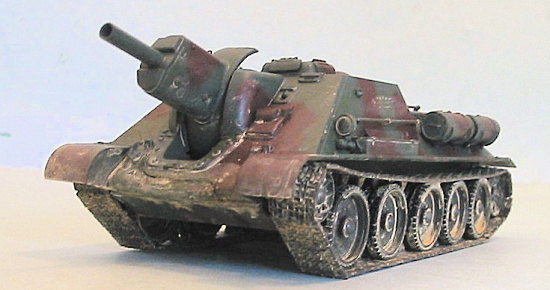
The SU-122 was an assault gun based on the chassis of the T-34 tank. Its
development began with an April 1942 specification for mobile assault guns using
weapons of 122 mm or higher. The SU-122 was de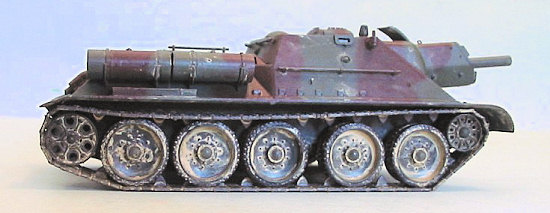 signed
at the Uralsky Machine Building Factory (UZTM), and was armed with the 122 mm
M-30 howitzer.. Known as the U-35 at the factory, the first 25 production
vehicles rolling off the assembly line at the end of 1942.
signed
at the Uralsky Machine Building Factory (UZTM), and was armed with the 122 mm
M-30 howitzer.. Known as the U-35 at the factory, the first 25 production
vehicles rolling off the assembly line at the end of 1942.
In combat, the 122mm weapon proved to be useful for both close support work and in the anti-tank role, where its high explosive round often proved powerful enough to knock out enemy tanks from the sheer concussion effect.
Production of the SU-122 continued into the summer of 1944, by which time over 1,100 had been produced. The introduction of the Tiger tank, which was fully capable of knocking out the SU-122, combined with the fact the M-30 howitzer was only marginally effective against the Tiger, led to its discontinuance.
| THE KIT |
This kit by Tamiya is a follow-up to the earlier T-34/76 (kit #32515). It is
not a “shrink down” of the 1:35 SU-122 (kit #35093). This
 kit has many finer details and
is overall more correct than the larger kit.
kit has many finer details and
is overall more correct than the larger kit.
The kit comes with 222 parts in dark green plastic, along with the now-familiar cast metal lower hull tub, a length of string for the tow cables, a few poly caps plus the decal and instructions sheets. It shares sprue A from the T-34/76 kit with the running gear and other bits.
The small decal sheet is typical of Tamiya, with well printed markings on slightly-thick carrier film. It provides generic markings allowing a modeler to create any SU-122. The boxart and instructions provide information on three: one overall green shown on the box art, one camouflaged vehicle shown in the instructions, and a third shown on the box side in winter whitewash finish.
| CONSTRUCTION |
I call these little Tamiya armor kits “weekend models.” I don’t mean that in a bad way. They are well designed and go together easily over the course of an evening. One can then spend the rest of the modeling time available over a weekend painting and weathering - of course, this is a “weekend” that doesn’t include lots of “honey-do’s” or “daddy-can-we’s,” but even with those, it’s not a long project. I now have a system for assembling these Tamiya tanks that really does make the whole process quite easy.
First I assemble the hull and turret separately, other than the items like tools
and such that will go on later. Then I paint the model, including all the road
wheels and suspension parts and tracks on the two A sprues. Then I apply the
decals. Following that, I give a wash, and then weather the road wheels and
track with mud or whatever. Then I return to assembly, construct the suspension
and ro ad wheels and attach
them, then attach the tracks. I then attach the upper hull to the lower hull,
then glue on the jacks, shovels, and whatever else goes on the hull, then I
attach the turret (in the case of this SU-122,that last is not part of the
process). The system works perfectly with every one of these kits, and is very
easy.
ad wheels and attach
them, then attach the tracks. I then attach the upper hull to the lower hull,
then glue on the jacks, shovels, and whatever else goes on the hull, then I
attach the turret (in the case of this SU-122,that last is not part of the
process). The system works perfectly with every one of these kits, and is very
easy.
Details on the road wheels, drive sprockets and idler wheels is excellent. The rubber rimmed road wheels have a good tread pattern and well defined rim and bolt head details and a separate center hub cap for good definition and are simply glued in place on the axles. While there are four large pin ejector marks on the inside of the inner road wheels, these won’t be seen after assembly unless you make habit of turning the model upside down.
The tracks are plastic link and length with nice link details. If you leave the drive sprocket and idler wheels loose, this will make attaching the track easier.
The upper hull is in one piece, with openings for the upper rear engine intake screen door and side engine intake louvers, which are separate to allow good detail definition. The front driver’s hatch, upper hull hatches and visors and the large gun mounting are also separate.
Once I had the upper hull assembled, I proceeded to paint the model.
| COLORS & MARKINGS |
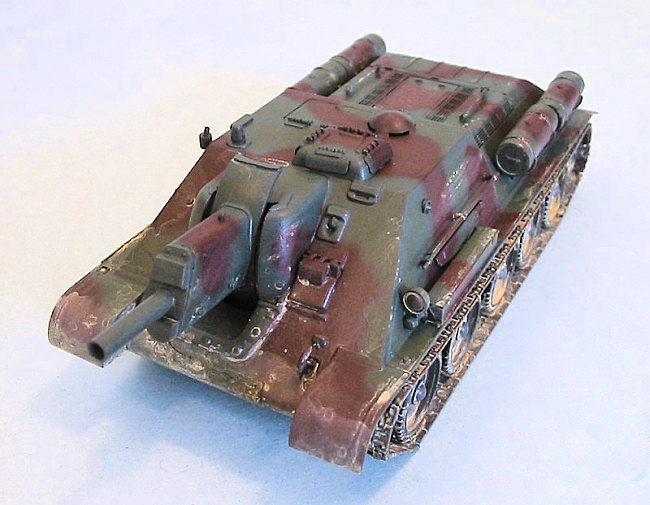
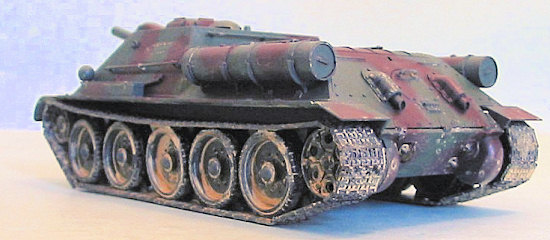
 I decided to do the
camouflaged version, and used Medium Green and Red-Brown for the upper
camouflage, with the lower hull and the wheels and sprockets all painted Medium
Green, with the wheels and sprockets left on the sprues. I hand painted the
rubber wheels, and then gave all this a wash of thinned red-brown to simulate
mud.
I decided to do the
camouflaged version, and used Medium Green and Red-Brown for the upper
camouflage, with the lower hull and the wheels and sprockets all painted Medium
Green, with the wheels and sprockets left on the sprues. I hand painted the
rubber wheels, and then gave all this a wash of thinned red-brown to simulate
mud.
When this was completed, I assembled the tracks, which present no difficulty when done before mating the upper and lower hull sub-assemblies together.
The upper hull is attached to the lower hull with two small screws via locating holes under the rear screen door panel and front hull gun mounting opening.
| CONCLUSIONS |
This is one of the easiest kits in Tamiya’s line of 1/48 armor to assemble. It represents an important vehicle in the Soviet armored forces of the Great Patriotic War, and is a worth addition to any collection alongside the T-34, KV-1 and KV-2 tanks that have been produced so far.
November 2006
Review kit courtesy of HobbyLink Japan. Get yours at “Japanese prices” at www.hlj.com
If you would like your product reviewed fairly and quickly by a site that has over 325,000 visitors a month, please contact me or see other details in the Note to Contributors.