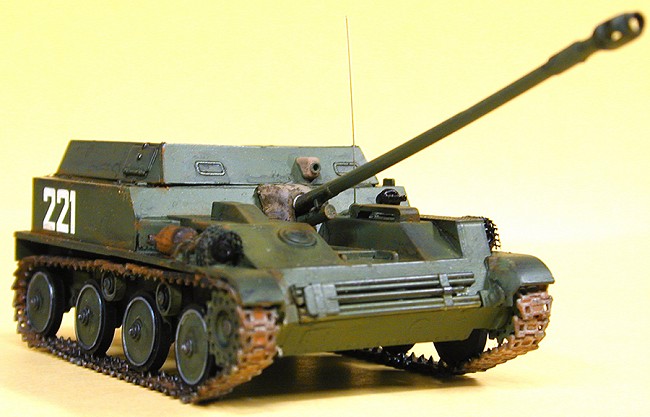
Maquette 1/35 ASU-57 SPG
| KIT #: | MQ-3517 |
| PRICE: | $10.98 (9.96 at Squadron) |
| DECALS: | One option |
| REVIEWER: | |
| NOTES: |
| HISTORY |
Please visit Scott Van Aken's preview (AKA “Da Boss”) for a short history and a peek at what comes in the box.
| THE KIT |
 When I first volunteered to review this kit for the Boss, I figured it
would be a fairly simple construction process, and a great way to get
myself back into the modeling game after a long running bout with advanced
modeler’s syndrome (AMS). But once I got started, I quickly discovered that
this was just a wee bit harder than the average armor kit I’ve built in the
past. Call me a wuss or whatever, but individual track links are not
exactly my favorite feature (I know, armor purists: they are far superior
to the toy-like vinyl tracks that have come in armor kits for years, but it
doesn’t make them that much more appealing to an occasional armor kit
assembler like myself. There: my heresy is on the table!).
When I first volunteered to review this kit for the Boss, I figured it
would be a fairly simple construction process, and a great way to get
myself back into the modeling game after a long running bout with advanced
modeler’s syndrome (AMS). But once I got started, I quickly discovered that
this was just a wee bit harder than the average armor kit I’ve built in the
past. Call me a wuss or whatever, but individual track links are not
exactly my favorite feature (I know, armor purists: they are far superior
to the toy-like vinyl tracks that have come in armor kits for years, but it
doesn’t make them that much more appealing to an occasional armor kit
assembler like myself. There: my heresy is on the table!).
Couple the individual track links with less than lucid instructions and small parts and you have, well, for an old guy like me, a bit more of a challenge than anticipated.
Nevertheless, where I come from a commitment is a commitment, so I sucked it up and dove into the kit’s construction. As Scott pointed out in his preview, there is amazingly good detail in this kit for the price, and the unusual subject matter is another bonus.
| CONSTRUCTION |
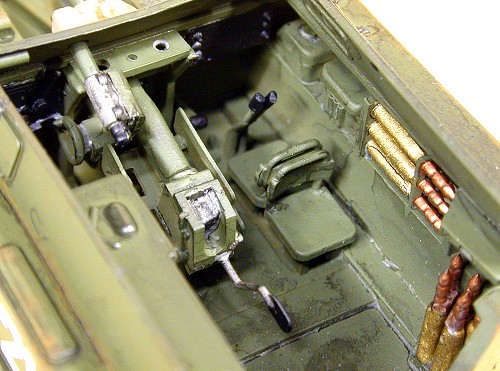
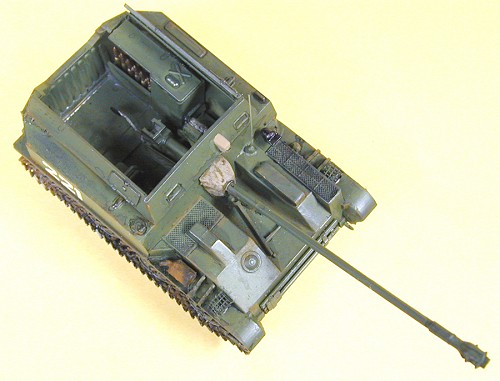
I started by assembling the fighting compartment and the gun. Right off the bat, I was in trouble as the instructions are very vague regarding the locations of some of the interior parts and equipment. I had to revisit the instructions several times and eventually relocated several parts once I saw I had incorrectly placed them. Another small hurdle: unlike many other armor kits, one must decide on the gun’s elevation beforehand, as there is no elevating mechanism included in the kit’s design. Again, the instructions do not fully explain this, so I had to figure this out on my own through a little trial and error.
 The gun required some filing and sanding, especially where the muzzle brake
mates to the barrel. Mr. Surfacer 1000 was sufficient for this, and, with
just a little sanding, the gun was finished.
The gun required some filing and sanding, especially where the muzzle brake
mates to the barrel. Mr. Surfacer 1000 was sufficient for this, and, with
just a little sanding, the gun was finished.
Once the gun and fighting compartment were complete, I assembled the lower hull, and here I made another potentially fatal error: being so used to vinyl tracks, I proceeded to glue the upper hull containing the gun and fighting compartment to the lower hull. I generally do this so I can fill any seams between the two and then paint the overall model, given the usual single color paint job found on most armored equipment. Needless to say, this later made the addition of the individual track links difficult at best (I believe the saying is “it’s hard to teach old dogs new tricks.”). Oh well, another “duh” modeling moment.
I also had some trouble getting the two hulls to line up, and in the end, I had to use a little bit of Mr. Surfacer to fill some of the seams. Overall, however, I had to use a lot less filler than a lot of kits I’ve built over the years.
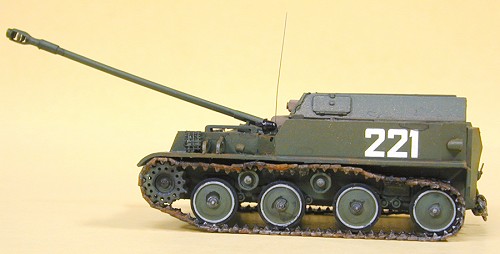
 Another interesting moment in the assembly process: when mating the upper
and lower hull sections, I noticed that the left and right front road
wheels did not line up. In fact, the right wheel is noticeably closer to
its drive sprocket than the left one is. Given the assembly process, I
first thought I had misaligned the hull sides during construction. But
after a lot of head scratching, consulting the Farmer’s Almanac and
viewing a batch of chicken entrails, I finally concluded that this either
was the correct a
Another interesting moment in the assembly process: when mating the upper
and lower hull sections, I noticed that the left and right front road
wheels did not line up. In fact, the right wheel is noticeably closer to
its drive sprocket than the left one is. Given the assembly process, I
first thought I had misaligned the hull sides during construction. But
after a lot of head scratching, consulting the Farmer’s Almanac and
viewing a batch of chicken entrails, I finally concluded that this either
was the correct a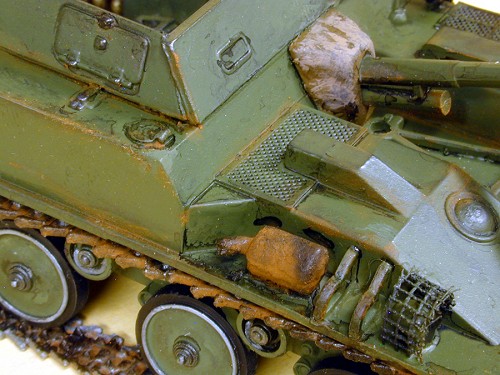 lignment
on the real McCoy or just the way the kit was designed and molded. I must
admit, ‘though, it had me stumped for a while.
lignment
on the real McCoy or just the way the kit was designed and molded. I must
admit, ‘though, it had me stumped for a while.
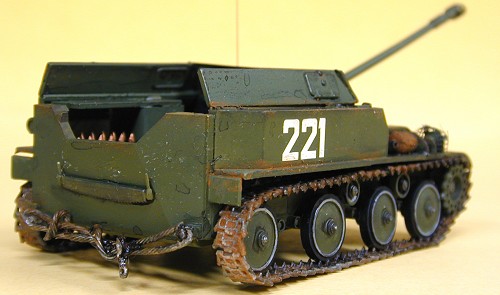
For the track links, I spent quite a few hours assembling these into various length sections for their subsequent installation on the model. Once assembled, I sprayed them with Pactra Steel (yes, I still have some of that stuff left on my workbench), and set them aside to dry. An indispensable tool for this process is a set of tweezer-like nippers to “desprue” the track links. These really are handy and minimize the clean up required for the links after removing these parts from their sprues.
| COLORS & MARKINGS |
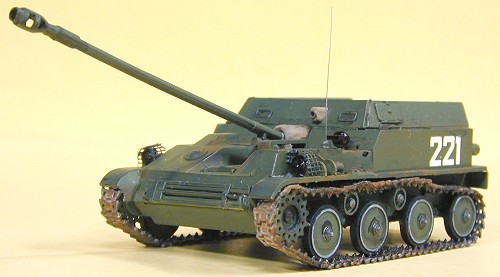
Since I have only built one other Soviet armor model in the past 20 years (DML’s T-34/85), I was not quite sure just what overall color Soviet armored vehicles actually sported in the fifties, so here I deferred to the Boss. Based on his build of Maquette's BA-64 armored car, I opted for FS34102, only I chose to use Floquil’s version vice Model Master’s.
Again, given the dearth of info on these vehicles, I had no idea what color the fighting compartment should be (another shortcoming of the instructions), so I finally opted to spray it the same color as the exterior.
 For the road wheels, I decided to use a black Sharpie pen for the rubber
portions. This actually worked quite well, as the pen was easier to control
than a paintbrush and eliminated the need for “circular” masking of the
steel portions of the wheels.
For the road wheels, I decided to use a black Sharpie pen for the rubber
portions. This actually worked quite well, as the pen was easier to control
than a paintbrush and eliminated the need for “circular” masking of the
steel portions of the wheels.
After I painted the vehicle minus its tracks, I then proceeded to learn just how difficult it is on a small armor kit to install individual track links with the fenders and upper hull already mounted on the model (I have since read several armor kit reviews that show a much better technique for doing this: essentially, you complete the lower and upper hulls separately, paint the lower hull, mount the track links, THEN attach the upper hull, mask off the wheels/tracks/lower hull with paper and tape, and spray the upper hull and/or turret).
After much agony, I finally got the tracks installed, but I was not very happy with their appearance. In short, one of the benies of individual track links is the ability to incorporate realistic track sag into the model. Upon realizing that I had virtually NO sag in my tracks, I began a long fiddling process to try and create this look using my installed tracks. Needless to say, I had to remove several sections, break them apart, and then reglue them in different orientations. I found that Aleene’s Tacky Glue (available at most craft stores) was a fairly valuable asset in this after-the-fact rescue attempt. While the end result was still not what I had hoped for, it was at least better than the original look I had managed to create. If you want to see how these tracks CAN look when installed correctly, check out Andrew Judson's excellent build of this identical kit.
The
final assembly step involved installation of some of the small parts to the
hull. Here, I decided on substitutions for two of the kit’s parts that
looked out of scale to me: the radio antenna and the brush guards covering
the front headlights. The kit’s
 antenna is too thick, so I cut a piece of
.009 inch steel guitar string, cut off the kit’s antenna at its base,
drilled a hole in it, and superglued the new steel antenna to the base and
hull. For the also overly thick brush guards, I cut some strips from the
bustle rack nets supplied in Tamiya’s M1A2 OIF tank kit (#35269) and
superglued these over the lights.
antenna is too thick, so I cut a piece of
.009 inch steel guitar string, cut off the kit’s antenna at its base,
drilled a hole in it, and superglued the new steel antenna to the base and
hull. For the also overly thick brush guards, I cut some strips from the
bustle rack nets supplied in Tamiya’s M1A2 OIF tank kit (#35269) and
superglued these over the lights.
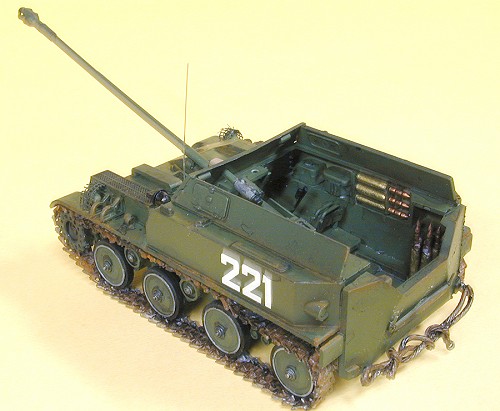
The only other added part was a tow chain constructed from picture hanging wire. Although the kit supplies plastic molded end pieces for a towrope, it doesn’t provide either string or a molded towrope, so one has to manufacture this particular item. I draped the towrope over the rear towing hooks and then painted it with Model Master Anthracite Gray Metallic (alas, my trusty bottle of Pactra steel finally gave up the ghost and I had to retire it to the trash can).
The final painting involved some brush painting. I painted the saw with MM Anthracite Gray. Based on pics of a vehicle I managed to locate on an armored vehicle website, I also decided to paint the headlights and (I believe) fender-mounted air intake with Testor’s gloss black, and the canvas gun and sight covers with MM dark tan (FS30219). Finally, I also had no clue what color the ammo rounds supplied with the kit should be, so I defaulted to Testors Brass for the shell casings and Testors Copper for the shells.
Once this brush painting was complete, I shot the whole vehicle with Testors Glosscote in preparation for adding the decals (I could have just limited my gloss finish to the two fighting compartment sides where the meager decals go, but I had to tone down the gloss on the rubber road wheels, so I decided to gloss the whole kit).
After the gloss coat dried, I applied the hull number decals to the fighting compartment side shields. I used a little Microsol to set the decals, and they settled onto the gloss finish quite nicely. Unlike the Boss’ experience with Maquette’s armored car, I had no trouble with these decals.
| FINAL CONSTRUCTION |
At this stage, I applied a wash of black Liquitex Acrylic Artist Color to the entire model. Once it dried, I wiped off the excess where the wash had pooled. I then decided to add a touch of rust to the tracks and vehicle surfaces by dry brushing on some Floquil rust I had purchased over 30 years ago (this, too, is on its last legs). Finally, I completed the weathering with some graphite I had ground into powder by rubbing a No. 2 pencil over a sheet of 200-grit sandpaper. I used my finger to rub this on portions of the vehicle to highlight metal surfaces that would ordinarily receive some wear after a lot of operational use.
| CONCLUSIONS |
 And there you have it: in spite of the minor glitches (most of which were
self-induced), I actually enjoyed this project. The kit appears to be an
accurate representation of the prototype and has surprising detail for the
price. Experienced armor modelers should have little trouble with the
rather sparse instruction sheet, and with just a few scratch-built
additions, they can easily turn this kit into a real gem (in addition,
Eduard makes a rather extensive photoetched detail set for this kit).
And there you have it: in spite of the minor glitches (most of which were
self-induced), I actually enjoyed this project. The kit appears to be an
accurate representation of the prototype and has surprising detail for the
price. Experienced armor modelers should have little trouble with the
rather sparse instruction sheet, and with just a few scratch-built
additions, they can easily turn this kit into a real gem (in addition,
Eduard makes a rather extensive photoetched detail set for this kit).
If you are into building relatively unknown Soviet armored equipment from the fifties (or you just can’t resist odd armor modeling subjects), you can’t go wrong with this kit. And yes, I finally see a glimmer of hope that I might be recovering from my acute case of AMS!
| REFERENCES |
1. “The Tankmaster,” website, 2004.
January 2005
Copyright ModelingMadness.com
If you would like your product reviewed fairly and fairly quickly, please contact the editor or see other details in the Note to Contributors.
2018