| KIT #: | 35289 |
| PRICE: | $50.008 |
| DECALS: | Four options |
| REVIEWER: | Donald Zhou |
| NOTES: | Advantages: Great detail, choice of link and length or single piece tracks, Easy build up. Disadvantages: Some details simplified, Markings Limited, Tracks all have their faults. |
| HISTORY |
When the Germans received the shock of their life during Operation Barbarossa, at the chance encounter of the T-34, which proved superior to all German tanks, especially Panzer III and IV, the urgent need to develop a counter became very serious. In the end of course, this resulted in the famed Panzerkampwagen V Panther and the Panzerkampwagen VI Tiger. Despite the fact only some 6000 Panthers were produced along with between 1800-2000 Tigers (compare this to the number of Shermans produced, which could have totaled as much as 40,000. T-34’s? As much as 50,000! Both sides lost counter of the exact numbers), the Russian quickly started their own program to develop their own counter.
 During the Battle of Kursk, the Russians noticed their
own 122mm howitzer, used to provide indirect fire support, was actually pretty
darn good and smashing armor too, including the new German Kittykats tanks! The
shell it fires maybe slow, but it more than makes it up with size and weight. At
around 1000 meters or so, the shell, even if it did not penetrate the frontal
armor of the Panther or Tiger, could have shatter it to the point the tanks on
the receiving end was out of action! Russians, unlike the Americans or the
British, with their stupid Cruiser and Infantry tanks or the mantra that tanks
are for supporting infantry, enemy tanks are best dealt with by tank destroyers,
quickly started to ram the cannon into a tank turret!
During the Battle of Kursk, the Russians noticed their
own 122mm howitzer, used to provide indirect fire support, was actually pretty
darn good and smashing armor too, including the new German Kittykats tanks! The
shell it fires maybe slow, but it more than makes it up with size and weight. At
around 1000 meters or so, the shell, even if it did not penetrate the frontal
armor of the Panther or Tiger, could have shatter it to the point the tanks on
the receiving end was out of action! Russians, unlike the Americans or the
British, with their stupid Cruiser and Infantry tanks or the mantra that tanks
are for supporting infantry, enemy tanks are best dealt with by tank destroyers,
quickly started to ram the cannon into a tank turret!
The fact of the matter is, the Russians already had a tank in testing, the KV and later JS-85 (JS or Joseph Stalin, aka, “Uncle Joe”, or in Russian IS) armed with an 85mm cannon that would eventually wound its way into the T34/85. Many felt the new tank should’ve gotten a bigger cannon instead so the Russians promptly slap the new 122mm into the turret. The original version still need testing and working out and eventually evolved into the JS-2 (Russian IS-122). This was the combat ready counter to the Tiger and Panther!
The new tank was armed with the D-25 122mm gun similar to the A-19 weapon that foreshadowed its use as a tank weapon. The biggest disadvantage of the weapon was it used two pieces ammo charges, the main round and its powder charge. This proved to be a serious disadvantage as a tank weapon since it also meant the new tank can carry only 28 rounds but the Russians pressed on. The tank armor was anywhere between 166mm equivalent (turret, hull front all at 100mm + the angle), with the mantlet even thicker at 155mm rounded. The sides features armor up to 90mm thick. The tank weighted 46 tons fully loaded, some 2 tons lighter than the Panther and as much as 9 tons lighter than the Tiger. The tank was thrown into the fray as early as early 1944. Germans were instantly shook by the new encounter. Some Tiger crews reported they were only able to penetrate the new tank from as close as 500meters, and gotten lucky of course! Meanwhile, the new tank’s cannon can take out a Tiger at equal ranges, leaving the crews to decide the outcome (it is here that the Germans had the advantage). Obviously, the JS-2 has bought the Russians to parity with the Germans.
 However, there were some disadvantages with the new
tank. The initial version has a slope front leading to a straight glacis. This
proved to be a decidedly good shot trap. Later versions fixed this problem with
a much less sharper slope that eliminated this weak spot.
However, there were some disadvantages with the new
tank. The initial version has a slope front leading to a straight glacis. This
proved to be a decidedly good shot trap. Later versions fixed this problem with
a much less sharper slope that eliminated this weak spot.
The biggest problem with the early version was sometimes poor quality control. Before the JS-2, the Russians never casted armor this thick and thus, quality suffered. Sometimes, air bubbles would form in the armor and they would not be mixed out during the casting process, leaving the armor brittle and weak and liable to shatter when hit, especially the Panther’s 75mm and Tiger’s 88. These were eventually brought under control and the new versions of the tank, equipped with the D-35T, which increased the firing rate to 3 rounds per minute was put into service in late 1944. The final WWII versions added a welded hull and a placement for a DSHK .50/12.7mm machine gun on the commander’s cupola. Overall, the tank saw production numbers into the 2000’s! A number that could have especially achieved by the Americans had they put the M-26 Pershing into production in late 1943 early 1944 also!
| THE KIT |
This kit is Tamiya’s late 3rd generation kits, made in
2007 just before the 4th generation. Previously, Dragon was the only kit maker
that released a series of JS-2’s, including the Chkz version as depicted in this
kit, with the cast sloped hull that eliminated the “stepped” hull in the earl
version of the tank along with revised driver vision port. Dragon also produced
the late version with the welded hull and the placement for the DSHK machine
gun. However, some details were missing, such as the tow ropes and the side fuel
drums were a little an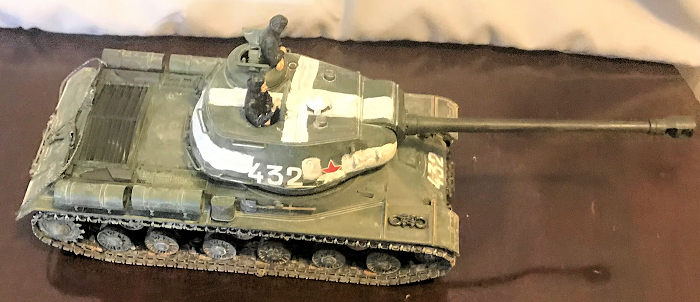 emic. Enter Tamiya.
Tamiya’s JS-2 is also the Chkz “mid” production variant that cured many of the problems found in the earlier vehicles. It features slightly sharper details and includes the tow ropes with two figures. It also features your choice of tracks including two single piece plastic tracks and link and length individual tracks. However, both options have faults. The plastic tracks details are pretty sharp for this medium but track tension would definitely be too tight! All JS series had very loose tensions so the tracks hung down on the upper rung. But the individual links all have two ejector pin marks on them and stomping them would be a PAIN! Four markings are included, including the 7th Independent Guards Heavy Tank Brigade, April 1945, Berlin, 88th Independent Guards Heavy Tanks Regiment in Berlin, Czech 1st heavy Tank Brigade in Prague May 1945, and finally a Polish version belonging to the Polish 4th Heavy Tank Regiment, April 1945.
| CONSTRUCTION |
This is a Tamiya kit so everything is easy and simple. Construction begin always with the lower hull with the drive section. All road wheels, drive sprockets, and idler wheels have poly caps in them so they can move should you choose the plastic tracks. Save the spare track links on the front and rear plates for later. The rest, the drive arms etc are easy, just be sure they are all even. An alignment tool is provided to make sure all the arms are even.
Accessories are build up next. I saved most of them until final painting are done.
 Again, you can make your choice of single plastic
tracks or individual link and length tracks. To help you with the upper sag,
another tool is used. Just assemble the upper rung tracks on this tool to create
the sag. I choose the single piece plastic track just so I can hurry the project
up. Maybe later on, I’ll do the individual one as the tank does not look right
without its famous sag. The tracks of course, were placed on later.
Again, you can make your choice of single plastic
tracks or individual link and length tracks. To help you with the upper sag,
another tool is used. Just assemble the upper rung tracks on this tool to create
the sag. I choose the single piece plastic track just so I can hurry the project
up. Maybe later on, I’ll do the individual one as the tank does not look right
without its famous sag. The tracks of course, were placed on later.
Upper hull details include photo-etched grills, gun lock and tow ropes. I save the ropes for later.
Turret begins with the cannon. The barrels are in two halves cause again, slide mold technology was not invented at this time. A two piece muzzle brake is then put on. The barrel is trapped behind the mantlet by two poly caps so it could rotate. Be sure to put in the figure stands if you choose to put in the figures. I saved the tank dessants hand rails until later cause these are really thin and can be easily broken off. Time to hit the paint shop.
| COLORS & MARKINGS |
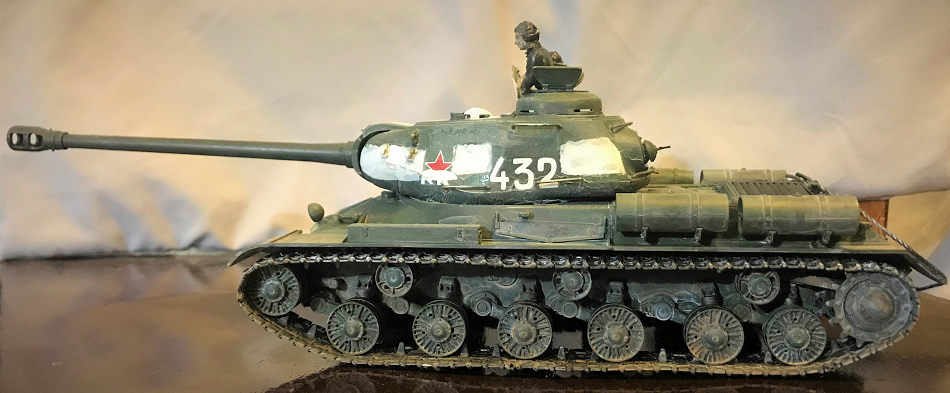
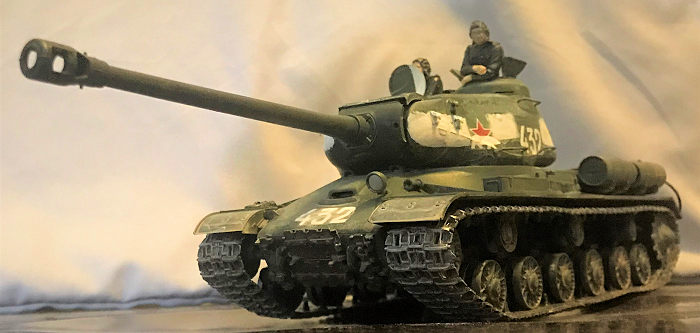
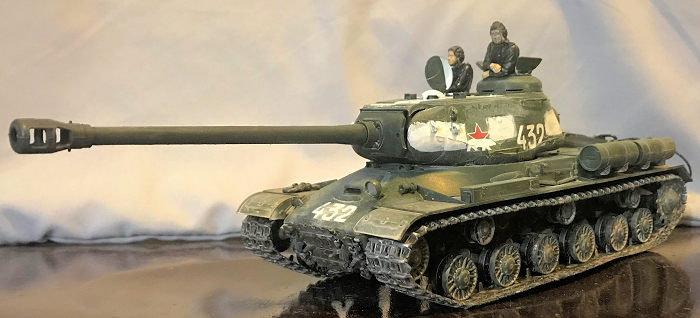
I chose the first marking, the tank belonging to the
7th Independent Guards Heavy Tank Brigade. Not only because the tank has a polar
bear beneath the red star and the number 432 painted on the tank’s side, but
also the front. The most special thing about the tank is that it had hand
painted white paint stripes around its turret and the top as a “This is a
Friendly Tank!!! DON’T SHOOT!!!!” identification marking for Allied troops. As
the Russians kept on pushing West and the Americans and British kept on pushing
East, the chances of the two units confronting each other became a distinct
possibility! There was one famous aerial incident in which several Yaks and
P-38’s, while chasing Germans, strayed into the “neutral zone” and both sides
suffer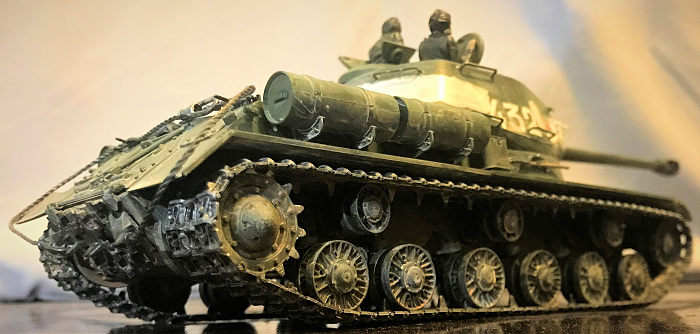 ed loses. The Russians then started to paint white stripes around their
armored vehicles as a way to stop the friendly fire incidents.
ed loses. The Russians then started to paint white stripes around their
armored vehicles as a way to stop the friendly fire incidents.
For the overall paint, Testors coincidently, has a paint called “Russian Armor Green”…Guess what I picked? Yes, all Russian armored vehicles, especially tanks were painted in this shade of green. Hence another reason why I picked the first marking. That white stripe really break up the mass of green and add a little to the overall scheme.
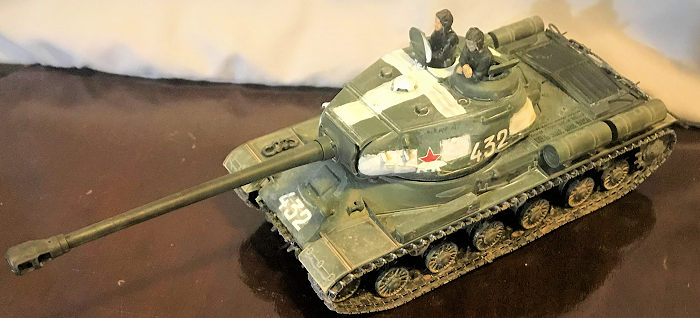
If you read any of my previous armored builds, you’ll know the drill now. First a heavy slobber of jet black/flat black wash, followed by the first coat of Russian armor green. Then more wash, thinner this time, before more coats of paint. This is then followed by heavy slobber of thinned cream to denote dust, then territorial beige to denote mud. These were heavily slobbered onto the drive section and tracks followed by pewter grey for dust. Again, should result in a very dirty tank. The markings were applied after the second coat of paint so they could receive the same treatment.
After the markings were set, time for the white stripe. Again, these were HAND painted! I saw some models in show where these stripes were sprayed on! Most of the stripes were thrown up quickly by the crews with whatever white paint they had so they were nowhere close to being THAT smooth and that even! I started with a turret side with a flat brush and just haphazardly put it on as straight as possible. If it end up being crooked a bit, well, that hardly matters! After that, the top received the same treatment. I hope it turned out looking like it did in the field, haphazard, quickly put on there just as a “Look, don’t shoot! Ima friendly!!!!” ident card! Again, this was put on after the second coat was dried so it could be weathered along with all the rest.
| FINAL CONSTRUCTION |
Final construction involved putting on the tow rings, the shovel and spare tracks. These were put onto the tank after the second coat of paint so they could receive the same weathering. The tow rope was also cut to the right length and put onto the tank. These should have been included in the Dragon’s kit but were somehow missing. The spare tracks also received a coat of raw umber to denote rust. Again, no rusts on operational tank but if left along, WW II tracks tend to rust quickly.
 Then come the figures. These are painted first on the
tree with flesh faces and hands, flat black helmets and uniforms and then
assembled and they slid easily down their respective hatches. The commander’s
hatches were put on after the figure was in place. The last pieces are the tank
dessants handles. All Russian tanks later carried their own tank “dessants” or
riders. These men had an average life span of three days and were there so they
could quickly exploit the break through achieved by the tanks. Because of this,
all Russian tanks, including those given to them by the Americans and British
were also quickly fitted with metal handles around the turret so the dessants
had something to hold onto while riding their mount. These handle are pretty
thin and “crispy” to say the least! I carefully slip them off, then using a very
sharp hobby knife, trimmed them before gently putting them on the correct spot.
The final spots were the exhaust pipes. I used burnt metal and exhaust to
simulate the heat and gas soot in this area. Tank done!
Then come the figures. These are painted first on the
tree with flesh faces and hands, flat black helmets and uniforms and then
assembled and they slid easily down their respective hatches. The commander’s
hatches were put on after the figure was in place. The last pieces are the tank
dessants handles. All Russian tanks later carried their own tank “dessants” or
riders. These men had an average life span of three days and were there so they
could quickly exploit the break through achieved by the tanks. Because of this,
all Russian tanks, including those given to them by the Americans and British
were also quickly fitted with metal handles around the turret so the dessants
had something to hold onto while riding their mount. These handle are pretty
thin and “crispy” to say the least! I carefully slip them off, then using a very
sharp hobby knife, trimmed them before gently putting them on the correct spot.
The final spots were the exhaust pipes. I used burnt metal and exhaust to
simulate the heat and gas soot in this area. Tank done!
| CONCLUSIONS |
Overall, you can certainly achieve something of lesser known tank in a very short amount of time with this kit! It has no major vices except the rather thin and crispy tank dessant hand rails. The rest is just chessy peesy for even a modeler with just a few glue kits under their belt and again, these things are just great practice for weathering techniques since well, tanks are awful dirty things and the Russians especially used, abused and rode their vehicles HARD (and sometimes right into the ground and then some!) so some of them are very very dirty so you can go hog wild with it and still come out looking good! Highly recommended!
11 March 2019
Copyright ModelingMadness.com. If you would like your product reviewed fairly and fairly quickly, please
contact
the editor or see other details in the
Note to
Contributors. Back to the Main Page
Back to the Review
Index Page
Back to the Previews Index Page