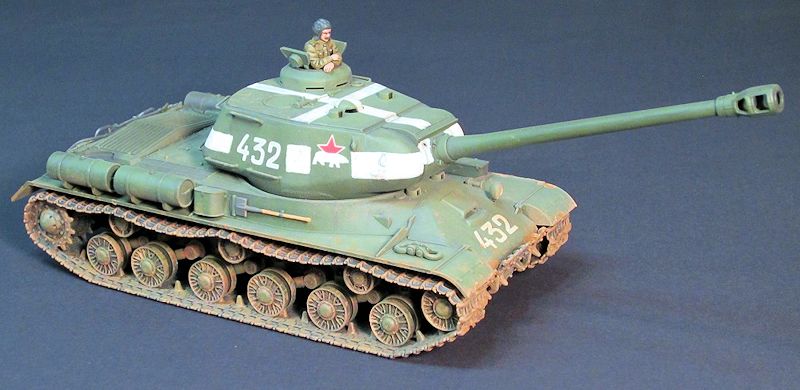
Tamiya 1/48th
JS-2 model 1944 ChKZ
| KIT #: | 32571 |
| PRICE: | $41.00 |
| DECALS: | Four options |
| REVIEWER: | Jonathan Prestidge |
| NOTES: |
| HISTORY |
The JS-2 was
an evolution of the original Russian monster tank, the KV-1. When it first
entered combat on the Eastern Front, the KV-1 gave the Germans fits since it was
all but unstoppable. Though poor usage by the Russian Army minimized the effect
of the KV-1, it and the T-34 inspired the German High Command to push for
larger, better-armed and armored tanks like the Tiger and Panther. The Russians
responded to the newer German machines with the JS-2. Its massive, 122mm cannon
dwarfed the Tiger’s 88mm weapon. However, even though the JS-2 had the biggest
gun on the block, the 122mm ammunition was a 2 part type, resulting in a slow
rate of fire and limited internal ammunition storage, both of which were
liabilities in tank
 vs. tank
warfare. More than just Main Battle Tanks, the JS-2s were also used as assault
weapons against German fortifications and functioned in the infantry support
role.
vs. tank
warfare. More than just Main Battle Tanks, the JS-2s were also used as assault
weapons against German fortifications and functioned in the infantry support
role.
| THE KIT |
 Tamiya’s
1/48th JS-2 is kit No. 71 in their Military Miniatures series. The
instructions are well printed and easy to follow. The engineering of the Tamiya
JS-2 is superb, resulting in beautiful detail without difficult construction or
an excessive parts count. The kit is crisply molded in green plastic and there
is almost no flash on the kit parts. One commander figure is included. The
molding of the figure is good. The kit decals are thin, in register, and provide
markings for four Soviet Armor Green tanks - two tanks with white ID stripes on
their turrets from Berlin, April 1945, one Czechoslovak tank, and one Polish
tank. There are metal chassis weights and nice link and length tracks with the
longer portions pre-formed, minimizing assembly time.
Tamiya’s
1/48th JS-2 is kit No. 71 in their Military Miniatures series. The
instructions are well printed and easy to follow. The engineering of the Tamiya
JS-2 is superb, resulting in beautiful detail without difficult construction or
an excessive parts count. The kit is crisply molded in green plastic and there
is almost no flash on the kit parts. One commander figure is included. The
molding of the figure is good. The kit decals are thin, in register, and provide
markings for four Soviet Armor Green tanks - two tanks with white ID stripes on
their turrets from Berlin, April 1945, one Czechoslovak tank, and one Polish
tank. There are metal chassis weights and nice link and length tracks with the
longer portions pre-formed, minimizing assembly time.
| CONSTRUCTION |
 This was
only my second tank build. As such, I started by carefully reviewing the kit
instructions. I decided to follow the kit instructions to the letter up thru
step 9, assembling the chassis and tracks followed by the upper hull. I skipped
only a portion of step 10 (attaching the upper hull to the chassis and attaching
the tow cables) to more easily facilitate painting and weathering. The turret
was then assembled per steps 11 thru 13 in the instructions. The excellent fit
of the parts, minimal cleanup and excellent engineering really made for a
rewarding and painless build. After about six hours of building, I had the three
main components (chassis, upper hull and turret) ready for paint.
This was
only my second tank build. As such, I started by carefully reviewing the kit
instructions. I decided to follow the kit instructions to the letter up thru
step 9, assembling the chassis and tracks followed by the upper hull. I skipped
only a portion of step 10 (attaching the upper hull to the chassis and attaching
the tow cables) to more easily facilitate painting and weathering. The turret
was then assembled per steps 11 thru 13 in the instructions. The excellent fit
of the parts, minimal cleanup and excellent engineering really made for a
rewarding and painless build. After about six hours of building, I had the three
main components (chassis, upper hull and turret) ready for paint.
| COLORS & MARKINGS |
It is
difficult to find a color scheme for the JS-2 that is anything other than Soviet
Armor Green. I went with the most colorful of the kit markings - option “A”, a
JS-2 with the 7th Independent Guards Heavy Tank Brigade, April 1945,
Berlin. First, everything was airbrushed PolyScale acrylic Dark Green FS34079 (a
good match for Soviet Armor Green) thinned with Future. Thinning with Future
helped the paints spray better and the satin finish was better suited to
washes/filters. Once the entire model had been sprayed, I added some PolyScale
Israel Khaki to the Dark Green and sprayed various panels on the upper surfaces
of the upper hull
 and turret.
I did this to give some tonal variation to the Dark Green.
and turret.
I did this to give some tonal variation to the Dark Green.
I used the
excellent, kit-supplied marking guide as my primary reference for hand brushing
the ID stripes. These stripes were hand applied in the field and brush painting
them is much more realistic than masking and airbrushing them. The tracks were
brush-painted dark gray next. I used a tooth pick to pull the tracks away from
the idlers while I painted them. They were dry-brushed with Testors oil-based
silver prior to weathering.
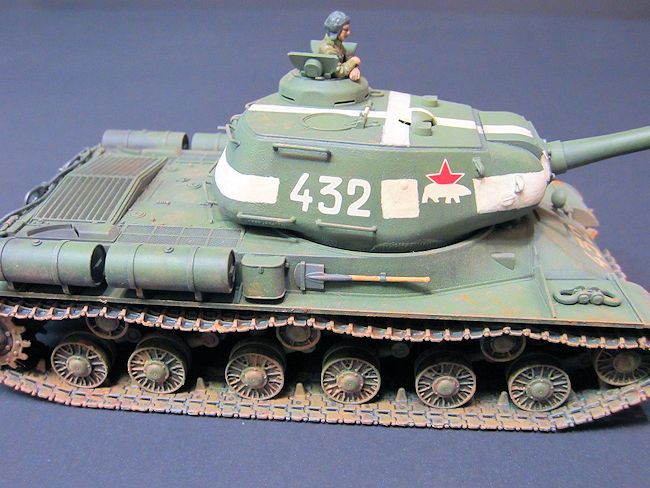
Next came
the fun part – weathering! I have always enjoyed seeing dirty, muddy, stained
and faded armor models. I started the weathering process by applying a thin,
black, soapy water filter/wash. I went section by section, using a Q-tip to
remove some of the wash and to streak it unevenly. I then dry-brushed some
thinned Dark Green to accent detail and further vary tone. The tracks and
chassis were strategically dry brushed with several layers of differing shades
of brown and tan paint to approximate dusty, muddy European conditions in which
these tanks operated. Good pictures of actual JS-2s proved invaluable during the
weathering process.
| FINAL CONSTRUCTION |
The upper
hull was glued to the chassis and the turret was then added prior to decaling. I
brush-painted several coats of Future in the areas where decals were to be
applied. After letting the Future dry overnight, I started to apply the kit
decals. They were very thin and very sticky, not wanting to mov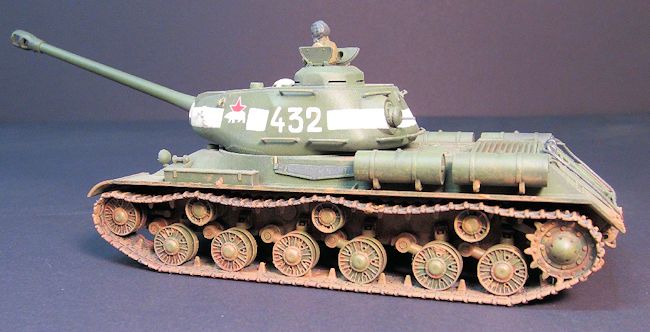 e
once they were placed on the model. Having had a similar experience on a Tamiya
Matilda, I was prepared this time. I wet the area where the decal was to be
placed and made sure that my first placement of the decal on the model was as
close to the final resting place as possible, therefore requiring minimal
adjustment. Once the decals were in place they settled down with no silvering
and responded well to an application of MicroSol.
e
once they were placed on the model. Having had a similar experience on a Tamiya
Matilda, I was prepared this time. I wet the area where the decal was to be
placed and made sure that my first placement of the decal on the model was as
close to the final resting place as possible, therefore requiring minimal
adjustment. Once the decals were in place they settled down with no silvering
and responded well to an application of MicroSol.
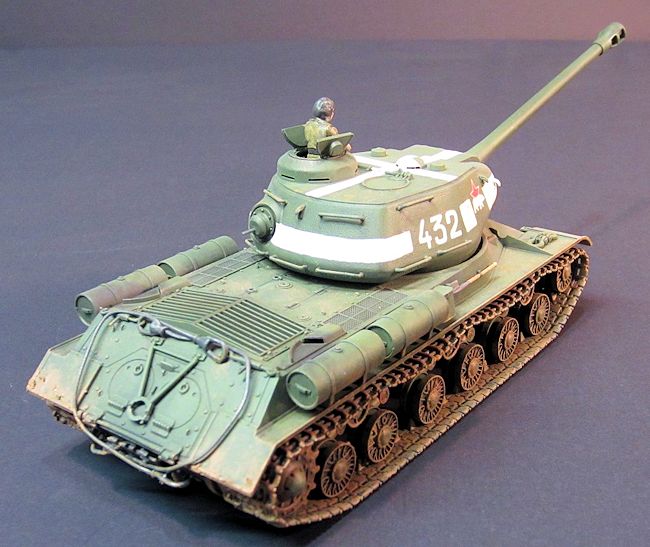
I added the
tow cables and commander figure at this time. I then air-brushed Poly Scale Flat
Clear mixed with a few drops of Hazel Tan over the entire tank. I used pastels
to further dirty the JS-2. Finally, I added thickened brown paint scraped from
the lids of my paint containers with a toothpick to depict mud on the tracks &
fenders. Final detailing was then completed.
| CONCLUSIONS |
March 2014
If you would like your product reviewed fairly and fairly quickly, please contact the editor or see other details in the Note to Contributors.