
Tamiya 1/35 BT-7 model 1935
| KIT #: | 35309 |
| PRICE: | $30-50.00 |
| DECALS: | Five options |
| REVIEWER: | Scott Lyle |
| NOTES: |
|
| HISTORY |
Yet another Soviet interwar family of tanks built in large numbers, the BT tank series sprang ironically from the American Christie tank, a “convertible” tank that could be driven with or without its tracks. Intended to be the cavalry tank of the Soviet forces, the BT tank would ultimately see combat in the Spanish Civil War, the Mongolian campaign, the Winter War against Finland, and of course, World War II. Despite a modest career, the BT tanks served perhaps most importantly as the forerunner of one of the greatest tanks of all time, the T-34.
American automotive engineer J.
Walter Christie created several innovative, if eccentric tank designs during the
1920s. Though they failed to garner much interest from the US Army, his
“convertible” tank concept attracted attention from several foreign governments.
Designed to alleviate the need for a fleet of t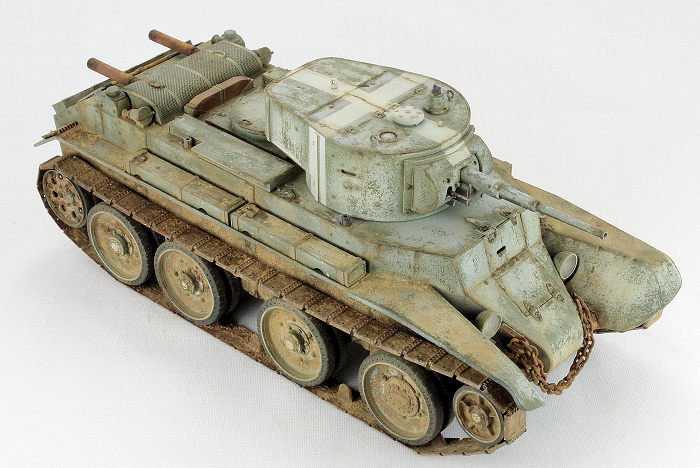 rucks
to transport tanks across great distances, Christie’s convertible sported large
road wheels and a chain-driven rear wheel that could actually drive the tank
across roads like a car once the tracks were removed. While the US Army passed
on the idea, the Soviet Union decided to invest in the design. Skirting around
laws prohibiting the sale of arms to foreign countries, Christie sold two of the
vehicles to the Soviets in 1931, who decided to put the Christie design into
production as the BT-2.
rucks
to transport tanks across great distances, Christie’s convertible sported large
road wheels and a chain-driven rear wheel that could actually drive the tank
across roads like a car once the tracks were removed. While the US Army passed
on the idea, the Soviet Union decided to invest in the design. Skirting around
laws prohibiting the sale of arms to foreign countries, Christie sold two of the
vehicles to the Soviets in 1931, who decided to put the Christie design into
production as the BT-2.
Development of the tank continued in parallel with production, resulting in the 45mm gun armed BT-5 in 1933, followed by the BT-7 in 1935. The fundamentals of the tank did not change much during that time. It was manned by a crew of three; a driver in the front of the hull, a gun loader in the right side of the turret and the commander/gun aimer on the left side. The large helical springs of the Christie suspension consumed a lot of space in the interior, making the BT rather cramped. All BT tanks retained the convertible capability, though the time it took to transform the tank meant it was not done on a regular basis. The 45mm gun was held in high esteem, both for its anti-tank and high explosive capabilities.
BT-5s were sent to Spain in 1937 where they earned a solid reputation, though poor Spanish tactics soon depleted their ranks. The BT debuted in combat for the Soviets during the Khalkin Gol campaign of the summer of 1938. A political purge wiped out the tank unit’s leadership just before the battle, but the tanks generally acquitted themselves well. The campaign resumed during the summer of 1939 with more intensity as the Japanese improved their tactics and took a stiffer toll of the Soviet tank forces.
The BT saw deployment to Poland during the tail end of the German invasion in late September 1939. The action entailed mostly long road marches that revealed the poor condition of Soviet maintenance, reliability, and logistics.
 On
November 30, 1939, the Soviet Union began its invasion of Finland, and this time
dubious Soviet leadership and tactics against a skilled and resourceful foe
brought near catastrophe. Lingering mechanical reliability issues also hampered
the effectiveness of their tank forces, as did the heavy snow and stubborn
Finnish anti-tank defenses.
On
November 30, 1939, the Soviet Union began its invasion of Finland, and this time
dubious Soviet leadership and tactics against a skilled and resourceful foe
brought near catastrophe. Lingering mechanical reliability issues also hampered
the effectiveness of their tank forces, as did the heavy snow and stubborn
Finnish anti-tank defenses.
The start of World War II saw the Soviet tank force in a rather ragged state, still trying to recover from the various purges and previous conflicts. With some 23,000 tanks in its inventory the Red Army looked ferocious on paper. In reality most of those tanks were old and broken down, and the level of crew training and tactical leadership was less than adequate. The majority of losses in 1941 were not to enemy action but to mechanical breakdowns.
Operation Barbarossa would prove to be an absolute disaster for the Soviet tank force. In the first three weeks of the campaign the Soviets lost some 11,700 tanks compared to less than 500 for the Germans. The massive gulf between the two armies in leadership, tactics, and experience resulted in the near loss of the war for the Soviets in those early months.
As a result of the losses sustained in 1941 there simply weren’t many BT tanks left to serve in 1942. Between the heavy losses and the emergence of the T-34, the few BT tanks that were still serviceable were relegated to rear units. A few fought in the Far East towards the end of the war, but all BTs were retired by 1946.
| THE KIT |
 Tamiya
issued their 1/35 scale BT-7 Model 1935 in 2010 and followed that up with a
Finnish assault gun version (BT-42) in 2011 and the Model 1937 in 2013. Upon
opening the box you are greeted by five sprues of medium green parts, all molded
to the high level we have come to know and love from Tamiya. A small sprue of
clear parts, a fret of photo etch engine grill covers, poly-caps and a length of
heavy chain round out the box contents.
Tamiya
issued their 1/35 scale BT-7 Model 1935 in 2010 and followed that up with a
Finnish assault gun version (BT-42) in 2011 and the Model 1937 in 2013. Upon
opening the box you are greeted by five sprues of medium green parts, all molded
to the high level we have come to know and love from Tamiya. A small sprue of
clear parts, a fret of photo etch engine grill covers, poly-caps and a length of
heavy chain round out the box contents.
Tamiya gives you the option of adding the frame antenna around the turret to make the radio variant of the tank. The tracks are the link and length variety, and decals are provided for five different vehicles, including one captured by the Germans. A separate multi-language background of the BT-7 completes the package.
| CONSTRUCTION |
Unlike most tank kits that provide a hull tub and have you start attaching the suspension bits, this kit has you build up the hull from separate wall and floor plates. The BT-7’s unique wedge-shaped front is nicely replicated by attaching angled plates to the front of the hull’s sidewalls. The sidewalls are then spaced apart by front and rear rods and a center bulkhead, all of which fit together nicely. The hull deck plate comes next and it too fits perfectly, clicking crisply into place and softly whispering “…Tamiya…” in your ear in the process.
 The
suspension arms and somewhat complex front steering linkages consume the next
few steps. The instructions would have you next assemble the wheels and tracks
to the hull, but I left those off until some painting and weathering had been
done.
The
suspension arms and somewhat complex front steering linkages consume the next
few steps. The instructions would have you next assemble the wheels and tracks
to the hull, but I left those off until some painting and weathering had been
done.
Moving to the upper hull, Tamiya provides a very clever fixture to help with bending the curved, photo etch engine grills. Once bent, those grills are glued to the rear deck along with several other boxes, hatches and the like. The left and right fenders go on next, their fit perfect and their top surfaces soon to be populated with rectangular gas tanks and more small details.
Moving on to the turret, the gun and mantlet are first assembled together. In the next step you have to decide if you’re going to add the radio ring onto the turret or not – if you are, you have to first open up some small holes.
The turret halves are then glued together, sandwiching the turret roof in the process. The gun mantlet fits next followed by several small turret details at which point you’re basically done with the construction phase. Very fast and trouble free!
| COLORS & MARKINGS |
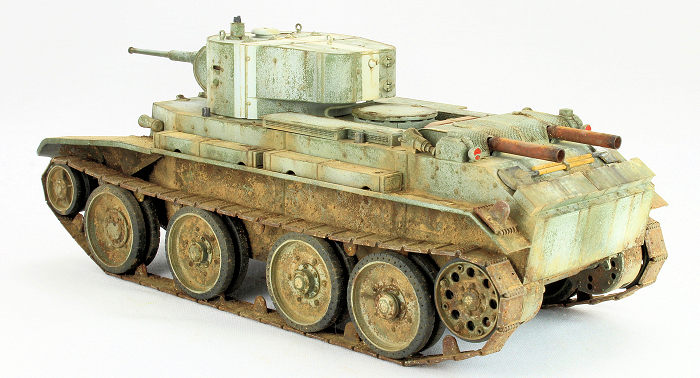
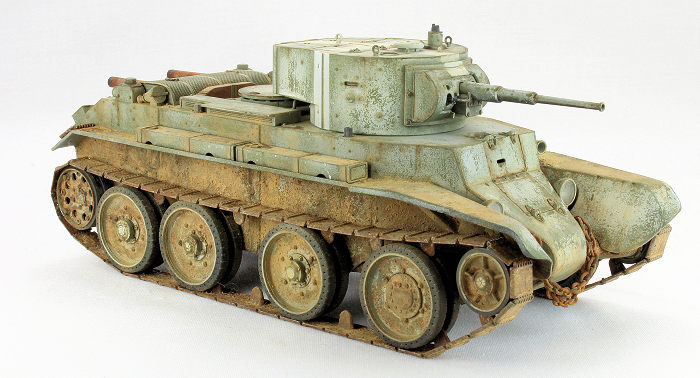
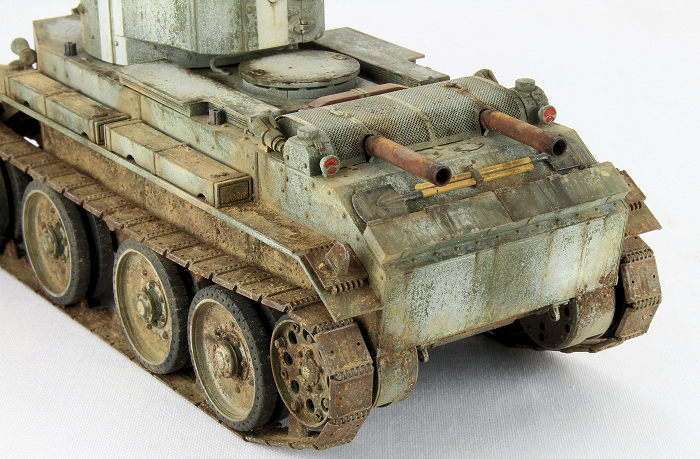
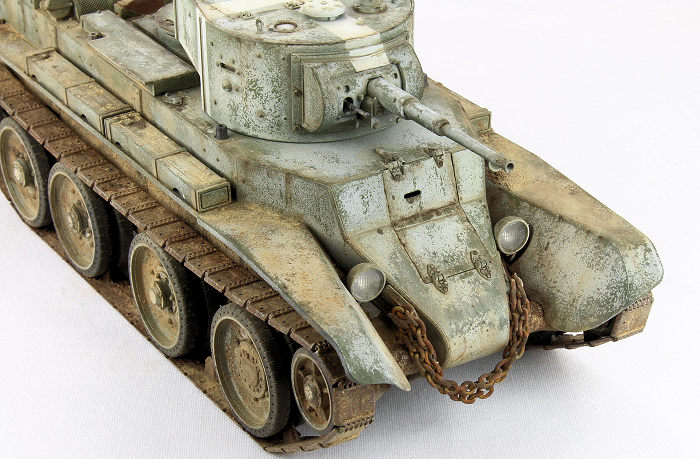
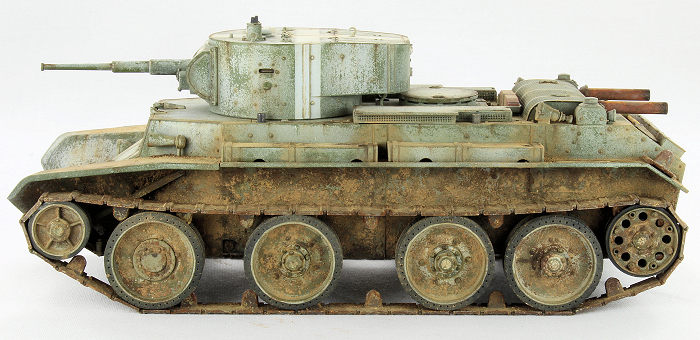
My ambition for this project was to achieve a couple of firsts – my first attempt at a badly worn winter whitewash effect, and to achieve that, my first attempt at the “hairspray technique” But before I could do any of that I first primed the model with Tamiya’s Liquid Surface Primer. I then painted the entire tank Tamiya XF-69 NATO Black. For the base coat of “Soviet Green” I chose Tamiya XF-67 NATO Green, misting it on lightly around the suspension to keep it darker but laying it on thicker the higher up on the tank to create a graduated effect. A little bit of XF-2 Flat White was added to the mix and sprayed on the upper surfaces. For the only markings on the tank I masked off the turret with Tamiya masking tape and sprayed a Flat White cross onto it. Once dry, it was time for hairspray….
 I’ve read
about the “hairspray technique” in magazines for a few years now and its ability
to create a really convincing, finely chipped paint effect. It is ideal for any
situation where a temporary coat of paint has been applied over a basecoat and
is then gradually worn away. I’ve wanted to give it a try for a while now and
the image of a badly worn, wintery BT-7 was firmly entrenched in my brain.
I’ve read
about the “hairspray technique” in magazines for a few years now and its ability
to create a really convincing, finely chipped paint effect. It is ideal for any
situation where a temporary coat of paint has been applied over a basecoat and
is then gradually worn away. I’ve wanted to give it a try for a while now and
the image of a badly worn, wintery BT-7 was firmly entrenched in my brain.
I chose Tresemme Ultra Fine Mist and misted it over the whole model, straight from the can. It imparts a glossy sheen to the model and smells terrific! I then airbrushed Tamiya XF-2 Flat White (note: thin the paint with water or their acrylic thinner – do not use lacquer thinner, it will eat through the hairspray) onto the model, being careful to lightly cover the model not with a uniform coat of white but with more of a splotchy coat. Once dry it was time for the fun to begin.
Wetting an old brush with water, I began lightly scrubbing the white areas, and watched in amazement as the white paint began to come off in very small chips. The technique is very controllable - by that I mean you can vary how much paint you remove by varying how hard you scrub. I didn’t have disappointing moments either, where too much paint came off too fast. The technique seemed to work in a very controlled, predictable fashion. I noticed the areas where the paint did not come off were areas where I did not spray on enough hairspray. So next time I will make sure to give all areas a good coat of hairspray!
I can see why so many are enthralled with this technique. It is controllable, fun, instantly gratifying, and the options are endless. It can be applied to virtually any modeling subject, not just tanks but also aircraft, rusty old cars, even dinosaurs and sci-fi models. That being said, like any technique there is a learning curve. Next time I will lay the white coat on a bit thicker and “stronger” so that it is a bit more opaque.
 After
working away at the whitewash for a couple of nights I was ready to move on to
the next weathering steps. I first added a pin wash using a 50/50 mix of MIG
Productions’ Brown Wash and Dark Wash. That was followed by a few different
applications of pigments. Turning the tank on its side I applied some MIG
Pigments’ Dark Mud, Russian Earth and Europe Dust to the tops of the fenders and
the sidewalls under the fenders. I used MIG Pigments Fixer with an eye dropper
to fix them all in place.
After
working away at the whitewash for a couple of nights I was ready to move on to
the next weathering steps. I first added a pin wash using a 50/50 mix of MIG
Productions’ Brown Wash and Dark Wash. That was followed by a few different
applications of pigments. Turning the tank on its side I applied some MIG
Pigments’ Dark Mud, Russian Earth and Europe Dust to the tops of the fenders and
the sidewalls under the fenders. I used MIG Pigments Fixer with an eye dropper
to fix them all in place.
Once the pigments were dry I blended some dark brown oil paint onto the outer edges of various hatches to replicate chipping and wear. Some more subtle streaks were added to the various vertical surfaces, and dark stains were added to the horizontal surfaces on the engine deck to replicate oil and fuel stains.
Next up was to assemble the tracks, which are the link and length variety in this kit. I first painted them Vallejo Panzer Aces Track Primer, then followed that up by dry-brushing them some light rust shades. They were then mounted to the tank. The fit was good, but you have to pay attention to the order in which the various links are mounted. Once they were set I coated them with the same pigments as above to tone down the bright rust colors.
At this point just a few final steps remained. The clear lenses were added to the headlights. The rear lights were painted red and then given a coat of gloss. A few more stains and streaks were added here and there, and my winterized tank was complete.
| CONCLUSIONS |
I used more hairspray on my model than I ever used on my (long gone) hair, but the results were definitely worth it. I look forward to trying the hairspray technique again in the near future to see what neat results I can come up with.
Tamiya’s BT-7 is yet another beautiful addition to their armored collection and the perfect kit for weathering effects. The fit of the parts is what we’ve come to expect and love from Tamiya and the quick and trouble free build allows you to get to the painting and weathering steps. Highly recommended!
| REFERENCES |
- Steve Zaloga, Osprey Publications, New Vanguard #237, “BT Fast Tank”
If you would like your product reviewed fairly and fairly quickly, please contact the editor or see other details in the Note to Contributors.
Back to the Main Page Back to the Review Index Page Back to the Previews Index Page