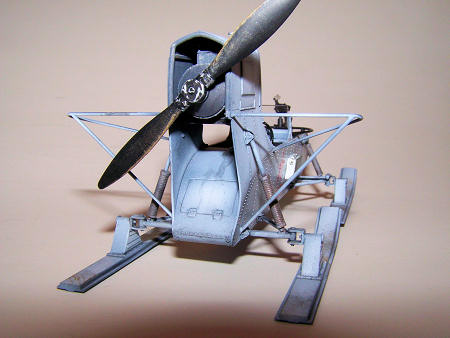
Trumpeter 1/35 RF-8/GAZ- 98 Aerosan
|
KIT #: |
02322 |
|
PRICE: |
$11.00 SRP |
|
DECALS: |
One option |
|
REVIEWER: |
Bill Koppos |
|
NOTES: |
Simplified but fun |
An aerosan (Russian: aэросани, aerosani, literally 'aerosled') is a
type of propeller-powered snowmobile, running on skis, used for
communications, mail deliveries, medical aid, emergency recovery and border
patrolling in northern Russia, as well as for recreation. Aerosans were used
by the Soviet Red Army during the Winter War and the Second World War.
The first aerosans may have been built by young Igor Sikorsky in 1909–10,
before he built multi-engine airplanes and helicopters. They were very light
plywood vehicles on skis, propelled by old airplane engines and propellers.
Military use of the aerosani goes back to at least the 1920s. During the
1939–40 Winter War against Finland, some were equipped with a machine-gun
ring mount on the roof. They could carry four to five me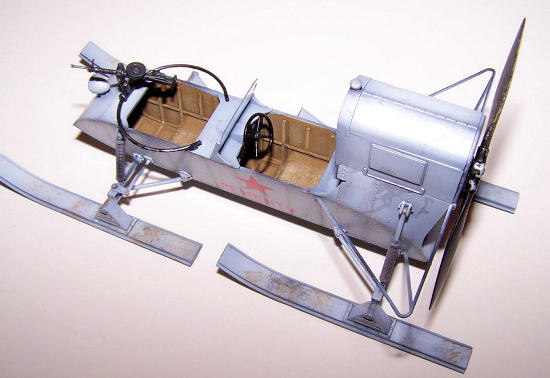 n, and tow four more
on skis. The aerosanis were initially used for transport, liaison, and
medical evacuation in deep snow, and mostly used in open country and on
frozen lakes and rivers because of their poor hill-climbing ability and
limited maneuverability on winding forest roads.
n, and tow four more
on skis. The aerosanis were initially used for transport, liaison, and
medical evacuation in deep snow, and mostly used in open country and on
frozen lakes and rivers because of their poor hill-climbing ability and
limited maneuverability on winding forest roads.
During WWII, aerosans were found to be useful for reconnaissance and light
raiding in northern areas, thanks to their high mobility in deep snow (25–35
km/h, where many vehicles couldn't move at all). Responsibility for aerosans
was transferred to the Soviet Armoured Forces (GABTU) and orders were
submitted for design and fabrication of lightly armoured versions, protected
by ten millimetres of steel plate on front. They were organized into
transport or combat battalions of 45 vehicles, in three companies, often
employed in co-operation with ski infantry. Troops were usually carried or
towed by transport aerosans, while fire support was provided by the heavier
machine gun-armed, armoured models. Aerosans were not used for direct
assault because of their vulnerability to explosives such as mortar rounds.
The ANT-I through ANT-V were a successful series of aerosans of the 1920s
and ’30s, designed by aircraft engineer Andrei Tupolev. However, there is
reason to believe that in 1924 the Soviets obtained plans and specifications
for 'air sleighs' from Chester B. Wing, an aviator, automobile dealer and
former mayor of St. Ignace, Michigan, U.S.A. He had built practical
aerosleds to aid transportation across the ice between St. Ignace and
Mackinac Island, and for use by fishermen. The Spring 1943 issue of the
magazine Science and Mechanics states that "from his aerosleds the Russians
developed their present battle sled." The claim though has to be viewed in
the context of a picture of an Igor Sikorsky machine in Kiev pre-WWI.
The first military aerosanis used in Finland, the KM-5 and OSGA-6 (later
called NKL-6), were initially built at the Narkomles Factory in Moscow.
During WWII, improved NKL-16/41 and NKL-16/42 models were built, and
production started at the ZiS and GAZ car factories, and at smaller
industries such as the Stalingrad Bekietovskiy Wood Works. In 1941 the
armoured NKL-26, designed by M. Andreyev, started production at Narkomles.
The following year, Gorki Narkorechflota developed the smaller, unarmoured
GAZ-98, or RF-8, powered by a GAZ-M1 truck engine and durable metal
propeller. There was also an ASD-400 heavy assault sled used in WWII.
I first learned of the existence of this contraption when on my Wednesday
wargame night at my buddy's house he trotted out a unit of weird looking ski
sleds, for use in the upcoming Russian front scenario. My question of "WTF
is that?" was answered by "It's an Aerosan of course!" Learn something new
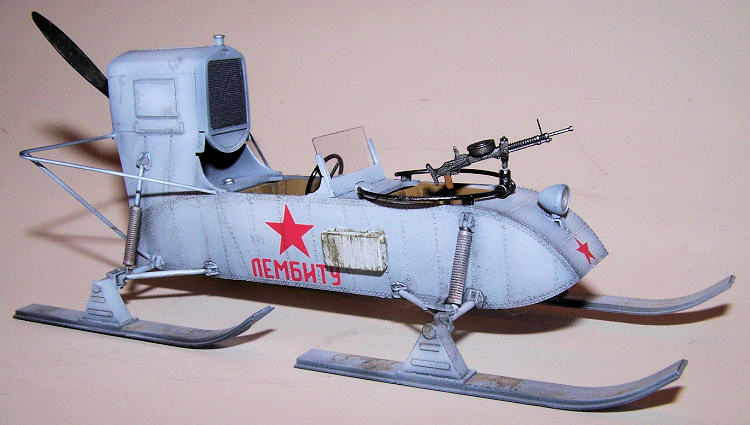
every day. I liked it immediately, and when Trumpeter released this new 1/35
scale kit of the 2 major models, I grabbed the first one I could get, which
was the low-riding RF-8 version.
The kit gives you 3 sprues of good Trumpeter plastic, an acetate sheet with
punch-out windscreen and headlight lens, and a small decal sheet for one
sloganed machine. An etched fret provides 2 brass gunsights for your main
battery. Picture type Instruction sheet and color painting complete things.
Let's propel ourselves forward.
First one assembles the inline engine, a detailed little thing that will be
unfortunately well hidden when installed. This kit is aircraft-like in that
the interior has to be painted before the "fuselage" is closed up. The
instructions call for a Khaki base, and this was done with a coat of Humbrol
# 26 Khaki. A word to the wise here- I usually cut strips of masking tape
and tape off the join lines, as I hate scraping paint before glueing. On
this one, the tape would NOT stick even though I wiped the surfaces down
with alcohol as I usually do. I had to resort to the old soap and water
wash, and now the tape stuck. Bottom line is the mold re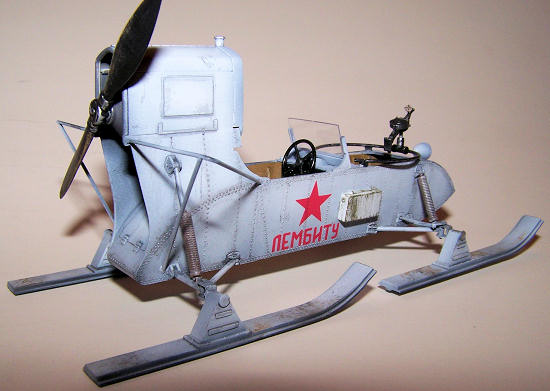 lease agent on this
one is really strong, so give the sprues a good washing first.
lease agent on this
one is really strong, so give the sprues a good washing first.
After the Khaki, I washed the raised firring strip detail with black sludge
for shadows, and drybrushed the raised areas with some Buff for highlites
and to give a plywood effect. This was done on the seats also. I sprayed the
engine and insides of the upper/rear engine area dark grey. Now, not
forgetting our engine mounts, the body was closed up, and the seats glued
in. the rear seat required some trimming on the sides to get her down;
test-fit first. Engine installation follows, then the radiator. Skis are
next, the fit of the springs and rods being really spot on, as all other fit
has been so far. The skis themselves are a bit loose, I assembled them all,
then applied cement to the pivots all at once, laying the model on a flat
surface, and putting a metal ruler against the sides to line them up. I'm
pretty sure these would never be perfectly aligned in reality, the steering
probably being something like a Flexible Flyer sled, but I don't want to
hear it from any nit-pickers.
Now the nicely molded propeller guards were carefully cut off the prues and
trimmed up, lining the lower ones to the tops are the only tricky bit of
assembly in the kit. An instrument panel with for empty gauges is given you.
I painted the gauge areas white enamel , let them dry, gave it an overall
acrylic flat black coat, and etched some needles in with a scriber. then the
gauges got a glosscoat, for the glass. I left the steering wheel off to ease
masking. Here we get into aircraft territory again as there is an interior
to mask off, and then the engine. I stuffed tissue into the "cockpits", and
covered over with tape. Onward! To the paint shop!
 My winter white paint jobs start off with Black, of course. A complete coat
of flat black, Testor's little glass jar flat. Next from the Testor's little
jar is Flat White, leaving sreaks and hints of the black undercoat showing
randomly, but mostly on the lower areas. An Hour later, I applied aseveral
coats of Testor's Metallizer Sealer (No, this is not a Testor's ad) as a
prep for decals and "sludging". 20 minutes later the decals were applied,
these being 3 red stars and 2 side slogans. At first I thought I would have
trouble, but they slowly reacted to the Solvaset decal solution, when the
wrinkles went away I carefully rolled them with a damp Q-tip, and they
conformed the way I wanted.
My winter white paint jobs start off with Black, of course. A complete coat
of flat black, Testor's little glass jar flat. Next from the Testor's little
jar is Flat White, leaving sreaks and hints of the black undercoat showing
randomly, but mostly on the lower areas. An Hour later, I applied aseveral
coats of Testor's Metallizer Sealer (No, this is not a Testor's ad) as a
prep for decals and "sludging". 20 minutes later the decals were applied,
these being 3 red stars and 2 side slogans. At first I thought I would have
trouble, but they slowly reacted to the Solvaset decal solution, when the
wrinkles went away I carefully rolled them with a damp Q-tip, and they
conformed the way I wanted.
Now the jar of black acrylic/water/soap based "sludge" was bought out, and
some was brushed lightly along the rivet lines, and hatch panels, steering
and pivoting links and engine area, anywhere we need oil or dirt. Excess was
removed from the rivet lines with an old dry short bristled brush, just
leaving a hint of shadow. Sometimes this needs redoing several times to get
right. To enter or exit this thang, the crew was going to have to tread upon
the skis, so these were dirtied up too, scratched up with dark grey, and
muddied up with a Tamiya weathering stick. Now another glosscoat seals
everything in. I was going to flatcoat it too, but it looked alright to me
as it was, kind of a wet look, so I left it alone.
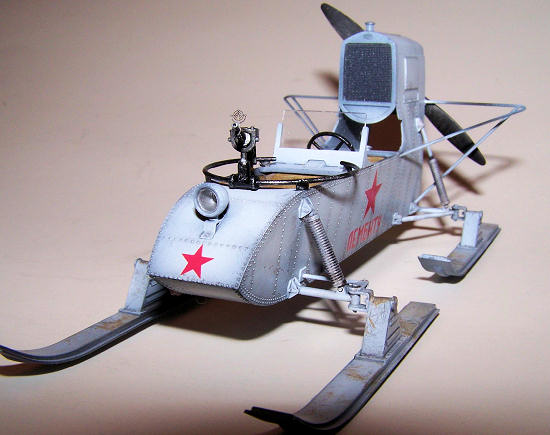
 The masking removed, it's time to attach the rest. Steering wheel was gloss
black. The machine gun ring was carefully cut out and cleaned up, painted
black with aluminum drybrushing, and glued up front. The assembled machine
gun got a steel color and a wooden grip, and the muzzle was hollowed out
using an X-Acto #11 blade tip. (Watch those fingers!). The pivot pops right
into the ring, and can swivel if not glued. It looks menacing with it's
photo-etched front sight. The acetate windscreen and headlight lens were cut
out, and attached with white glue. Slight trimming was needed on the screen,
after the inner headlight shell was painted aluminum, the lens popped right
in. The Propeller's hub got a coat of aluminum, the whole thing then got
brush painted flat black. Then I peeled some black off the hub, and drybrushed some light brown on the blades for a worn wood look. Let's ride!
The masking removed, it's time to attach the rest. Steering wheel was gloss
black. The machine gun ring was carefully cut out and cleaned up, painted
black with aluminum drybrushing, and glued up front. The assembled machine
gun got a steel color and a wooden grip, and the muzzle was hollowed out
using an X-Acto #11 blade tip. (Watch those fingers!). The pivot pops right
into the ring, and can swivel if not glued. It looks menacing with it's
photo-etched front sight. The acetate windscreen and headlight lens were cut
out, and attached with white glue. Slight trimming was needed on the screen,
after the inner headlight shell was painted aluminum, the lens popped right
in. The Propeller's hub got a coat of aluminum, the whole thing then got
brush painted flat black. Then I peeled some black off the hub, and drybrushed some light brown on the blades for a worn wood look. Let's ride!
One heck of a fun little model. For the Ten bucks or so you spend one would
be hard pressed to find more modeling enjoyment. Low parts count with enough
detail to look good and excellent fit throughout. If references could be
found there is room for embellishment (the interior seems sparse to me, even
for a Russian machine, and where is the tailpipe?) but that would miss my
point. Build and enjoy. I want a real one! Winter approaches.
Only Wikepedia at this time.
Bill Koppos
October 2011
Kit courtesy of my whims
If you would like your product reviewed fairly and fairly quickly, please contact the editor or see other details in the
Note to
Contributors.
Back to the Main Page
Back to the Review
Index Page