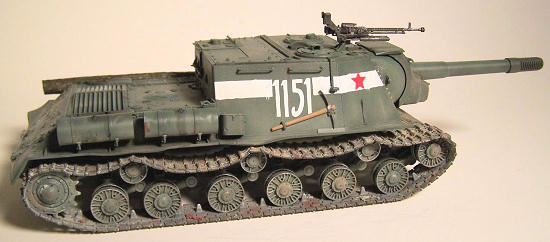
Tamiya 1/35 JSU-152
|
KIT #: |
35303 |
|
PRICE: |
$59.00 MSRP |
|
DECALS: |
Four options |
|
REVIEWER: |
Bill Koppos |
|
NOTES: |
A Tamiya slammer |

 The JSU
152 was a development of the KV based SU 152, this time a 152 Howitzer on a
Josef Stalin chassis. This vehicle was used as basically a big mobile
nutcracker, able to blow down medium size buildings and Panther turrets with
one shot. Used in independent units, these were called in when the going got
rough. The huge slabs of frontal armor were good against German 75mm fire at
medium range, it's main disadvantage was the Ammo was so huge only 20 rounds
could be carried internally. Russian soldiers referred to it as "Beast
Killer", and said of it "Nekrasivo, no Spasivo" ("Not pretty, but thanks!")
Use started in summer 1944 up till the fall of Berlin, and postwar.
The JSU
152 was a development of the KV based SU 152, this time a 152 Howitzer on a
Josef Stalin chassis. This vehicle was used as basically a big mobile
nutcracker, able to blow down medium size buildings and Panther turrets with
one shot. Used in independent units, these were called in when the going got
rough. The huge slabs of frontal armor were good against German 75mm fire at
medium range, it's main disadvantage was the Ammo was so huge only 20 rounds
could be carried internally. Russian soldiers referred to it as "Beast
Killer", and said of it "Nekrasivo, no Spasivo" ("Not pretty, but thanks!")
Use started in summer 1944 up till the fall of Berlin, and postwar.
This brand new model kit from Tamiya is another
excellent addition to their parade of armor. Based on the recent JS-2 Stalin
Tank kit, the Beast Killer is beautifully represented. The first thing one
notices on box opening is that there are much fewer sprues and parts than a
Dragon mega kit, looking much less scary to part-time armor builders like
me. Molded in Dark Green, the main parts are textured to represent the rough
castings of Soviet factories., featuring rough torch cuts and pitted plates
in the 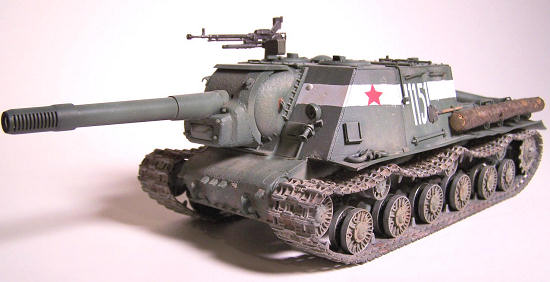 right
areas. The big ol' main gun is well molded, the muzzle brake's fine slots
are beautifully done. The wheels have no center seams, just clean up the
sprue nubs and install. A plastic line-up tool is in the kit to make sure
all the suspension arms are in line with no wheel wobble. Each wheel
including the return rollers have poly caps in them, more on this later,.
Two types of tracks are given, a link and length set and a rubber set. The
rubber set looks well done, but these are really obsolete these days, and
Tamiya could have saved the money. The cast set is nice, but has ejector pin
marks that might drive hardcore armor guys crazy .(I just let them be).
There are some extra links, which is good, as I wanted a lot of sag in my
tracks, as seen in photos. Photo-etch intake screens are included, as is a
rope and end tow cable and clear headlight. The decal sheet allows choice of
4 hulking vehicles.
right
areas. The big ol' main gun is well molded, the muzzle brake's fine slots
are beautifully done. The wheels have no center seams, just clean up the
sprue nubs and install. A plastic line-up tool is in the kit to make sure
all the suspension arms are in line with no wheel wobble. Each wheel
including the return rollers have poly caps in them, more on this later,.
Two types of tracks are given, a link and length set and a rubber set. The
rubber set looks well done, but these are really obsolete these days, and
Tamiya could have saved the money. The cast set is nice, but has ejector pin
marks that might drive hardcore armor guys crazy .(I just let them be).
There are some extra links, which is good, as I wanted a lot of sag in my
tracks, as seen in photos. Photo-etch intake screens are included, as is a
rope and end tow cable and clear headlight. The decal sheet allows choice of
4 hulking vehicles.
2 Crewmen are included, a loader (looking too anemic to
sling around 152mm shells) and a "Chef de Char" (commander). If you are
going to crew your Beast, put the commander in before the hatches, or he
will not go in. I buttoned mine up.
Assembly, as in all Tamiya products, is a breeze. Fit
is great all around. Just follow the instructions and all will go smooth.
Tamiya gives you a jig for the top run of track, with a "wave" in it to give
the track it's sag, but I wanted more. I started by
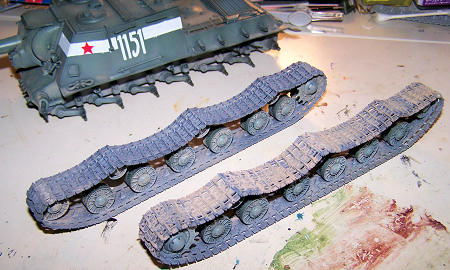 attaching
the straight bottom run, then worked my way around the front and rear by
glueing short sections together, letting the glue set up, and bending as
needed to get the sag I wanted. The links were also glued to the wheels as
I went. I think I used 2 more links per side than standard. When done,
this thing was badly in need of track maintenance, just like pictures I'd
seen of vehicles in Berlin. These things sag worse than Grandma's-well you
know. The poly caps in all the wheels let me use a trick. When I had all the
track links glued on and thoroughly dry, it was possible to carefully,
moving back and forth, slide the assembly off the hull as a unit. The only
problem here was the mud scrapers glued on to the hull stuck into the drive
sprockets, I broke 2 teeth getting the tracks past these. If you do this
trick glue the scrapers on after reassembly. Having the track assembly off
greatly eases the painting/weathering process. (Even though I found it very
hard to wait to get it back together). Another thing I wanted was the front
fenders torn off. Very few Russian tanks from this urban environment had any
fenders left, so I just left off both assemblies, and beat up the remaining
fenders using the ancient hot-light-bulb method.
attaching
the straight bottom run, then worked my way around the front and rear by
glueing short sections together, letting the glue set up, and bending as
needed to get the sag I wanted. The links were also glued to the wheels as
I went. I think I used 2 more links per side than standard. When done,
this thing was badly in need of track maintenance, just like pictures I'd
seen of vehicles in Berlin. These things sag worse than Grandma's-well you
know. The poly caps in all the wheels let me use a trick. When I had all the
track links glued on and thoroughly dry, it was possible to carefully,
moving back and forth, slide the assembly off the hull as a unit. The only
problem here was the mud scrapers glued on to the hull stuck into the drive
sprockets, I broke 2 teeth getting the tracks past these. If you do this
trick glue the scrapers on after reassembly. Having the track assembly off
greatly eases the painting/weathering process. (Even though I found it very
hard to wait to get it back together). Another thing I wanted was the front
fenders torn off. Very few Russian tanks from this urban environment had any
fenders left, so I just left off both assemblies, and beat up the remaining
fenders using the ancient hot-light-bulb method.
Painting starts with a coat of Testor's Flat Black,
then the base coat of ModelMaster Russian Armor green. Then some white was
added, and the larger flat areas lightened up. The tracks were done with
Panzer Grey mixed with a dab of Aluminum,
 spraying
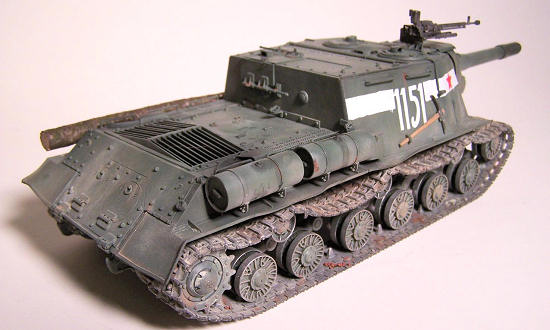
carefully around the wheels. Now the good part starts. I mixed some
"Concrete" (light grey) and "rubble dust" (Tan and white) and started
streaking underneath and the sides randomly. At this point I realized "Holy
Crap, I forgot the decals!", so I applied a coat of Tamiya Spray can clear
gloss to the decal areas. If a vehicle is in Berlin, it must have it's ID
stripes, and the one with the stripes and stars can be seen on U-tube,
crawling thru the wreckage. The Tamiya decals worked fine, reacting to
Solvaset perfectly, and laying down showing no film. I recently picked up
the Mig Pigment's "Urban Combat" set, which includes "Concrete", "Rubble
Dust" and Brick red pigments. These I mixed with some water and proceeded to
smear them all over my beast. I wanted this 152 to look like it just bowled
over an apartment building on Wilhelmstasse. Testing showed the pigments
would disappear under a flat coat so I left them as is. Time will tell if
they hold up. But for now, I like the look. Finally I rubbed all the contact
surfaces of the tracks with good ol' Silver Rub 'n Buff. In place of the
left hand fuel cells I put a large log (from my yard) as per a picture I
saw. Some rust streaks and exhaust and muzzle blast and I called it done.
spraying
carefully around the wheels. Now the good part starts. I mixed some
"Concrete" (light grey) and "rubble dust" (Tan and white) and started
streaking underneath and the sides randomly. At this point I realized "Holy
Crap, I forgot the decals!", so I applied a coat of Tamiya Spray can clear
gloss to the decal areas. If a vehicle is in Berlin, it must have it's ID
stripes, and the one with the stripes and stars can be seen on U-tube,
crawling thru the wreckage. The Tamiya decals worked fine, reacting to
Solvaset perfectly, and laying down showing no film. I recently picked up
the Mig Pigment's "Urban Combat" set, which includes "Concrete", "Rubble
Dust" and Brick red pigments. These I mixed with some water and proceeded to
smear them all over my beast. I wanted this 152 to look like it just bowled
over an apartment building on Wilhelmstasse. Testing showed the pigments
would disappear under a flat coat so I left them as is. Time will tell if
they hold up. But for now, I like the look. Finally I rubbed all the contact
surfaces of the tracks with good ol' Silver Rub 'n Buff. In place of the
left hand fuel cells I put a large log (from my yard) as per a picture I
saw. Some rust streaks and exhaust and muzzle blast and I called it done.
Overall I'm happy with my Beast. It's an easy build yet
authentic model of a vehicle I always found neat. I use Tamiya armor as a
break from aircraft when I get sick of interiors and canopies. This one is a
lot of fun, give it a try.
Eastern Front Camo and Markings Zaloga and Grandsen Arms and
Armour 1983
Wikepedia and Google Images
Bill Koppos
February 2010If you would like your product reviewed fairly and quickly, please
contact
me or see other details in the
Note to
Contributors.
Back to the Main Page
Back to the Review
Index Page