
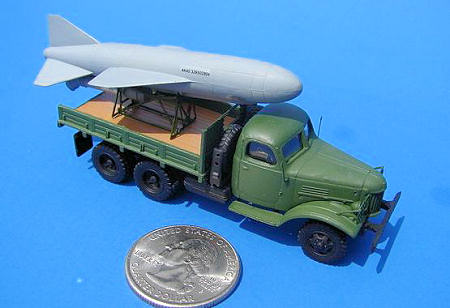
ZZ Modell 1/87 ZIS 151 Transport Vehicle with P-15 Anti-ship Missile
| KIT #: | 87019 |
| PRICE: | $24.95 |
| DECALS: | One option |
| REVIEWER: | Mark Hiott |
| NOTES: | Interesting subject, vague instructions |
| HISTORY |
See Scott’s preview (here) for history and the parts layout.
| THE KIT |
I have to admit when Scott asked me to do this review;
I w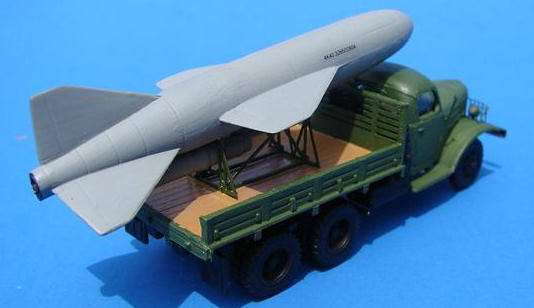 ent
“Huh?” I had never heard of ZZ Modell and had to check his preview to see what
it was. I must admit, however, that after opening the smallish box came in the
mail I was quite surprised. While the kit contains less then 50 parts (and 12 of
those are the wheels), the molding is very nice. The detail on all the parts is
crisp and sharp. There is a bit of flash on some of the parts but nothing that
10 minutes and a knife can’t cure. There are a few extra parts that will not be
used. The kit is molded in a somewhat brittle black plastic and the missile is
made up of three resin parts.
ent
“Huh?” I had never heard of ZZ Modell and had to check his preview to see what
it was. I must admit, however, that after opening the smallish box came in the
mail I was quite surprised. While the kit contains less then 50 parts (and 12 of
those are the wheels), the molding is very nice. The detail on all the parts is
crisp and sharp. There is a bit of flash on some of the parts but nothing that
10 minutes and a knife can’t cure. There are a few extra parts that will not be
used. The kit is molded in a somewhat brittle black plastic and the missile is
made up of three resin parts.
Two very nice pe frets are included; a brass one for the cab mirrors and headlight guards and one for the missile mounting. The missile mounting is of some kind of other metal, which is a bright copper color. It’s rather heavy but is very soft.
The instructions are a single side 5x7 sheet. The other side has a parts layout and decal placement for the missile. There are no decals for the truck. (But there are a number of military country badges for the doors as shown on the box art. Ed)
| CONSTRUCTION |
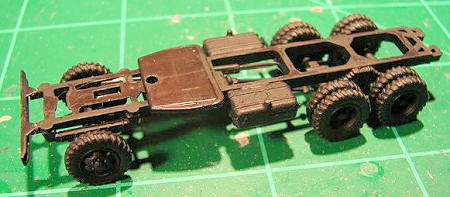 I started
assembly with the very nice one-piece chassis. The front and rear suspensions
are single parts that drop into place. Care should be taken with the rear bogie
as it’s a bit of a hard fit and could be easily broken. The drive shafts are a
single part and again, care is needed. It’s a fragile part and I broke the front
shaft trying to install it. A note on the instructions here: there are no
placement arrows or what have you to tell you where things fit. Some of the
parts are just shown floating in space with no indication of how to assemble
them. There are no locating pins or holes. Some “experimentation” is needed to
figure out were some of the parts go.
I started
assembly with the very nice one-piece chassis. The front and rear suspensions
are single parts that drop into place. Care should be taken with the rear bogie
as it’s a bit of a hard fit and could be easily broken. The drive shafts are a
single part and again, care is needed. It’s a fragile part and I broke the front
shaft trying to install it. A note on the instructions here: there are no
placement arrows or what have you to tell you where things fit. Some of the
parts are just shown floating in space with no indication of how to assemble
them. There are no locating pins or holes. Some “experimentation” is needed to
figure out were some of the parts go.
 The axle
housings are hollow and the wheels have small holes in them, but there is no
indication of how to mount them. No axles are included and the instructions show
them already in place. I ended up using a paper clip to make axles. Note that
the tires have rotational tread, the instruction don’t point this out. I have
the treads all in the same direction, but I’m not sure it’s the right direction!
The mud flaps shown in the instructions were not in my kit. However, there was a
different type included, so I used those instead.
The axle
housings are hollow and the wheels have small holes in them, but there is no
indication of how to mount them. No axles are included and the instructions show
them already in place. I ended up using a paper clip to make axles. Note that
the tires have rotational tread, the instruction don’t point this out. I have
the treads all in the same direction, but I’m not sure it’s the right direction!
The mud flaps shown in the instructions were not in my kit. However, there was a
different type included, so I used those instead.
The front fenders are one-piece and must be installed before the cab. (the fenders may be resin as they are the same color as the missile) The vacformed windows will require careful trimming to clear the one-piece interior. Several test fits were needed to get it right. I suggest drilling mounting holes for the headlights, cause those suckers are small!! I used a drop Krystal Klear for the lenses.
The truck bed needs to be modified to fit the missile. The instructions DO indicate this and it’s a simple matter of removing the side rails and tailgate.
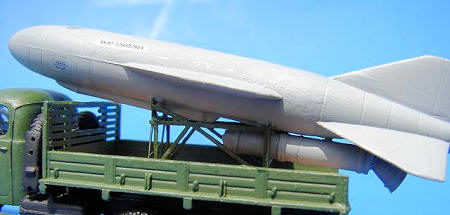 The
missile is nicely molded in three resin parts. The rear section in my kit
appears to be a different type of resin, as it had black swirls in it. The fit
of the missile parts is very good and only required a bit of trimming to get it
to fit together. The booster engine is also three parts, but molded in plastic.
These parts are quite rough and required some work. The missile mounting is made
of three pe parts that have very nice locating tabs made onto the parts. I must
say again, that the mounting is of some kind of medal I have never seen used for
pe parts. It’s looks almost like copper. Take care bending the parts, as they
are VERY soft. I mounted the missile in the bed before I installed it on the
truck. I’m not sure if that the easy way, but it worked for me.
The
missile is nicely molded in three resin parts. The rear section in my kit
appears to be a different type of resin, as it had black swirls in it. The fit
of the missile parts is very good and only required a bit of trimming to get it
to fit together. The booster engine is also three parts, but molded in plastic.
These parts are quite rough and required some work. The missile mounting is made
of three pe parts that have very nice locating tabs made onto the parts. I must
say again, that the mounting is of some kind of medal I have never seen used for
pe parts. It’s looks almost like copper. Take care bending the parts, as they
are VERY soft. I mounted the missile in the bed before I installed it on the
truck. I’m not sure if that the easy way, but it worked for me.
The last step was installing the pe parts on the cab. Two types of headlight guards are provided as well as parts I took to be supports for the guards. Cab mirrors are also provided. I drilled holes for these parts as well, as like the headlights, they are very small.
| COLORS & MARKINGS |
 The
instructions don’t have a color callout for the chassis, but from the box top, I
gather it is black. The color callout for the truck itself is Medium Green and
for the missile is Gull Gray. I used Model Masters Medium Green for the truck,
and as I didn’t have any Gull Gray handy, I used Neutral Gray for the missile.
The missile also calls for a “middle blue” nose cone. I didn’t have anything
close to this, so I left it off. I painted the bottom of the truck bed Wood, as
that’s what the box top appears to show. However, it could just be a shadow but
it still looks cool.
The
instructions don’t have a color callout for the chassis, but from the box top, I
gather it is black. The color callout for the truck itself is Medium Green and
for the missile is Gull Gray. I used Model Masters Medium Green for the truck,
and as I didn’t have any Gull Gray handy, I used Neutral Gray for the missile.
The missile also calls for a “middle blue” nose cone. I didn’t have anything
close to this, so I left it off. I painted the bottom of the truck bed Wood, as
that’s what the box top appears to show. However, it could just be a shadow but
it still looks cool.
The instructions show basic decals for the missile, but there are none for the truck. The decal sheet includes a lot more decals then is called for, but I wasn’t sure what they were for, so I didn’t use them. The decals came off the backing very quickly and went down with no trouble.
| CONCLUSIONS |
 All in
all, this is a very nice kit. If this is an example of ZZ Modell kits, they
should do well. It’s very well detailed for it’s size and went together with no
trouble. In fact, I had it done in just a few days. Wargamers and HO railroad
guys should find this a useful addition to a layout.
All in
all, this is a very nice kit. If this is an example of ZZ Modell kits, they
should do well. It’s very well detailed for it’s size and went together with no
trouble. In fact, I had it done in just a few days. Wargamers and HO railroad
guys should find this a useful addition to a layout.
I highly recommend this to modelers who like vehicles. You could put an amazing amount of them in a small space. At this size, with the tiny and fragile parts, I wouldn’t recommend it for the younger modelers.
The down side is the vague instructions and lack of decals for the truck.
| REFERENCES |
Just the box top and instruction sheet
May 2009
Copyright ModelingMadness.com
Thanks to the fine folks at http://www.scale-model-kits.com where you can get this and many other interesting kits and accessories.
If you would like your product reviewed fairly and quickly, please contact the editor or see other details in the Note to Contributors.