| KIT #: | 00312 |
| PRICE: | $12.00 at a flea market |
| DECALS: | Two options |
| REVIEWER: | Steve Dedrick |
| NOTES: | I found this kit (still sealed) at a local flea market and picked it up on a whim after a 15-year hiatus from modeling. What follows is my version of AMS- not ‘Advanced Modeler Syndrome’ but ‘Atrophied Modeling Skills’… |
| HISTORY |
 From the box, verbatim- “Produce at
the same time in the kv-1 model 1941, the KV-2 (Also be called the year in KV-2
model 1941) also threw in the production. The KV-2 characteristic is its
quick-fried tower shape. The quick-fried tower that equip 152 mm howitzer
reports the hexagon keeps the square form, resembling an enormous box. But, it
is said of the excess, if not on the horizontal plane, dry by heat the tower
connect to revolve all and very difficult. Because of such weakness, KV-2 is in
actual battle, only used for proceeding to the virtuous soldier the
thermodynamic power inhibit, but need not in the battlefield that hour of
backstroke break war.”
From the box, verbatim- “Produce at
the same time in the kv-1 model 1941, the KV-2 (Also be called the year in KV-2
model 1941) also threw in the production. The KV-2 characteristic is its
quick-fried tower shape. The quick-fried tower that equip 152 mm howitzer
reports the hexagon keeps the square form, resembling an enormous box. But, it
is said of the excess, if not on the horizontal plane, dry by heat the tower
connect to revolve all and very difficult. Because of such weakness, KV-2 is in
actual battle, only used for proceeding to the virtuous soldier the
thermodynamic power inhibit, but need not in the battlefield that hour of
backstroke break war.”
Alles klar? An infantry support tank that had difficulty revolving the turret on anything but level ground… for more detail, see Scott’s review of the 1:48 Hobby Boss KV-2.
| THE KIT |
Inside the top-opening box one
finds 10 sprues of fairly soft, light grey plastic. Each is individually bagged
with the exception of sprues E and T which are two per bag and contain the road
wheels/support rollers and track bits respectively. There is a small clear sprue
for the headlight and tail light lenses. The hull and turret are contained within
their own compartment. There are also the two ‘rubber band’ tracks should one
 opt to avoid the ‘link-and-length’ injected track parts. Parts are well molded
and detail is sharp but many- if not most- parts display noticeable seam lines
and a touch of flash here and there. Ejector pin marks also abound- considerable
clean-up is entailed but the soft plastic makes it a relative breeze. Snap out a
new #10 blade, comrade!
opt to avoid the ‘link-and-length’ injected track parts. Parts are well molded
and detail is sharp but many- if not most- parts display noticeable seam lines
and a touch of flash here and there. Ejector pin marks also abound- considerable
clean-up is entailed but the soft plastic makes it a relative breeze. Snap out a
new #10 blade, comrade!
There was no damage of any kind to the kit parts though one thin rectangular part (A11) was slightly warped. It would have been easy enough to straighten it but it is a component easily bent on an actual tank so I left it as is. I was in tanks in the Army (M60A1s and M551s) and yeah- stuff gets bent and broken!
Instructions are 10 pages including a parts diagram. There is little text but the construction sequence is well illustrated and thought out. Parts fit is excellent all round once flash and sprue stubs are removed.
| CONSTRUCTION |
Tank models for the most part can be considered as two kits- the hull and the turret, and this KV-2 is no exception. I constructed the turret and hull concurrently but will comment on the kit progress in the order the steps are presented in the instructions. The instructions are clear and parts fit is excellent so really I’ll be commenting on the few things that need a bit of care. All sprues were washed in warm soapy water to remove mold release goo and allowed to air dry.
Step 1 has the modeler open up various holes and slots in the deck, side plates, and fenders to allow for the bits that make this a KV-2 rather than the -1 the kit is based on. The side plates (B1 & B2) attach to the hull and accommodate the suspension and each one has no less than 24(!) ejector pin markings on the back. Some of these have raised edges and flash which must be scraped/sanded to get the necessary flush fit. I also did the same with the fenders (C1 & C14) at this point though they ‘only’ have 12 apiece. Again, the soft plastic helps make this short work.
 Steps 2, 3, & 4 take one deep
into hull construction and the many bits appended thereto. The rear deck is
adorned with 6 lifting eyes (A28) and these buggers are smaller than a
politician’s conscience. I mean, they are tiny.
I struggled with these for a while and after losing two to the carpet monster
(no, he hadn’t forgotten me over the years) I simply left them off. It was also
necessary to use several clamps to get a nice tight fit between the hull and the
two top deck parts. Large rubber bands would also have worked as little pressure
was required. Step 4 has you assemble the track tensioners; there are two and
they are ‘sided’ so make a right and a left. The instructions would have you
cement the tail light lens here after painting it clear red; I chose to leave it
for final assembly.
Steps 2, 3, & 4 take one deep
into hull construction and the many bits appended thereto. The rear deck is
adorned with 6 lifting eyes (A28) and these buggers are smaller than a
politician’s conscience. I mean, they are tiny.
I struggled with these for a while and after losing two to the carpet monster
(no, he hadn’t forgotten me over the years) I simply left them off. It was also
necessary to use several clamps to get a nice tight fit between the hull and the
two top deck parts. Large rubber bands would also have worked as little pressure
was required. Step 4 has you assemble the track tensioners; there are two and
they are ‘sided’ so make a right and a left. The instructions would have you
cement the tail light lens here after painting it clear red; I chose to leave it
for final assembly.
Step 5 entails attaching the suspension and various grates, hatches, and what appears to be a horn. Seriously, a horn? Ivan, buddy- if you can’t hear this brute coming up behind you I rather doubt the horn will help. The three circular hatches can apparently be posed in the open position as each has a hinge that mounts internally and a rather crudely embossed representation of the locking apparatus. Being as the interior of the hull is naught but gaping emptiness these hatches were glued shut (ditto with the turret hatches).
Step 6 is the mundane chore of assembling road wheels and drive sprockets. Many of the wheel halves had some flash at the mating surfaces; scrape away! You also assemble the hull machine gun installation here; I left the MG barrel itself off.
Step 7 seems out of order as it would have you assemble the link-and-length tracks. But- you have not yet mounted the road wheels and other running gear you need for a ‘pattern’. Hold off until Step 10 if using this track option.
Meanwhile, the quick-fried turret has been under construction. The gun mount is a seven piece sub-assembly with parts L11, L12, L16, & L17 ‘keyed’ to prevent misalignment of the howitzer barrel. Take care when gluing this assembly to the turret front- I was off slightly at the lower right and didn’t notice until the photo session when it became glaringly obvious (natch). The handrails (L10) are rather delicately thin and attached to the sprue via ridiculously large gates but with some careful attention cleaned up nicely. The rear-facing MG barrel was again set aside for final assembly.
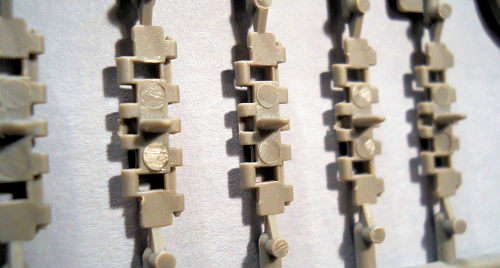 The link and length tracks include
a nice ‘pre-sagged’ upper portion but here things get even more ejector pin
happy. EACH track link- including those in the length sections- has two pin
marks; some recesses and the others towers. There are 168 links… so I wimped out
and went with the rubber option.
The link and length tracks include
a nice ‘pre-sagged’ upper portion but here things get even more ejector pin
happy. EACH track link- including those in the length sections- has two pin
marks; some recesses and the others towers. There are 168 links… so I wimped out
and went with the rubber option.
These were first brushed with Apple Barrel brand Metallic Charcoal and when dry brushed with Barn Red, followed by a thin black wash. I may have gotten a bit carried away with the rusting effect but hey- it’s been a wet summer on the steppes. When all was dry the contact surfaces were abraded with a damp sponge to bring back the bare metal. When thoroughly dry, the connecting tabs and corresponding attachment areas were scraped clean of paint and glued together with Loctite CA. Wrapped with wax paper and clamped, these were set aside to cure. Wax paper prevents the clamps becoming one with the tracks…
Steps 8 & 9 involve installing the running gear and a few other bits. One is the headlight lens which, again, was saved for later. Regardless of which track option you’ve chosen, do not cement the idler wheels (those that attach to the track tensioners) yet- track installation will be greatly facilitated with these ‘loose’.
In step 10 the fenders and braces and glued in place. Fit was good but again several clamps were employed to insure a gap-less fit. One brace was carelessly broken in the process and this became a touch of ‘character’, ahem.
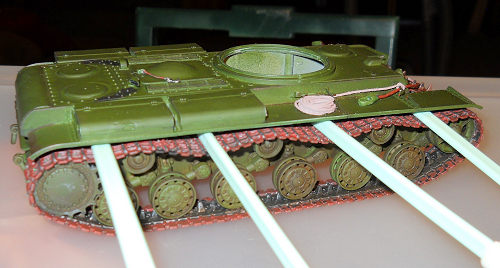 I use this technique to achieve
track sag when using the rubber option: I mount the tracks to the tank and mark
where the support rollers contact the track, then remove the track. Using a #10
blade, I then scrape paint from the tops of the support rollers and the
corresponding locations on the inside of the track. I now thread the track
around the drive sprocket and road wheels. With the idler wheel positioned over
the track center guides it’s an easy matter to mount the idler wheel to its axle
without unduly stressing the track connection.
I use this technique to achieve
track sag when using the rubber option: I mount the tracks to the tank and mark
where the support rollers contact the track, then remove the track. Using a #10
blade, I then scrape paint from the tops of the support rollers and the
corresponding locations on the inside of the track. I now thread the track
around the drive sprocket and road wheels. With the idler wheel positioned over
the track center guides it’s an easy matter to mount the idler wheel to its axle
without unduly stressing the track connection.
After an overnight cure, I inserted plastic wipe handles between tracks and fenders at the appropriate places to induce the necessary track sag and super glued the track to the support rollers. Tow cables were made up using the copper wire provided, cut to length using the handy scale in the instructions.
| COLORS & MARKINGS |
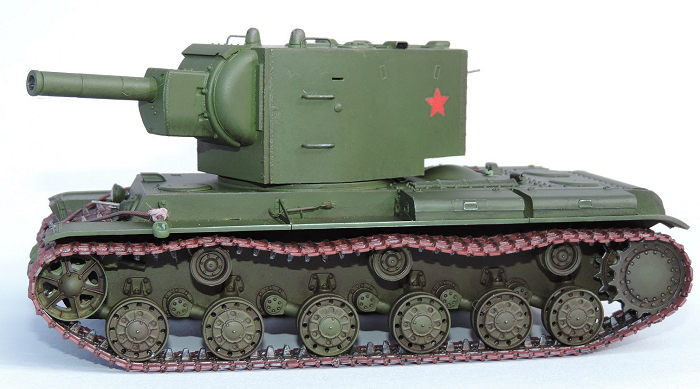
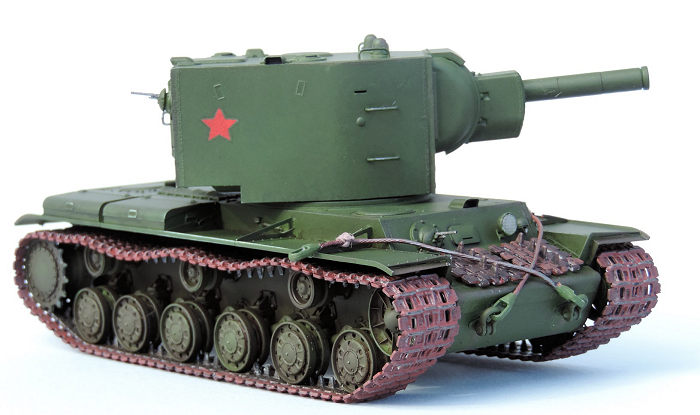
The very nice five-view color paint chart calls for Gunzo H 135 but I had half a rattle can of Testors FS 34102 medium green. This can was 15+ years old but still held pressure so there’s a nod to Testors… the hull, turret, fenders, and running gear (sprockets and wheels) were all given several light coats earlier in the construction process. At this time, I used a swab to lightly highlight some corners and edges with a dark brown pastel. The suspension and running gear got a wash of highly diluted brown acrylic. Some silver was dry brushed on the turret rungs to simulate paint wear.
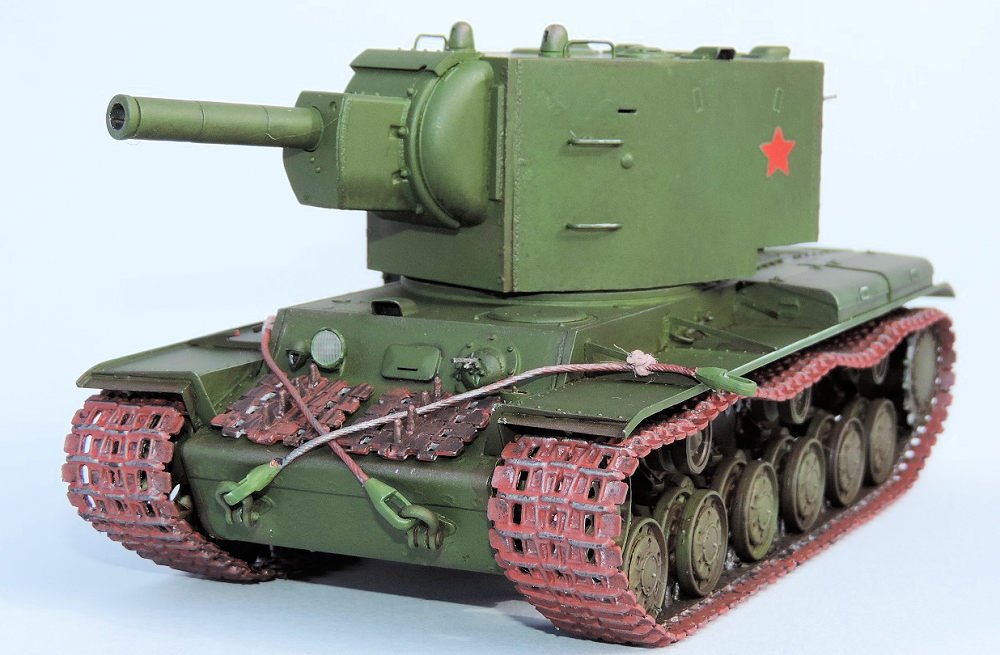
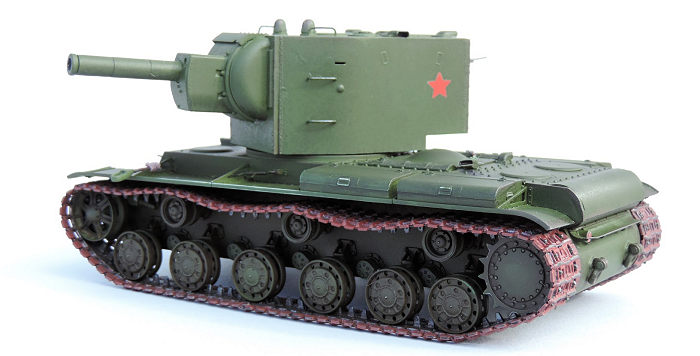 Decals include two variations of the Soviet star- one standard
and the other with a hammer and sickle in the center. There is also a patriotic
slogan; probably translating along the lines of “Death to Fascism” or “Adolf’s
Mom Wears Combat Boots”. Now, none of the many KV-2 photos I googled showed any
markings at all (perhaps it was thought the outline was distinctive enough to
preclude misidentification) but that big green turret just cried out for a red
star! Not having any gloss, I buffed the paint smooth in those areas and the
decals went on just fine.
Decals include two variations of the Soviet star- one standard
and the other with a hammer and sickle in the center. There is also a patriotic
slogan; probably translating along the lines of “Death to Fascism” or “Adolf’s
Mom Wears Combat Boots”. Now, none of the many KV-2 photos I googled showed any
markings at all (perhaps it was thought the outline was distinctive enough to
preclude misidentification) but that big green turret just cried out for a red
star! Not having any gloss, I buffed the paint smooth in those areas and the
decals went on just fine.
Both MG barrels were painted Metallic Charcoal and when dry buffed with pencil lead before gluing in place. Headlight and tail light lenses were attached with white glue. Extra track links were added to the glacis and secured by routing the tow cables across them, the cables tied off with some fuzzy rope. Funny how you don’t see some things until after the pics…!
An overall coating of Testors Flat Laquer (like the green, 15+ years old and still good) and it was done.
| CONCLUSIONS |
This is a very nice kit and makes for a convincing KV-2. Parts fit is excellent and kit engineering well thought out. Issues with flash, mold seams, and overly large sprue gates are easily overcome and even the astounding number of ejector pin marks on the injected tracks could have been dealt with had I felt like doing so. As for scale accuracy, I have read elsewhere the howitzer barrel is slightly short ( a turned replacement is available) but even in my active modeling days I was satisfied with the TLAR (That Looks About Right) standard for these things. With due attention a modeler of any skill level can turn this kit into a nice KV-2.
I enjoyed this build; might have to pick up some proper supplies and find another kit- or finish that half-built Pzkw IV I found in a box…
5 March 2018
Copyright ModelingMadness.com
If you would like your product reviewed fairly and fairly quickly, please contact the editor or see other details in the Note to Contributors.
Back to the Main Page Back to the Review Index Page Back to the Previews Index Page