
| KIT #: | 35274 |
| PRICE: | $50.00 |
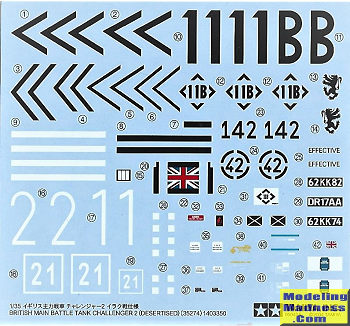
| DECALS: | Four options |
| REVIEWER: | Donald Zhou |
| NOTES: |
Advantages: Extremely detailed, simple to
build, nice fit Disadvantages: details somewhat simplified, acetate plate for view ports, lower hull parts from early 80’s 2004 boxing |
| HISTORY |
The tank that became the British Challenger II was developed from the original Challenger I by the Vickers Defense Systems, now BAE Land Systems & Armaments. Currently, the UK and Kingdom of Oman operate the tank. It’s a heavily remodified version of the original Challenger I developed in the early 80’s.
The original Challenger I was built as a result of a Royal Iranian request to replace their own Chieftain tanks using the then latest Chobham armor. Unfortunately, before the “Chally I” was fully developed, Iran fell under the Islamic Revolution and the order was shelved. By late 70’s, the British Ministry of Defense decided to adapt the new vehicle to supplement and replace the aging Chieftain. However, the tank, although features the new Chobham armor and a new rifled barrel 120mm main cannon, was still behind the brand new German Leopard II and the American M1 Abrams in terms of new digital computers and sighting units. During 1991 Gulf War, one Challenger was able to destroy an Iraqi T-55 at the range of 4.5 kilometers! Still a record for a tank kill at long distance. However, after the Gulf War, the tank age really started to show, especially its aging stabilization and fire control systems against the new Leopard II A5 and the M1A2 Abrams. During one contests in which a Leopard II, a M1A1 Abrams and a Challenger were pitted against each other in a firing course featuring 12 targets, many of them moving with the tank crew required to execute the target in a set time limit, many of the time limit tight so the tanks also had to fire on the move, the M1A1 scored a perfect 12/12, the Leo 11/12, and that was mainly because the gunner screwed the firing solution (and supposedly, he knew it too!), the Challenger? Only 7/12…..About as accurate as a T-80, all misses especially were against moving targets or targets that were moving and required the tank to also fire on the move. Something must be done to improve the vehicle.
In fact, the British knew that the Chally I’s firing control and ballistic computers were way long in the tooth and need some vast improvement. To this end, in 1993, they produced the first new vehicle. The Challenger II, or Chally II features the Chobham II armor in a new turret called the Burlington. The hull was similar to the Chally I but also vastly improved and can accept frontal ERA and side armor panels. The torsion bar suspension was also improved to accept the new weight of the vehicle, which is the heaviest of all Western MBT’s due to the heavy armor. A vastly improved TOGS, or Thermal Observation and Gunnery Sight, or TOGS II was moved from the left side of the turret, which heavily restricted its view to a centrally mounted point right above the barrel in front of the turret. An independent thermal viewer similar to the M1A2 Abrams CITV was mounted directly in front of the commander’s hatch. The biggest improvement though was the digital fire control computer from Computing Devices Co of Canada that contains two 32-bit processors with a MIL STD1553B data bus, and has the capacity for additional systems, such as a Battlefield Information Control System. This system, plus an improved gyroscopic stabilizer system for the main gun, brought the tank to parity with the M1A2 and the Leopard 5, and in some cases, better than the baseline A2 Abrams and the Leo 5. Currently, this system is being improved to bring the Chally II to parity with the new M1A2 SEP II and Leo A6/A7.
The tank is armed with the same L55 caliber main 120mm rifled cannon as in the Chally 1, with two machine guns, one co-axle with the main cannon, and one on the loader station. Four men, a commander, driver, loader and gunner rounds out the crew.
The new tank’s baptism of fire came in 2003 second Gulf War. Previously, the tank saw service in Bosnia and other peace keeping duties. In order to deal with the obnoxious sand and dry weather of the desert, several improvements and changes were added, these included adding long muffler pipes to suppress the exhaust. A canvas skirt were added to the bottom of the side skirt to reduce dust from bouncing upward and a series of ERA armored blocks were added to the hull front and the side skirts. These are the same as the one found on Chally I in the first Gulf War. Later on, when these EAR blocks proved unable to stop rockets such as the RPG-29, Burlington armor blocks were used instead.
Overall, the tank gave great performance. Only two were damaged and one being a completely loss due to a friendly fire incident. The tank will remain service in with the British and Oman for the foreseeable future.
| THE KIT |
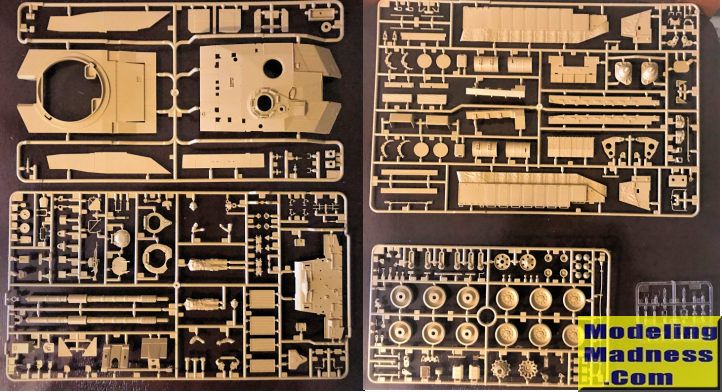 This is what I like to call
Tamiya’s “third-generation” tank. If you read my review on the M26 Pershing,
then you will realize this is a kit released from 1999-2010 or so. This
Challenger II tank is heavily based on the lower hull of the Challenger I
(not shown) released back in the 80’s. However, since this is the “Desertized” 2003 Iraqi
Freedom version, with the canvas covered sided skirts, the lower hull is mostly
covered up. The side and front ERA plates are also based on the Challenger I
“Desert” version that came out in 1993. The rest of the kit though, are brand
new. Including an excellent new turret with the TOGS II and the CITV turret. The
rest of the details on the hull are also the same. Some however, are still
simplified, which is typical for Tamiya kits of this nature cause it trades away
some details for fit and ease of assembly. The prime example are all the grab
handles on the hull engine maintenance hatches. Over 23 of these things are all
over the place here. Now, the Trumpeter version are all individual parts which
offers more detail. But the great things about these are you don’t have to
bother with them since the Trumpeter’s ones are also easily breakable. The rest
of the details are top notch too. The only other quibble is the acetate clear
plate that you need to cut out for the commander’s vision port. Which even in
2004, is a huge oxymoron. Other than that, it should be an easy pleasurable
build.
This is what I like to call
Tamiya’s “third-generation” tank. If you read my review on the M26 Pershing,
then you will realize this is a kit released from 1999-2010 or so. This
Challenger II tank is heavily based on the lower hull of the Challenger I
(not shown) released back in the 80’s. However, since this is the “Desertized” 2003 Iraqi
Freedom version, with the canvas covered sided skirts, the lower hull is mostly
covered up. The side and front ERA plates are also based on the Challenger I
“Desert” version that came out in 1993. The rest of the kit though, are brand
new. Including an excellent new turret with the TOGS II and the CITV turret. The
rest of the details on the hull are also the same. Some however, are still
simplified, which is typical for Tamiya kits of this nature cause it trades away
some details for fit and ease of assembly. The prime example are all the grab
handles on the hull engine maintenance hatches. Over 23 of these things are all
over the place here. Now, the Trumpeter version are all individual parts which
offers more detail. But the great things about these are you don’t have to
bother with them since the Trumpeter’s ones are also easily breakable. The rest
of the details are top notch too. The only other quibble is the acetate clear
plate that you need to cut out for the commander’s vision port. Which even in
2004, is a huge oxymoron. Other than that, it should be an easy pleasurable
build.
The build begins with the lower hull with the running wheels, torsion bars and sprockets. These build up well and are able to spin due to the poly caps inside. The rear and front plates are now added. I decided to leave the clear tail lights off for now. The rear is well appointed with various fuel drums, spare tracks and a spare jerry can holder with a jerry can.
The upper hull can be build up at this point. Do becareful with the front EAR blocks. The side skirts are in three pieces with the canvas “boots” on the bottom.
 The turret
are little more complex. The first thing being build is the complex TOGS II
sighting unit on top of the cannon barrel. The barrel itself is now added. They
are in two halves as slide mold technology were not invented at this point.
However, a round barrel tip with deep slot is separate. Great idea to drill it
out further. This is attached to a backing plate and the plate is held inside
the turret with poly caps.
The turret
are little more complex. The first thing being build is the complex TOGS II
sighting unit on top of the cannon barrel. The barrel itself is now added. They
are in two halves as slide mold technology were not invented at this point.
However, a round barrel tip with deep slot is separate. Great idea to drill it
out further. This is attached to a backing plate and the plate is held inside
the turret with poly caps.
Before attaching the upper turret, be sure to drill out the holes for the CIP panels and attach the poly cap that will hold the CITV. Again, the commander cupola’s vision ports are all cut from the acetylate plate.
Once the upper turret is attached, various fittings such as the wind sensor, tool boxes the CITV and machine guns are attached. Leave the hatch open for the two crew figures if you wish.
| CONCLUSIONS |
All in all, I’m getting more and more of these Tamiya armor kits. Again, they are fun, cheesy, easy, peesy and a whole a lot of joy to build without the worry of breaking things, 1000 different parts to lose or a complex paint job (just the weathering). Again, if you can stand the wait, get it from Amazon, and even if you don’t have Prime, you should knock at least $20 off the asking price! A price you can’t beat at around $35 a pop!
August 2018
Copyright ModelingMadness.com
If you would like your product reviewed fairly and fairly quickly, please
contact the editor or see other details in the
Note to
Contributors.
Back to the Main Page
Back to the Review Index Page
Back to the Previews Index Page