
Italeri 1/35 Nebelwerfer 41
| KIT #: | 324 |
| PRICE: | The equivalent of $5 when new |
| DECALS: | None needed |
| REVIEWER: | Spiros Pendedekas |
| NOTES: |
One day build |
| HISTORY |
 The
Nebelwerfer 41 (15 cm NbW 41) was a German multiple rocket launcher, utilizing
15 cm Wurfgranate 41 projectiles. It served during WWII with units of the “Nebeltruppen”,
which were German Chemical Corps units that not only had the responsibility for
poison gas and smoke weapons, but were also used to deliver high-explosives
during the war. The name “Nebelwerfer” is best translated as "Smoke Mortar",
with Allied troops nicknaming it “Screaming Mimi” or “Moaning Minnie” due to its
distinctive sound.
The
Nebelwerfer 41 (15 cm NbW 41) was a German multiple rocket launcher, utilizing
15 cm Wurfgranate 41 projectiles. It served during WWII with units of the “Nebeltruppen”,
which were German Chemical Corps units that not only had the responsibility for
poison gas and smoke weapons, but were also used to deliver high-explosives
during the war. The name “Nebelwerfer” is best translated as "Smoke Mortar",
with Allied troops nicknaming it “Screaming Mimi” or “Moaning Minnie” due to its
distinctive sound.
Like virtually all German rocket designs, the Wurfgranate 41 projectile was spin-stabilized, in order to increase accuracy. Unusually, the rocket motor was in the front, the exhaust venturis being about two-thirds down the body from the nose, with the intent to optimize the blast and fragmentation effect of the rocket as the warhead would still be above the ground upon detonation. However, this proved to greatly complicate manufacture without much improvement and it was not copied on later rocket designs.
About 6000 NbW 41s were built, together with almost 5,500,000 Wurfgranate 41s. Well preserved survivors can still be spotted at museums today.
| THE KIT |
Italeri introduced this kit in 1983 and reboxed it
only once, back in 1995. A copy of this latter issue was discovered, still
wrapped, in March 2021, at a bookshop that used to sell modeling stuff more than
25 years before. It was offered to me for the symbolic price of €5.
 The kit
comes in a small side opening box, with an attractive Nebelwerfer model as a
boxart. Upon opening the box, I was greeted with two grey sprues, 87 parts in
total, of which 69 are for the launcher and trailer construction, the rest being
6 projectiles and equal 2-piece containers. Molding is good but not perfect,
with some flash, mold lines and ejector pin marks visible. The firing tubes
walls look believably thin. Since I have zero experience in armor, I cannot
further comment about parts rendition and accuracy, other than the fact that
parts look sufficiently detailed and realistic!
The kit
comes in a small side opening box, with an attractive Nebelwerfer model as a
boxart. Upon opening the box, I was greeted with two grey sprues, 87 parts in
total, of which 69 are for the launcher and trailer construction, the rest being
6 projectiles and equal 2-piece containers. Molding is good but not perfect,
with some flash, mold lines and ejector pin marks visible. The firing tubes
walls look believably thin. Since I have zero experience in armor, I cannot
further comment about parts rendition and accuracy, other than the fact that
parts look sufficiently detailed and realistic!
Instructions are typical Italeri, looking clear, additionally containing a short
history of this relatively uncommon type and four b/w pics of the completed
model. Color callouts are provided where needed.
Exclusively occupied with plane models, some more complicated than others,
seeking not only some kind of creative break, but also some “modeling expansion”
towards armor, I had no reluctance whatsoever in unwrapping that little box and
attempting to put the kit together “in an afternoon”, basic hand painting
included, with minor corrections and weathering to be done next morning…..just
like old times!
| CONSTRUCTION |
Being an absolute beginner in armor modeling meant
by definition performing the radical act of following the instructions! I thus
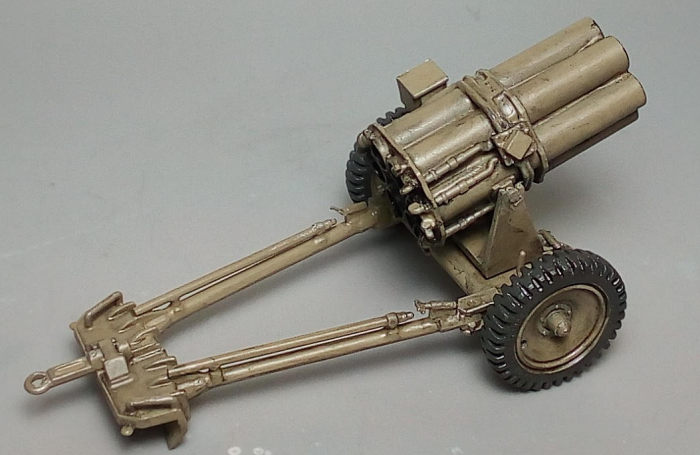
started by putting together the firing tubes, which are nicely casted in two
blocks that have to be joined; then a multitude of “bits and pieces” (supports,
triggers, mini levers, hoses, sprockets etc.) were attached onto them
circumferentially. Fit was not bad, however many of the above small parts
practically had no positive attaching location, meaning that the modeler has to
have many reference pics from different angles handy, as to figure out the exact
location of each part. The b/w completed model pics, provided by the
instructions, proved very helpful.
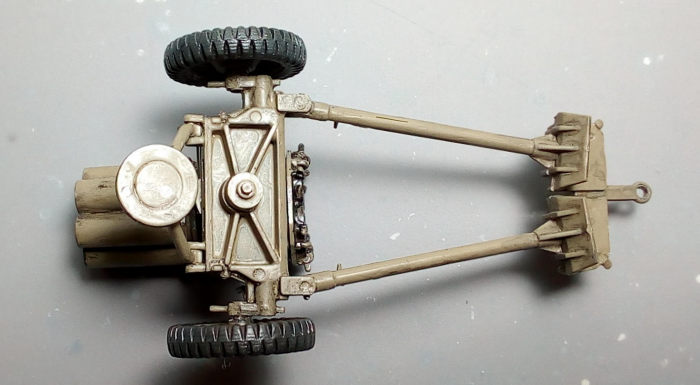
 Leaving the
basic weapon assembly to dry, I proceeded to the trailer, which was comprised of
three subassemblies: the 8-piece gun carriage and the pair of 4-piece connecting
rods that are joined at the front, in order to form the trailer coupler (the
modeler has the option to position the rods “deployed”, which is a nice posture
for a diorama).
Leaving the
basic weapon assembly to dry, I proceeded to the trailer, which was comprised of
three subassemblies: the 8-piece gun carriage and the pair of 4-piece connecting
rods that are joined at the front, in order to form the trailer coupler (the
modeler has the option to position the rods “deployed”, which is a nice posture
for a diorama).
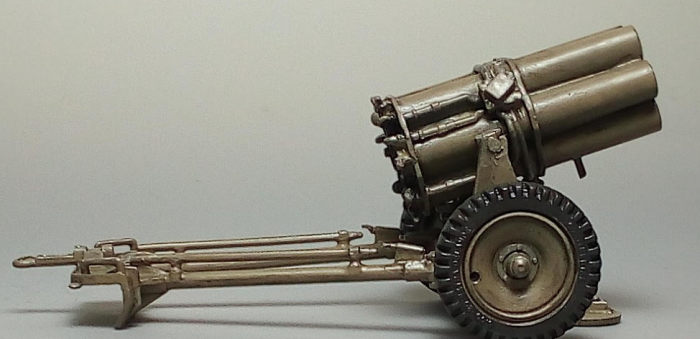
The 9-piece cradle, containing the driving trunnions, was then assembled and
attached onto the rear carriage, followed by the 7-piece spade, which was also
attached. Both the cradle and the spade are positionable.
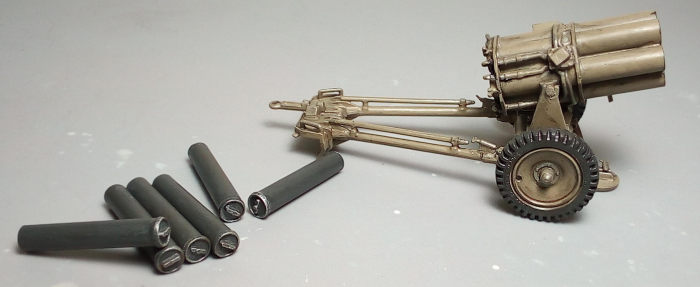
The kit offers six 1-piece projectiles, but with so many monstrous sink marks,
that I had to toss them. On the contrary, their respective 2-piece containers
looked nice, so I assembled them, in order to accompany the Nebelwerfer! The two
wheels had four nasty sink marks each onto the tires inner walls, sadly
interfering with the tire thread: they were sanded off as best as possible, and
then the wheels had their hubs attached.
All the above assembly process lasted a bit more than one hour of intensive
work. With glue still curing and no need for any further filling or sanding, I
took all assembled parts to the paint shop!
| COLORS & MARKINGS |
 break my
Hu72 Khaki and brush paint all components with my trusty #2 red sable brush.
The paint was used straight from the tin: luckily, it was sufficiently thick
as to help covering minor assembly imperfections, yet sufficiently thin, as
to be brushed smoothly – no beads, drips and the like!
break my
Hu72 Khaki and brush paint all components with my trusty #2 red sable brush.
The paint was used straight from the tin: luckily, it was sufficiently thick
as to help covering minor assembly imperfections, yet sufficiently thin, as
to be brushed smoothly – no beads, drips and the like!| CONCLUSIONS |
 Though
parts count is not exactly low, construction is not complex and the kit can
be easily tackled by a modeler with just a few kits under his belt. Painting
could not be easier, it can even be brush painted! Being a piece of
artillery means that you can weather it as much as you like, the more the
better!
Though
parts count is not exactly low, construction is not complex and the kit can
be easily tackled by a modeler with just a few kits under his belt. Painting
could not be easier, it can even be brush painted! Being a piece of
artillery means that you can weather it as much as you like, the more the
better!
31 May 2022 Copyright ModelingMadness.com. All rights reserved. No
reproduction in part or in whole without express permission. If you would like your product reviewed fairly and fairly quickly, please contact the editor or see other details in the
Note to
Contributors.