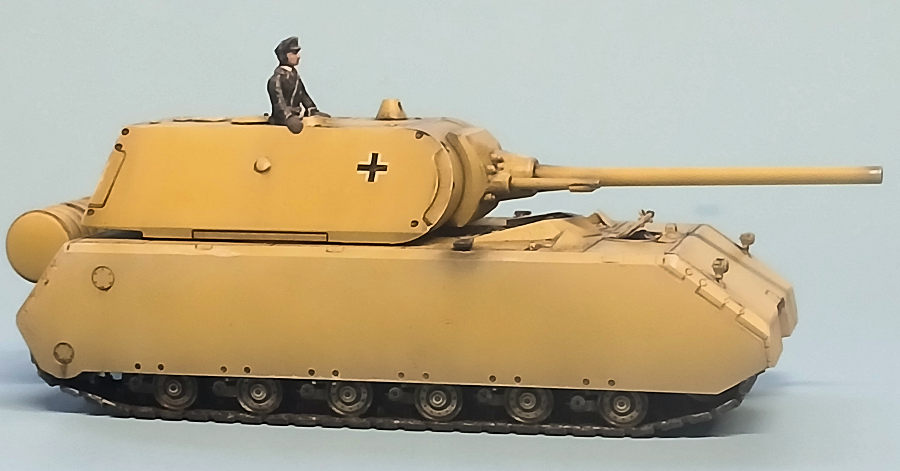
Vespid 1/72 Panzer VII 'Maus'
| KIT #: | VS720001 |
| PRICE: | $28.00 |
| DECALS: | Three options |
| REVIEWER: | Ryan Grosswiler |
| NOTES: | P.E. fret, metal gun barrel. |
| HISTORY |
 The Last Panzer: In
the English language the German word "Maus" has a few evocations. For linguists,
it's a reminder of how closely-related languages share common homophone words
for the same concept, but of different spelling. In pop culture, it's the title
of Art Spiegelman's unforgettable 2-volume Holocaust memoir in comic book form.
For fanatics of obscure combat equipment, it's the tongue-in-cheek name for
this, the heaviest tank ever built.
The Last Panzer: In
the English language the German word "Maus" has a few evocations. For linguists,
it's a reminder of how closely-related languages share common homophone words
for the same concept, but of different spelling. In pop culture, it's the title
of Art Spiegelman's unforgettable 2-volume Holocaust memoir in comic book form.
For fanatics of obscure combat equipment, it's the tongue-in-cheek name for
this, the heaviest tank ever built.
Conceived about a year into the invasion of the USSR as the final installment of the upward-spiraling "bigger, meaner, heavier" trend driven by armored warfare on the open steppes of Eastern Europe, the idea was for a heavy assault-type tank both impervious to all known weapons and able to destroy anything it met at any likely range of engagement: at a time when 75mm was a bit on the large side, a main gun of either 128mm or 150mm bore was specified. This, and the vehicle was also supposed to raise this weapon to elevations allowing it to operate as mobile artillery in an indirect-fire mode.
The already rather heavy Panther and Tiger tanks were close to reaching service, but Hitler was characteristically directly involved and looking past these to a ‘last-word’ solution. Krupp and Porsche were given design contracts. Upper weight limit was set at 100 tons. Some of the planners wanted a second turret for a smaller gun, but by 1942 multi-turreted tanks had proven impractical in combat, so other than the size, the design's most prominent weirdness went in at this point in the form of a 75mm gun coaxial to the big one.
Soon the process
became further convoluted over arguments as to the best gun/armor combination.
Then, predictably, the Good Idea Fairy arrived to provide further input,
demanding the
 addition of
an anti-aircraft turret, flamethrower for self-defense, and as the weight crept
upward beyond the ability for most European bridges to bear the weight of the
vehicle, a waterproofing and snorkel system to ford water obstacles. In the end,
most of this equipment was omitted, but the vehicle's weight had in the meantime
shot upward almost 100% to nearly 200 tons!
Porsche’s
hull and drive train and Krupp's turret design were settled on for the final
design and metal was cut.
addition of
an anti-aircraft turret, flamethrower for self-defense, and as the weight crept
upward beyond the ability for most European bridges to bear the weight of the
vehicle, a waterproofing and snorkel system to ford water obstacles. In the end,
most of this equipment was omitted, but the vehicle's weight had in the meantime
shot upward almost 100% to nearly 200 tons!
Porsche’s
hull and drive train and Krupp's turret design were settled on for the final
design and metal was cut.
Despite the common postwar perception of the Maus being an unwieldy behemoth, the power and drive train system was actually well-designed for a vehicle of such mass and the extensive driving and cross-country traverse trials conducted at Böblingen in 1944 revealed that the gigantic tank was surprisingly quite mobile and nimble, and not much more difficult to repair in the field than the supposedly more practical Jagdtiger which mounted the same gun—and far more reliable than either this or the smaller Panther and Tiger. The 1-meter-wide tracks' footprint was close to a quarter the overall footprint of the vehicle, so ground pressure wasn't much of an issue. Frontal armor was almost a foot in thickness in some places, against the 3"-7" of the Tiger II, meaning that only the heaviest Soviet guns would have posed a threat and these at close range.
Because
of the deteriorating strategic situation, orders for production were given and
rescinded twice, and despite by the last year of the war the Maus being
considered an experimental vehicle about 30 hull and turret pairings were in
various stages of production when the war ended. Whatever its attributes, the
design was defeated by simple common sense: sheer size meant that it was simply
impractical for deployed use or the titanic production effort it would have
required...and quite inappropriate for warfare while manning a defensive,
contracting front line.
It's interesting to note that the Maus' PaK 44 main gun at 128mm isn't that much larger in bore than the 120mm average carried by modern MBTs.
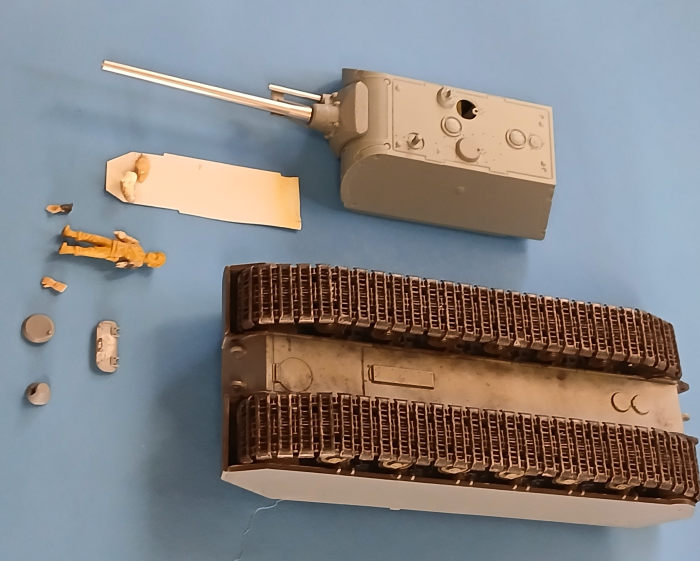
| THE KIT |
Flipping open the box reveals a comprehensive little package. A set of decals are included, though the real thing wore no markings (except, oddly, a crudely-painted set of hammer-and-sickle). Photoetch covers the engine vent screens and a couple other bits. All parts are very impressive in fineness of detail, almost like a larger scale has been reduced by 50% in size. This subject in 1/72 is about the size of a tankette in 1/35, so with fairly large parts it would be a good introduction into AFV modeling in Braille Scale.
| CONSTRUCTION |
Steps 1 and 2 are dedicated to assembly of the tracks and running gear, about 120 parts. You will spend 90% of assembly time here, and I found it took me well over an hour to free and clean up the wheels and bogies in Step 1. There is a little bit of 'play' between the two, so take the time to get the wheels as straight as possible on the bogies before their joints cure. Despite the instructions, leave the drive sprockets off the hull until you're ready to install the tracks in the next step. I dry-fitted the side armor panels (D1 and D2) and taped them in place to provide alignment while the assembly cured. Viewed from underneath, the assembled running gear with its gang of 48 wheels looks really, really cool!
 This unfortunately disappears under the tracks which come next. I started by
fitting the bottom runs (B12) and letting them dry overnight on a flat surface.
The front and rear segments over the idler and sprocket wheels followed; attach
the sprockets now so you can rotate them as necessary to fit the tracks over
their guide teeth. This also was left to cure overnight. The top runs (B4, B5,
and B9) could then get installed. This task was really fiddley and I found that
I had to bend the top fenders of the hull to a pretty severe deflection in order
to slip B9 into place. If you find this action forbidding you can omit these
parts: the top run of the tracks is only visible on the completed model if you
flip it over and really peer into the track wells.
This unfortunately disappears under the tracks which come next. I started by
fitting the bottom runs (B12) and letting them dry overnight on a flat surface.
The front and rear segments over the idler and sprocket wheels followed; attach
the sprockets now so you can rotate them as necessary to fit the tracks over
their guide teeth. This also was left to cure overnight. The top runs (B4, B5,
and B9) could then get installed. This task was really fiddley and I found that
I had to bend the top fenders of the hull to a pretty severe deflection in order
to slip B9 into place. If you find this action forbidding you can omit these
parts: the top run of the tracks is only visible on the completed model if you
flip it over and really peer into the track wells.
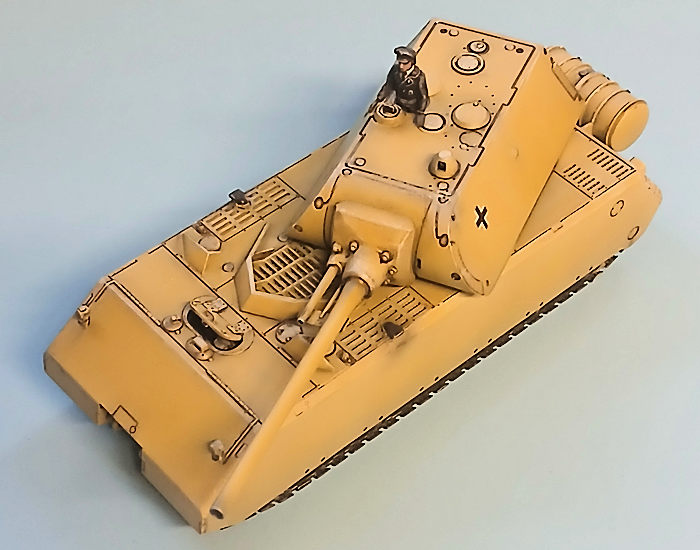
Most of this will be impossible to access on the assembled model for painting and weathering. I therefore stopped at Step 3, before attaching the side armor (D1 and D2) panels, to mask and give the running gear and wells a deep thorough coat of a very dark brown-gray mixed from Testor's square-bottle enamels. The road wheels were detailed in Dark Yellow from Tamiya acrylic. This was allowed to cure for a week, and followed with a wash based in Testor's Gloss Black to give a greasy look to the area, then a few treatments of highlighting to make the details really 'pop'.
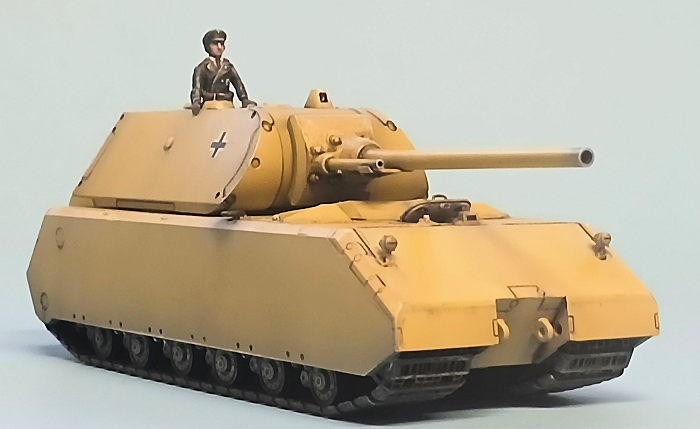
Remaining assembly was totally straightforward, my only deviations from the sequence being to assemble the hull top (C1) and its photoetch screens to the rest of the hull before attaching the little parts. Be sure to get the gun mount (E2) the right side up and to let it cure thoroughly before assembling the rest of the turret and mounting the gun. On a whim, I retrieved some old Esci panzer crew figures from the spares bin and adapted them to the vehicle: a commander in his post up top and two bust figures just visible in the slightly-open hull hatch.
The tracks and running gear were masked and it was off to the paint shop.
| COLORS & MARKINGS |
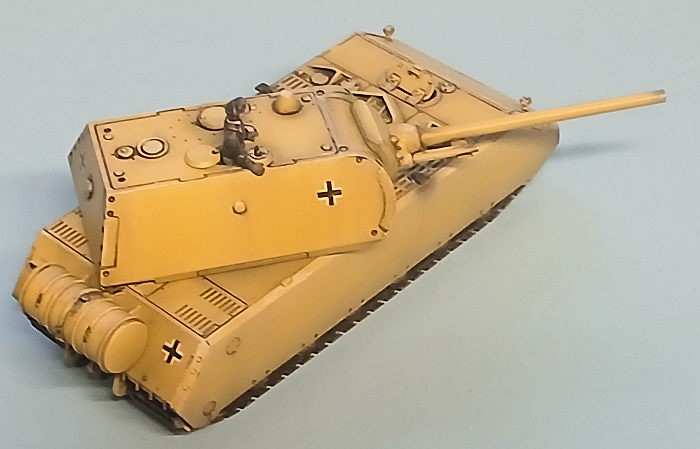
 I felt the best way
to depict the Maus was to emphasize its massive, slab-sided form with a simple
overall Dark Yellow finish. Depicting this monochromatic scheme successfully
isn't very easy, as any attempt to vary the finish tends to draw attention to
the techniques used. In the end, I used various pre-shading and pre-hueing
applications and buried these under successive coats of lightened Tamiya Dark
Yellow until I felt they had disappeared sufficiently enough. This was followed
with a simple wash and stark highlighting to draw attention to those angles.
I felt the best way
to depict the Maus was to emphasize its massive, slab-sided form with a simple
overall Dark Yellow finish. Depicting this monochromatic scheme successfully
isn't very easy, as any attempt to vary the finish tends to draw attention to
the techniques used. In the end, I used various pre-shading and pre-hueing
applications and buried these under successive coats of lightened Tamiya Dark
Yellow until I felt they had disappeared sufficiently enough. This was followed
with a simple wash and stark highlighting to draw attention to those angles.
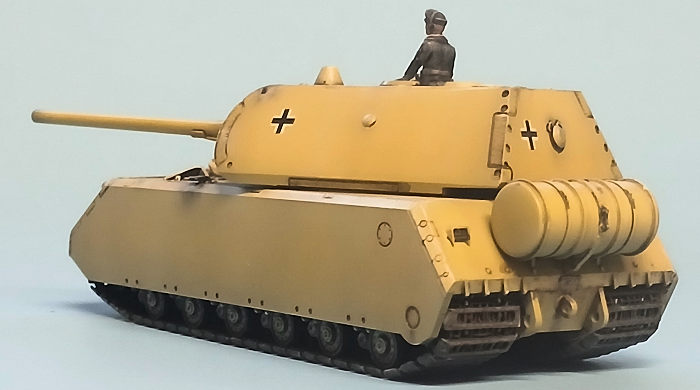
I wanted to give the model some identity (and for the sake of this review, test the decals), so I placed the supplied Balkankreuze in what I thought might be likely locations. The decals proved to be very thin and fine, performing quite well, but the black-over-white markings were slightly out of register, requiring a bit of touch up with paint to correct. The others looked okay in this regard.
| CONCLUSIONS |
I build 1/72 vehicles periodically and they normally just sort of disappear, placed as they are here and there in my 1/72 aircraft lineup, simply because airplanes are bigger. My Maus, however, really sticks out and assets itself. Apart from the predictably fiddley assembly of the tracks and running gear this was a really satisfying and quick build.
| REFERENCES |
Lots of references for a mere one-off prototype. I happened to have the old Arco-Aero book (acquired at a nearby garage sale when I was 14 for 25 cents). Most of what you need for modeling purposes may be found online. I found this site particularly useful:
https://tanks-encyclopedia.com/ww2/nazi_germany/panzer_maus.php
Spielberger, Walter.
Sonderpanzer:
German Special Purpose Vehicles (Armor Series 9).
Aero
8 April 2025
Copyright ModelingMadness.com. All rights reserved. No reproduction in part or in whole without express permission from the editor.
If you would like your product reviewed fairly and fairly quickly, please contact the editor or see other details in the Note to Contributors.