| KIT #: | 14 |
| PRICE: | $20.00 'used' |
| DECALS: | |
| REVIEWER: | Joe Essid |
| NOTES: |
| HISTORY |
I recommend the history given by Rick Reinbott is his review of this kit ()
Rick calls it (rightly) as an assault gun. Building the kit taught me something that had long confused me: the difference between assault guns (supporting infantry and knocking out strongpoints) and tank destroyers (doing what the name implies). The subject of this review was intended to be the former, but as the war went on, with Germany going on the defensive, it came to be a bit of everything, often filling in for tanks lost by Panzer Divisions. For modelers, it's also a catch-all vehicle, with room to add storage, gear, and nearly an sort of camo scheme imaginable.
I consider the STuG III to be one of the most successful vehicles of its type, and it labored on after the war in other hands, including the Syrians in the Six-Day War. I used to see one at a Spanish Army base, when my bus from Plaza Castilla would take me out north of Madrid to teach English at Continente, a hypermarket that could park a Wal-Mart in one corner and forget it was there. My students were decent folks, but it was a long ride to see them. So I looked forward to seeing the AFV three times a week. It never moved, so it must have been a prop for training. The Spanish had several, with at least one in a museum now.
| THE KIT |
Recently, as my return to modeling deepened into more than a build or two a year, I found the STuG III kit again on line from what I suspect to be the estate of a modeler. He had begun a detailed interior treatment with an engine and transmission, as well as Evergreen plastic to make interior bulkheads. There were meticulous drawings on graph paper in the box, but I had l plans to make the kit my own. First I sold off the engine kit, because my AFK would focus on the crew and what they carried.
The kit arrived with many of the vehicle's parts off the sprues, and the 1/35 humans uncut. I like it that Tamiya saw fit to include everyday items such as buckets, tools, and Jerry cans, a rarity on the kits of the early 70s. Being an earlier issue of this old kit, the parts had minimal flash and only one sink mark I found (and turned into a ding in the armor). It's all in a dark tan plastic and not flimsy. I did break the tow cable, but I usually only save the ends, making "cable" out of picture wire or in this case, leather-working thread: it proves so much easier to manipulate.
| CONSTRUCTION |
I followed the instructions, mostly, since a few parts had been assembled already. Laying everything out, I decided that other than building accessories and adding an engine cover that the prior owner had cut out and tossed, I'd make my STuG out of the box with the long 75mm gun but a closed interior. I planned to save the interior detail, such as the gun and ammo, for another kit.
I even like rubber-band tracks, though I saved the loose aftermarket links that had arrived with the kit for future builds.
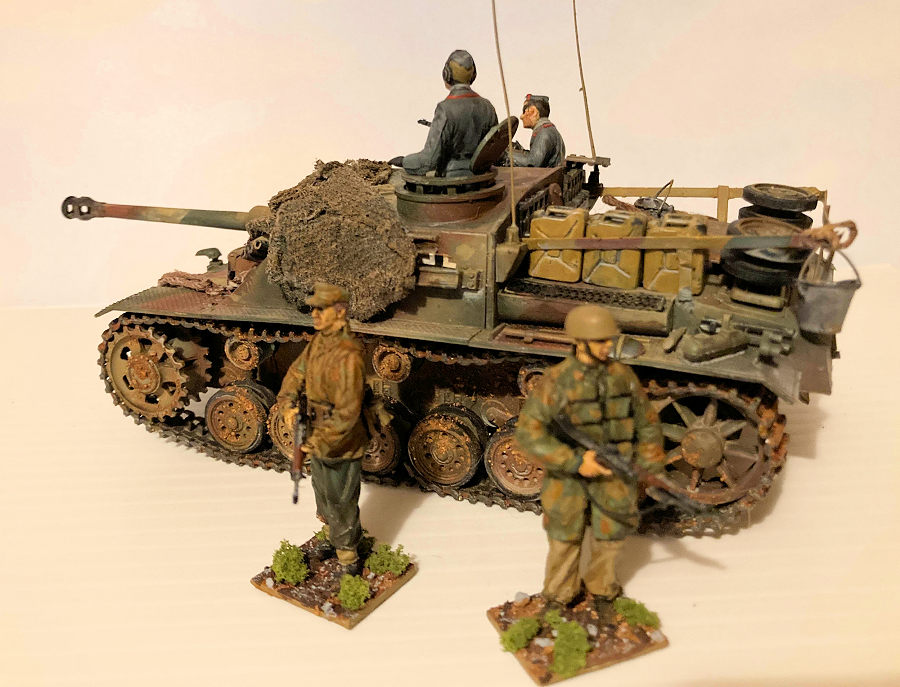
 I could not find the figure for the commander among
the loose parts, but I had a driver and commander from Tamiya's Panther, so I
decided to use them as they badly needed a repaint. At the time of writing, I've
not done anything with the four Fallschirmjäger troops that come with the kit,
all in action poses. They were so dramatic back in the day, clearly, as with the
kit, state-of-the-art stuff. Yet I find that I want more everyday scenes
nowadays. I painted two figures from Dragon's "Defense of the Reich" set and
posed them, standing guard, with the AFV.
I could not find the figure for the commander among
the loose parts, but I had a driver and commander from Tamiya's Panther, so I
decided to use them as they badly needed a repaint. At the time of writing, I've
not done anything with the four Fallschirmjäger troops that come with the kit,
all in action poses. They were so dramatic back in the day, clearly, as with the
kit, state-of-the-art stuff. Yet I find that I want more everyday scenes
nowadays. I painted two figures from Dragon's "Defense of the Reich" set and
posed them, standing guard, with the AFV.
Things went together quickly and painlessly. Even before painting I wanted to add a tarp partly over the front of the vehicle, which I made with bandage gauze picked at with a razor knife to look worn. It got several coats of acrylic paint later, after some diluted school glue dried to keep it in place.
I really wanted a heavily weathered if not battered vehicle, maybe one serving somewhere on the Italian boot, with all the "junk" visible. I left off the armored skirts in consequence. That meant, late in the build, adding sag to the tracks. I got that done by not fastening the tracks and leaving the joint at the bottom. Then one guide or road wheel at a time, I glued them down with CA gel, using clothes pins and shims to hold the tracks to each wheel until glue set up.
With a crate left from Tamiya's T-34/76, I put bottoms on each half to make two crates. I added the jerry cans and a coil of hemp craft cord as a coiled rope. The gear rack was made from PE bits in the parts box, and I hung a bucket there as well as from a tiny loop of bead-maker's brass chain under the vehicle.
One boo-boo I decided to fix at the 11th hour was up front, a flaw of mine and not the kit's. The upper hull did not fully mate to the lower hull, leaving a gap for either putty or a cheat. Using more hemp cord, I made a heavy tow rope of the sort I've used around our farm; not everything needs a metal cable. I used clear school glue to wrestle it into a bundle that drapes between the upper and lower hull.
| COLORS & MARKINGS |
My Badger airbrush had not yet arrived, so I pulled out Testor's flat black in a rattle can and pre-shaded the model. I then used my "cheapo Amazon Special" and had at it with Mission paints, which work fairly well in that awful airbrush. They went on nicely, though I did use Panzer Green, not Tan, as my base color. I put Silly Putty down to get my breaks in the camo, and that went well, though the demarcations are wider than seen on most German AFVs. Then on when the Future before the oil washes.
I washed with Burnt Umber and medium gray oils. I did a few pin washes, too, using makeup sponges dipped in odorless thinner to remove oils on high spots. With a small brush I put on some ancient Flouquil rust paint I bought 40+ years ago. I've enough left to outlast me! It took a lot of shaking to mix it again... Finally, I sealed things down with Tamiya Flat finish. Some dry brushing of raised details such as rope fibers helped make them pop, as did Prismacolor silver pencil on the edges of armor or jerry cans. I did not go overboard with rust, but some tools and got a bit of wear, and I used actual farm equipment in my barn to guide me on what gets rusty and what stays shiny with use. A final spritz of flat sealed in the weathering.
The crew, from a Tamiya Panther kit, had been in SS black and I wanted them in the kit of Luftwaffe ground division. So I covered them with flat black, then mixed my own Field Gray.
| FINAL CONSTRUCTION |
 The crew got their touch up to faces, uniforms, and
gear. STuG crews not in the SS had red piping on their collars, so I added that
as well as white dots to approximate uniform pins and other decorations. My
gunner "Helmut" had acquired an eyepatch when I built the Panther, mostly
because I was messing around with a face so poorly molded that the two eyes
would never look even. Once his uniform looked decent, I decided to keep the
patch. He'll aim the MG with his one good eye.
The crew got their touch up to faces, uniforms, and
gear. STuG crews not in the SS had red piping on their collars, so I added that
as well as white dots to approximate uniform pins and other decorations. My
gunner "Helmut" had acquired an eyepatch when I built the Panther, mostly
because I was messing around with a face so poorly molded that the two eyes
would never look even. Once his uniform looked decent, I decided to keep the
patch. He'll aim the MG with his one good eye.
Last of all I got some red clay dried out in my yard, where we just dug footings for an expanded back porch. I pulverized this in a heavy-duty plastic bag to make a powder. I sprayed the bottom and tracks with a contact adhesive, dusted it with clay as well as gray dust from my shop floor, then sealed it all with more Tamiya flat. It looks real enough for my tastes. Stretched sprue made the radio aerials.
| CONCLUSIONS |
Highly recommended for modelers of all skill levels. If you enjoyed Tamiya white-box kits in the 70s and are considering modeling again, do yourself a favor and re-enter the hobby there.
This was pure fun and a break from fiddly 1/72 aircraft builds, in particular a Sword kit of the English Electric Lightning that gave me fits (mostly of my own making). AFVs have long lured me, because I love the weathering of grimy, hard-used military vehicles more than any other part of a model build.
Joe Essid
6 June 2022
Copyright ModelingMadness.com. All rights reserved. No reproduction in
part or in whole without express permission.
If you would like your product reviewed fairly and fairly quickly, please
contact
the editor or see other details in the
Note to
Contributors. Back to the Main Page
Back to the Review
Index Page
Back to the Previews Index Page