Dragon 1/35
Tiger I Ausf E (Late) with Zimmerit
|
KIT #: |
6383 |
|
PRICE: |
$65.00 MSRP |
|
DECALS: |
Six options |
|
REVIEWER: |
|
|
NOTES: |
Numerous option parts; photo-etch; flex tracks |
|
HISTORY |
The Tiger I evolved from a heavy tank design started in 1937. It received a major priority bump when the Germans discovered that Soviet T-34s and KV-1s were more than tough armored opponents for their PzKpfw III and IV vehicles, which comprised the bulk of the German armor inventory. German arms manufacturers quickly received Armament Ministry requirements for a 45 ton tank armed with an 88mm main gun and sporting heavy armor. Both Porsche and Henschel started working on a tank to meet these requirements, and in field tests, the Henschel design, spearheaded by Dr. Erwin Aders, won out primarily due to its better maneuverability.
Tiger I production
began in August, 1942 and steadily built from a production rate of 25 to over
100 per month. A measure of the tank’s complexity is that it took twice as long
to build one Tiger as it did the Panther, which was no simple machine. With its
 88mm gun
and heavy armor, the Tiger I was the most powerful tank in the world when it was
first deployed. Due to its high muzzle
velocity (2,657 ft/sec), the 8.8cm KwK 36 L/56 gun allowed an extremely flat
shell trajectory and a high strike impact on the target; thus, the gun was able
to penetrate 112mm of armor at a range of 1400 meters.
88mm gun
and heavy armor, the Tiger I was the most powerful tank in the world when it was
first deployed. Due to its high muzzle
velocity (2,657 ft/sec), the 8.8cm KwK 36 L/56 gun allowed an extremely flat
shell trajectory and a high strike impact on the target; thus, the gun was able
to penetrate 112mm of armor at a range of 1400 meters.
During initial combat
encounters with the Tiger, many allied gunners were amazed to see their rounds
bounce off the Tiger’s sides, and it quickly gained an almost legendary
reputation for invincibility on the battlefield (of course, Tigers could be
defeated, and it would take combat experience to learn how).
Early to mid
production versions of the Tiger I sported large Feifel air cleaners at the rear
of the tank with its distinctive V shaped intake ducts on the tank’s rear deck,
and rubber-rimmed road wheels. There were also a number of turret differences on
the early versions, including a vertically opening hatch as opposed to the “side
swinging” hatch, introduced on mid-production models. The Tiger I featured
overlapping and interleaved road wheels, which had the disadvantage under winter
conditions of mud and snow easily packing the dished road wheels. If this
mixture then froze, it could jam the wheels and immobilize the tank.
The first 250 Tiger I
tanks had the Maybach V-12 HL 210 P45 engine, but its 642 BHP proved inadequate
for the tank’s 62 tons. The remaining 1100 Tigers were outfitted with the
improved Maybach HL 230 P45, which produced 694 BHP.
An on-board fuel capacity of 141 gallons of gasoline gave the tank a
cross country range of about 42 miles. Storage bins under the turret ring
 accommodated
92 rounds of 88mm ammunition.
accommodated
92 rounds of 88mm ammunition.
In early August,
1943, the Germans decided to install ‘zimmerit”, a coating to defeat
magnetically attached mines, on many of their armored fighting vehicles, and the
Tiger I was no exception. Zimmerit had no anti-magnetic properties; rather, it
worked by providing a non-conducting, irregular surface that reduced the contact
area between the tank’s hull and a mine. This in turn would cause the mine to
fall off the vehicle due to its own weight and vibration. Mid and late
production Tiger Is produced up until September, 1944 probably received factory
applications of zimmerit.
The most distinctive
feature of late production Tigers was their steel road wheels. Additionally, the
tanks hull-attached tools were moved to different locations, and the external
travel lock for the main gun was discontinued.
Over the course of the war, the 18 main Tiger I units managed a kill/loss ratio of 5.74. One of its most famous commanders was Michel Wittmann. Many of his confirmed kills (138 tanks and assault guns and 132 anti-tank guns) came during the two years he was a Tiger I commander. Wittmann was the leading tank ace of World War II.
|
THE KIT |
For a detailed look at what’s in the box,
see the
Boss' review. Like all recent Dragon
kits, this one is filled with optional parts, including the dreaded photo-etch
(I am slowly beginning to not dread this stuff quite as much as I have in the
past). Another great feature, at least to this old modeler, is the move back to
one piece flexible tracks instead of the tedious individual link Magic
 Tracks.
Individual links are provided for spare track links, and you can order a set of
the magic tracks for this kit at
cyber-hobby.com if you are so inclined.
Tracks.
Individual links are provided for spare track links, and you can order a set of
the magic tracks for this kit at
cyber-hobby.com if you are so inclined.
The molding is petite and extremely
detailed. In fact, I think Dragon’s molds are so good that one can essentially
opt out of many of the PE parts provided in the kit and just go with the
optional molded parts that are included (e.g., the tie-downs for the various
tools that are fitted to the tank’s hull).
This is my first Dragon kit with molded
zimmerit, and I can tell you that its rendering is “fantastic.” The detail is
quite amazing, and if any of you have applied your own zimmerit coatings to
German armor models in the past, you will fully appreciate the convenience of
this added feature (for those who don’t care to model a zimmerit-coated Tiger,
there are plenty of optional parts in the box to allow this choice).
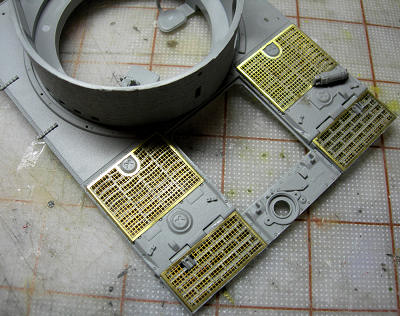
For the PE nuts out there, a nice touch
is the addition of PE “bending molds” on the TA sprue (you essentially wrap the
specific PE parts around these molds to get the proper shape for the model,
thereby eliminating the need for an aftermarket PE bending tool).
|
CONSTRUCTION |
I basically followed the step-by-step
assembly sequences in the Dragon instructions. Given the complexity of these
kits, I have taken to keeping a pencil handy during construction and
deliberately marking off each part in each step that I can complete. That
 way, if I
skip ahead to, say, assembling the turret, I can go back over the instructions
and see what specific assembly items I have not completed. I will assert that
Dragon appears to be improving their assembly instruction process, because I did
not find a single mistake on these (unlike several other Dragon kits I have
built recently).
way, if I
skip ahead to, say, assembling the turret, I can go back over the instructions
and see what specific assembly items I have not completed. I will assert that
Dragon appears to be improving their assembly instruction process, because I did
not find a single mistake on these (unlike several other Dragon kits I have
built recently).
There is one caution: you have to be
pretty focused on the “version” or options you are including in your particular
model. Example: I of course wanted to construct the zimmerit-coated Tiger I, and
proceeded down this path. Don’t ask me why, but for some reason (perhaps my age;
or, I could argue that the instructions depict some of these parts without
zimmerit, but that is a pretty lame excuse on my part) when I got to the gun
mantlet, I grabbed the non-zimmerit coated part off the sprue and proceeded to
construct the entire gun assembly. I didn’t discover this until I was ready to
mate the fully assembled turret with the tank hull. Needless to say, I had to
pry loose some well-glued parts to correct this boo-boo. Fortunately, I was able
to do this without too much damage to parts I had to reuse. Even after this
fiasco, I later discovered that I had also not glued the zimmerit coating to the
front lower hull half. This was
much easier to fix than the mantlet problem, but, nevertheless, it was a rather
maddening exercise.
 By and
large, the proven subassembly technique worked well on this kit. I finished the
lower hull and all the running gear first. Because the late production Tiger had
steel wheels, I was able to completely assemble all of the road wheels to the
chassis without worrying about painting the rubber rims.
By and
large, the proven subassembly technique worked well on this kit. I finished the
lower hull and all the running gear first. Because the late production Tiger had
steel wheels, I was able to completely assemble all of the road wheels to the
chassis without worrying about painting the rubber rims.
I then moved to the rear hull and
engine deck. There are a myriad of pieces for both of these, and I just
methodically stepped through all the parts until I completed each. The rear
engine deck is the first encounter of the dreaded PE, with the intakes being
covered by mesh PE screens. I must say, these are striking and give a great look
to the model. I used superglue to secure them to the deck.
I prefer to assemble hull mounted tools
and other items during the assembly process and then hand-paint items such as
wooden shovel, axe and sledge hammer components. As I mentioned, you have the
option of either forming numerous, very intricate (and small) PE
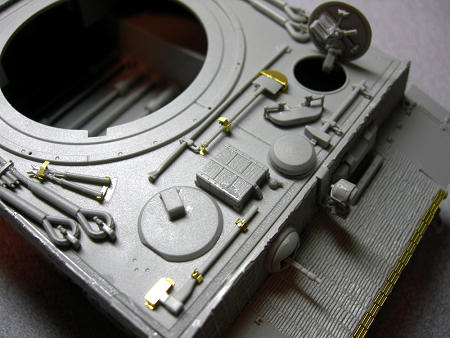 clamps
and hold downs for the tools, are just using the optional tools that already
have the hold downs and clamps molded on them. I opted for a mixed bag: for some
of the tools I used the PE parts, and for others, I did not.
Call me lazy or whatever, but there is limit to both the dexterity AND
eye sight of a 62 year old! Other younger, more dexterous whippersnappers may
opt for the “water torture” experience of using only PE where appropriate.
clamps
and hold downs for the tools, are just using the optional tools that already
have the hold downs and clamps molded on them. I opted for a mixed bag: for some
of the tools I used the PE parts, and for others, I did not.
Call me lazy or whatever, but there is limit to both the dexterity AND
eye sight of a 62 year old! Other younger, more dexterous whippersnappers may
opt for the “water torture” experience of using only PE where appropriate.
The turret is another area of great
detail and many parts. While Dragon does not provide a complete interior on this
kit, it does provide sufficient detail (e.g., gunner and loader’s seats,
periscopes, complete gun assembly including shell basket, etc.) so that one can
display the various hatches open and not be concerned about what will be showing
if they are open. The one
noticeable absence is that of the turret mounted machine gun: the mount is
there, but no gun is included in the vast box of parts. I opted to install a
spare MG34 from the old spares box.
The kit includes wire to make tow
cables, but I opted to use the plastic, pre-molded larger cables for the top of
the hull and the smaller plastic cable for the side-mounted cable. I made up one
of the metal cables and attached it to the front towing U clamp and then draped
it over the hull to the rear U
clamp.
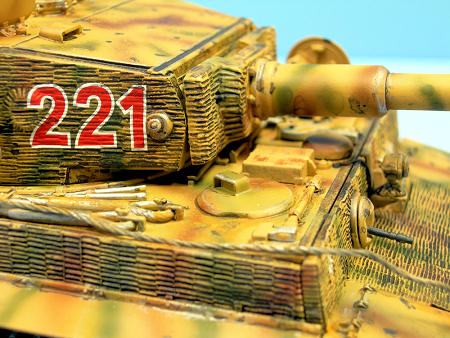
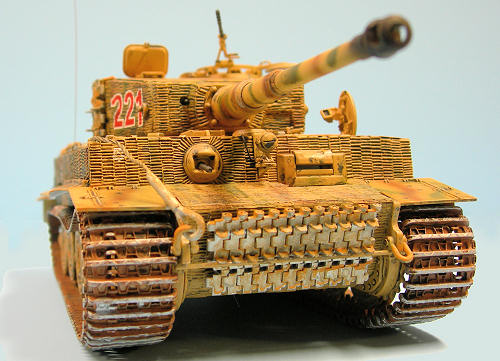
After mounting the turret, I then glued on all of the various tools and other items that cover the hull. I initially thought I would leave the side skirts off the tank, but after looking at numerous photos of Tiger Is from World War II, I did not run across any “operational” pictures of Tigers without the skirts – only pictures where the skirts were taken off to exchange the thinner, transport tracks with the wider battle tracks. As one would expect, these lighter gauge skirts took a terrific beating in war, so I did remove a section on each side, thinned out some of the sections, and then took pliers and bent single sections to simulate battle-damage. I thinned the skirts by scraping the plastic off the backsides with an Xacto knife. I also cut apart the individual fenders, thinned them, and bent them to simulate typical battle damage.
|
COLORS & MARKINGS |
Since the marking options are all for
late war Tigers, I opted for the standard post-1942 camouflage color scheme of
Dunkelgelb (a sort of mustard color) with stripes of Olivegrun (dark green) and
Ratbraun (reddish brown). I first
covered the entire tank with Model Masters Sand Gelb (close enough for me to
Dunkelgelb), and when this was dry, I began to create the striped camo pattern
using light (15 psi) air pressure and a ve ry
low nozzle opening on my airbrush. I
used Model Masters Dark Green and Testors Dark Brown for the camo stripes. This
is tricky and takes some practice, but after a while one gets the hang and feel
of it; also, any mistakes (such as pausing too long in one location with the
airbrush and causing a run) can be corrected by overspraying the basecoat of
sand Gelb and starting over (I won’t disclose how many times I had to do that).
ry
low nozzle opening on my airbrush. I
used Model Masters Dark Green and Testors Dark Brown for the camo stripes. This
is tricky and takes some practice, but after a while one gets the hang and feel
of it; also, any mistakes (such as pausing too long in one location with the
airbrush and causing a run) can be corrected by overspraying the basecoat of
sand Gelb and starting over (I won’t disclose how many times I had to do that).
I glued the tracks together, and then
sprayed them with Model Masters Steel. Once they were dry, I gave them a coating
of MM leather.
Once all was dry, I coated the entire
model with Rustoleum Crystal Clear straight from a rattle can (be careful with
this stuff: it will eat paint like crazy if you don’t mist it on at first, and
then build up your coats). But this stuff glosses like nothing I’ve seen, so I
think it’s worth using as opposed to trying to spray gloss finishes with an
airbrush.
I set the tank aside to dry, and later
covered the entire tank with a wash of acrylic black. After letting the wash dry
for an hour or so, I used wet Q-tips to clean up the areas of excess wash on the
tank. This process really makes the zimmerit and other details pop. I then
covered the flex tracks with an oil wash mixture of burnt sienna and yellow
ochre, mixed to a rust color. I
also applied this wash to selected spots on the tank to simulate rust. After
this dried, I applied the acrylic black wash to the tracks, and then highlighted
the high spots and other areas on the tracks with a silver paint pen.
I used Solvaset to soften and lay down
the decals, and once these were dry, I covered the tank with Testors Dullcote.
I then picked out various areas with a silver pencil to simulate bare
metal in strategic spots, including the road wheels and drive
 sprockets.
I also dry brushed Polly S Goblin’s
Flesh on various locations to simulate rust.
sprockets.
I also dry brushed Polly S Goblin’s
Flesh on various locations to simulate rust.
One of the drawbacks of flex tracks is
simulating the sag in German tracks. I tried supergluing the tracks to the
roadwheels, but finally opted for drilling a hole in the lower hull and
inserting a straight piece of paper clip to hold the track down, particularly at
the front of the tracks where the sag was so pronounced on Tigers.
The final step in painting the model
was to brush paint the various tools and their wooden handles. Since I had
already mounted them to the turret, I also opted to hand-paint the spare tracks
on the turret sides.
The final touches were to cut a length
of guitar string for a radio antenna and superglue it to the antenna mount on
the hull, and then to glue a plastic bucket from the spares box on the back
hitch.
|
CONCLUSIONS |
In my opinion, the latest Dragon kits are the industry leaders when it comes to armor modeling, and this Tiger I is no exception. The molded-on zimmerit creates a certain “wow” factor that is hard to top. I think this model contains the most detail of any armor model I have assembled to date. I recommend this kit to anyone with some experience in assembling models with numerous, small detail parts. I anxiously await future Dragon kit releases and look forward to building them!
|
REFERENCES |
 1.
Hamby, Alan, “PanzerKampfwagen VI: The Legendary Tiger I,”
Tiger I Information Center,
2009.
1.
Hamby, Alan, “PanzerKampfwagen VI: The Legendary Tiger I,”
Tiger I Information Center,
2009.
2.
“Zimmerit,”
Wikipedia, 2009.
3.
Feist,
Uwe, “Tiger I in Action,” Squadron/Signal Productions, 1973.
4.
Nightingale, Eddie,
Campaign
Battlefront Wargame Club, 2009.
5.
Ankerstjerne, Christian, “German
Tank Colours,” Panzerworld,
2009.