TAKOM 1/35 Sd.Kfz.182 King Tiger w/Full Interior
| KIT #: | 2047 |
| PRICE: | $70.00 |
| DECALS: | Four options |
| REVIEWER: | Blair Stewart |
| NOTES: | Complex kit with numerous (>1000) parts, including plastic and photo-etch; full interior and all associated internal equipment |
| HISTORY |
The Tiger II is a heavy tank of the Second World War. The final official German designation was Panzerkampfwagen Tiger Ausf. B, often shortened to Tiger B. The ordnance inventory designation was Sd.Kfz. 182. It is also known under the informal name Königstiger (the German name for the Bengal tiger), often translated as Royal Tiger, or as King Tiger by Allied soldiers, especially by American forces.
The Tiger II succeeded the Tiger I, combining the latter's thick armor with the armor sloping used on the Panther medium tank. The tank weighed almost 70 tons, and was protected by 100 to 185 mm armor in the front. It’s main gun was the 8.8 cm KwK 43 L/71 anti-tank cannon. The chassis was also the basis for the Jagdtiger tank destroyer.
The Tiger II was part of heavy tank battalions of the Army and the Waffen SS. The 503rd Heavy Panzer Battalion first used the tank in combat during the Allied Invasion of Normandy on 11 July 1944; on the Eastern Front, the first unit to be outfitted with Tiger IIs was the 501st Heavy Panzer Battalion, which by 1 September 1944 had 25 operational Tiger IIs.
The Germans initiated
development of a heavy tank design in 1937 and awa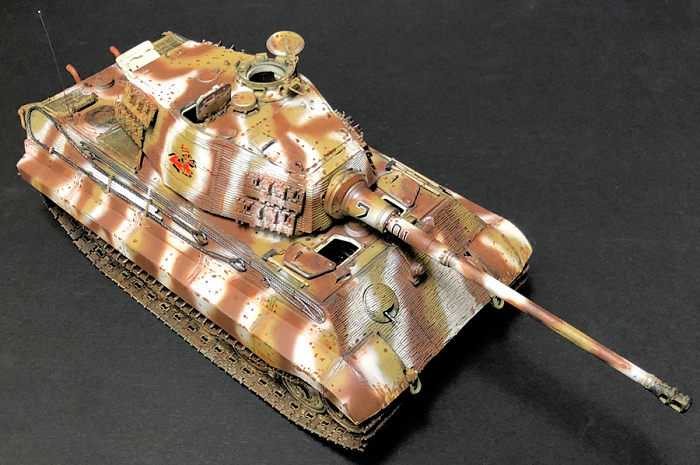 rded the initial design
contract to Henschel.
Another design contract followed in 1939, and was awarded to Porsche. Both
prototype series used the same turret design from Krupp;
the main differences were in the hull, transmission, suspension and automotive
features.
rded the initial design
contract to Henschel.
Another design contract followed in 1939, and was awarded to Porsche. Both
prototype series used the same turret design from Krupp;
the main differences were in the hull, transmission, suspension and automotive
features.
The Henschel version used a conventional hull design with sloped armor resembling the Panther tank’s layout. It had a rear-mounted engine and used nine steel-tired, eighty-centimeter-diameter overlapping road wheels per side with internal springing, mounted on transverse torsion bars, in a similar manner to the original Henschel-designed Tiger I. To simplify maintenance, however, as when the same steel-tired road wheels were used on later Tiger I hulls, the wheels were only overlapping without being interleaved — the full Schachtellaufwerk rubber-rimmed road-wheel system that had been in use on nearly all German half-tracks used the interleaved design, which the early production versions of the Tiger I and Panther inherited.
The Porsche hull designs included a rear-mounted turret and a mid-mounted engine. The suspension was the same as on the Elefant tank destroyer. This had six road wheels per side mounted in paired bogies sprung with short longitudinal torsion bars that were integral to each wheel pair; this saved internal space and aided repairs.
It is difficult to measure the overall effect of the Tiger II on the World War II battlefield, as they did not enter service until late in the war and only 492 were produced. Added to the complexity of the tank’s design/construction, one might argue that the Germans spent a lot of money and effort on a vehicle that, in the end, could not turn the tide of battle for Germany. One also might argue that allied tank crews were, in the end, very grateful that they did not have to face numerous Tiger IIs throughout the war in Europe.
| THE KIT |
When Takom and other kit
manufacturers started offering 1/35 tank kits with full interiors, I was
initially intrigued; but given my existing relatively large kit stash, I nobly
resisted the temptation to buy one of these. Alas: in the end, l was like the
person driving by a car accident who knows they shouldn’t gawk but can’t help
from doing so.
 Thus, after reading a couple of reviews of Takom’s Tiger II and
seeing pictures of the completed model, I ultimately gave in to the seemingly
irresistible temptation and bought one.
Thus, after reading a couple of reviews of Takom’s Tiger II and
seeing pictures of the completed model, I ultimately gave in to the seemingly
irresistible temptation and bought one.
Upon opening the rather large box, one is immediately taken aback by the sheer number of parts, presented on 16 plastic sprues – each individually wrapped in a clear plastic bag – two large photoetch sets, a sprue of clear plastic parts, and the two plastic bags containing the 192 individual track links. The upper and lower hulls are packaged separately.
In addition, there is a 30 page instruction booklet. A nice touch is a set of 5 full color glossies, that show how to paint the interior components by using actual kit assemblies. These also provide exterior painting instructions for four different camouflage schemes. All of these color plates call out Mig Ammo colors.
| CONSTRUCTION |
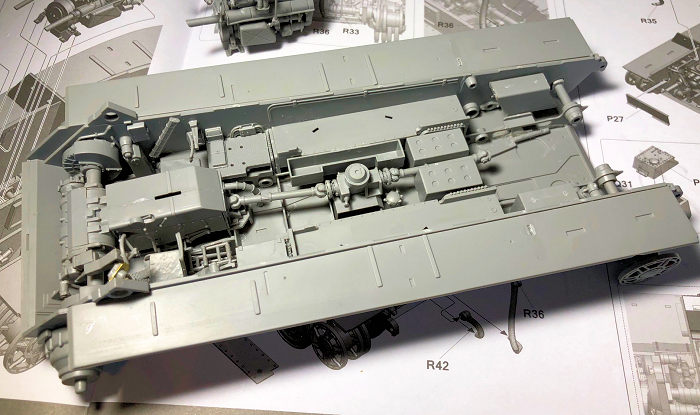
After a few months of examining/staring at the kit contents, I finally faced the fact that I had spent a tidy sum on this, and it would be a shame to relegate it to the kit stash heap in the basement. Accordingly, I dove in to constructing this beast. The 75 step instruction booklet is almost a deterrent to building the kit, but I ducked my head and charged into steps 1-4, which basically prepare the lower hull for the buildup of internal tank components that are anchored to it. At the start, I decided that I would check off each step I completed, in hopes that, down the road, I could easily go back through the instruction booklet and see any assembly steps I had opted to leave until a later time in the construction process. Next, I assembled the torsion bars, but opted to wait until later to insert them into the lower hull. I also constructed the 18 sets of dual road wheels and set them aside.
 Early in the
construction process, I found a series of three very useful YouTube
videos (see references) from Andy’s
Hobby Headquarters that take a modeler thru this kit’s construction. Based on
some tips in these videos, I delayed the assembly of some parts – for example,
the rear wall that separates the engine compartment from the tank’s fighting
compartment – to facilitate later painting of the interior and its components.
If you decide to build this kit, I heartily recommend you watch Andy’s videos
before and during your construction process and pay CLOSE attention (Note: even
with all of Andy’s great tips, I still was able to screw up a number of things,
which resulted in some not-so-cool problems in the final assembly. I elaborate
on these later in this article).
Early in the
construction process, I found a series of three very useful YouTube
videos (see references) from Andy’s
Hobby Headquarters that take a modeler thru this kit’s construction. Based on
some tips in these videos, I delayed the assembly of some parts – for example,
the rear wall that separates the engine compartment from the tank’s fighting
compartment – to facilitate later painting of the interior and its components.
If you decide to build this kit, I heartily recommend you watch Andy’s videos
before and during your construction process and pay CLOSE attention (Note: even
with all of Andy’s great tips, I still was able to screw up a number of things,
which resulted in some not-so-cool problems in the final assembly. I elaborate
on these later in this article).
Step 13 takes you thru the steps to assemble the transmission’s 21 parts. Since the lower part of the tranny was to be painted the same color as the lower hull, I glued it into place. I then moved to steps 17-25, which assemble the Maybach HL230 P30 gasoline engine. I spray painted the engine Mig Cremeweiss and set it aside. Steps 26-31 involve the assembly of the two radiators, the two gas tanks, and various engine plumbing components.
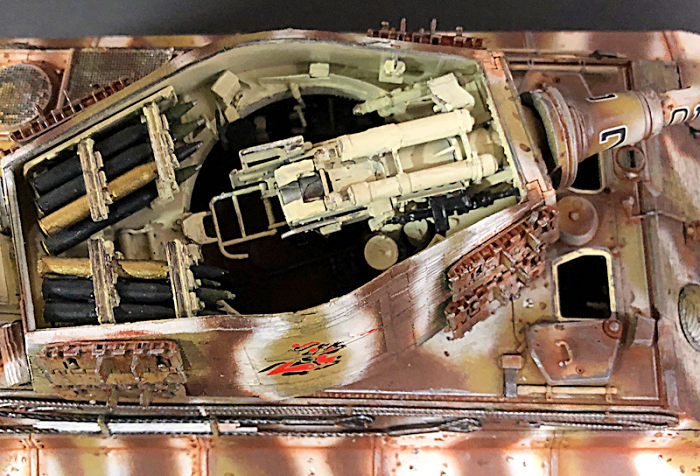
At this stage, I was ready for initial painting of the lower hull assembly. I painted the majority of the fighting compartment with Mission Models’ Rotbraun RAL 8012, which appears to be a spot on match for the actual hull red color the Germans commonly used for armored vehicle interiors. Once the lower hull was dry, I glued the black radios to the top of the transmission. I then glued in the torsion bars, which did not go in easily. I thus concluded that leaving these out per Andy’s video so they could be painted separately turned out not to be such a good idea in my case. After numerous attempts to feed several of the torsion bars through one side of the lower hull to the other, I gave up and cut some of them short. This actually didn’t matter in the long run because you cannot see all of the torsion bars underneath the fighting compartment’s equipment and lower floor. I can only conclude that I did not have some things properly aligned that would allow the torsion bars to be installed as designed.
 The other main color
used in the fighting compartment is Cremeweiss. While I already had a bottle of
this from Mig, it was a small amount (.5 Oz), and I didn’t want to buy another
bottle at some $4-5. Thus, I trudged to my local Walmart and began searching
their inexpensive line (50 cents a bottle) of craft paints. Voila! I found Apple
Barrel Vanilla Ice Cream, which is almost a one-for-one match to Cremeweiss.
Although I have yet to spray this paint, a local modeler informed me that Pledge
acts as a good thinner for these paints, so when I get some “free time” I will
try this. But my primary use of this cheaper version of Cremeweiss was to brush
paint components (such as the ammo racks, which would be a royal pain to mask
and then spray paint, given that the main gun rounds are pre-molded into them).
In hindsight, I probably should have spray painted these, and THEN hand-painted
the gun rounds. Oh well: live and learn!
The other main color
used in the fighting compartment is Cremeweiss. While I already had a bottle of
this from Mig, it was a small amount (.5 Oz), and I didn’t want to buy another
bottle at some $4-5. Thus, I trudged to my local Walmart and began searching
their inexpensive line (50 cents a bottle) of craft paints. Voila! I found Apple
Barrel Vanilla Ice Cream, which is almost a one-for-one match to Cremeweiss.
Although I have yet to spray this paint, a local modeler informed me that Pledge
acts as a good thinner for these paints, so when I get some “free time” I will
try this. But my primary use of this cheaper version of Cremeweiss was to brush
paint components (such as the ammo racks, which would be a royal pain to mask
and then spray paint, given that the main gun rounds are pre-molded into them).
In hindsight, I probably should have spray painted these, and THEN hand-painted
the gun rounds. Oh well: live and learn!
After completing the lower hull, I then moved to the upper hull. Here, I installed the first PE parts, which are the air intake screens, onto the rear deck. In keeping with the kit’s complexity theme, even the crew fired MG-42 has 6 parts, which I then glued to the inside of the upper hull.
At this point, I began the dreaded assembly of the individual track links (I don’t know why I have such a problem with these, but I can NEVER get them to fit or look correctly on a tank’s running gear/road wheels, and this kit was no different). It was at this stage that I discovered the angles of the road wheel attachment arms on the torsion bars were such that they would cause the upper track to drop below the tank’s side skirts (note: I actually followed the directions when installing them). This only increased my hatred for individual link tracks. After deciding there was very little I could do to remedy this problem, I pressed on. I then installed all of the delicate radiator and gas line hoses for the engine and hand-painted them.
 Per the instructions, I
next assembled the interior/exterior turret components and set the turret aside.
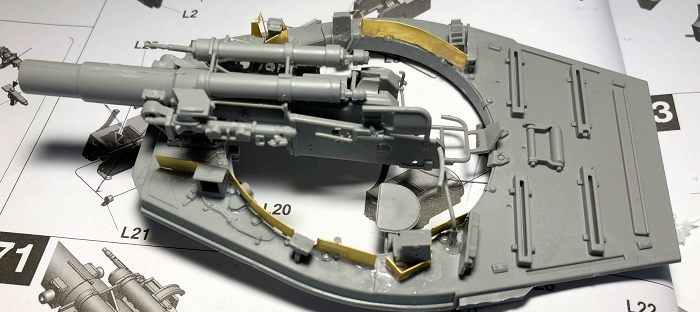
Steps 59-73 guided me through the assembly of the main gun and its mount, which
is a kit within the kit. I painted this assembly – mostly Cremeweiss – via
airbrush and bristle brush, and then installed it into the turret, along with
the main gun’s barrel.
Per the instructions, I
next assembled the interior/exterior turret components and set the turret aside.
Steps 59-73 guided me through the assembly of the main gun and its mount, which
is a kit within the kit. I painted this assembly – mostly Cremeweiss – via
airbrush and bristle brush, and then installed it into the turret, along with
the main gun’s barrel.
Per the video, I decided to glue the tank’s rear armor wall to the upper hull to facilitate removing the upper hull when showing the hull interior. It was at this point that I discovered a major problem: no matter how hard I tried, I could not get the upper hull to fit tightly to the lower hull. I noted points where I thought the two assemblies might be binding and shaved off some plastic. I even removed parts N3 and N19, which are glued to the inside of the upper hull to represent scale armor thickness of the hull. The result was “no dice.” After a long time fiddling with this issue, I decided that somewhere in the assembly process I had done something wrong that was preventing the two assemblies from lining up, but I finally threw in the towel and gave up. I also decided that I could at least minimize this issue by the way I ultimately chose to display the finished model (see below).
After super-gluing another set of PE screens to the upper hull and adding a radio aerial cut from a steel guitar string, I was now ready to paint the tank’s exterior.
| COLORS & MARKINGS |
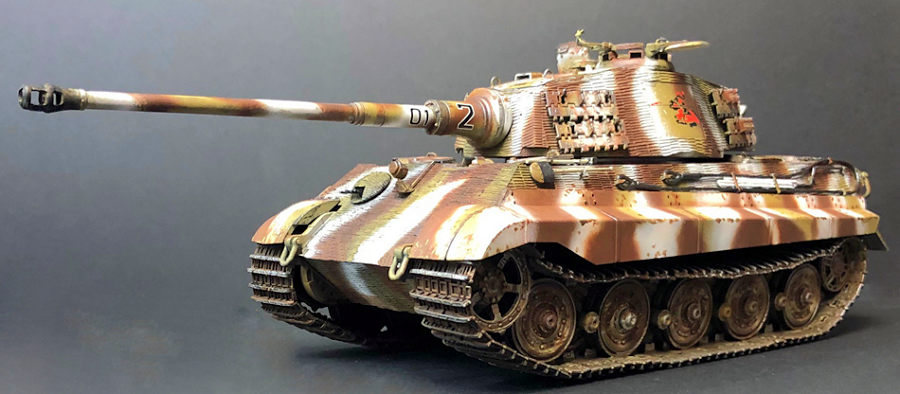
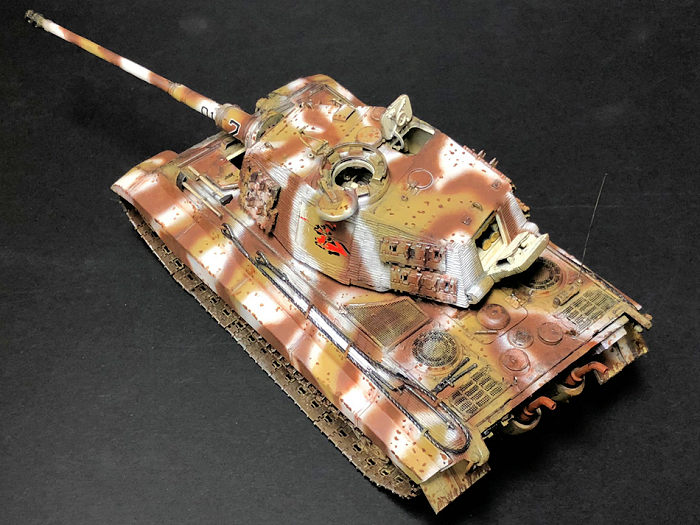
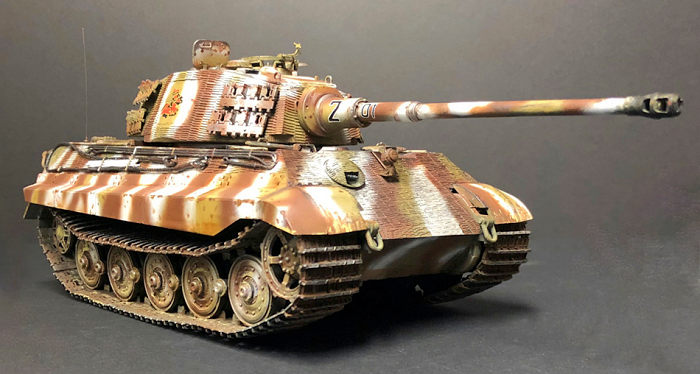
As previously stated, the kit offers four separate camo schemes, including a winter scheme that I had never seen before. At first, I thought I would avoid this scheme, but ultimately, I chose it for its uniqueness. The Color plates describe this scheme’s colors as Dunkelgelb, Schokobraun, and washable white. Not wanting to purchase more paint, I decide to substitute Tamiya XF-64 Red Brown and XF-60 Dark Yellow for the primary camo colors, and use Testors flat white for the winter camo white wash. The chosen paint scheme is for a Tiger II of the Panzer Abteilung 505 in the area of Konigsberg, Germany in October 1944. The 505 had a colorful charging knight logo on the turret. This and the number on the gun barrel are the only markings. I free-handed the two primary colors, and then misted on the white. After the paint dried, I brushed on a puddle of Pledge where the decals were to be placed, and then applied them to the model. After they dried, I covered them with Testors Dullcote.
 At this point, I assembled
the complete model (as well as I could) and began the weathering process. For
weathering, I applied various washes and dry brushed flat aluminum paint on
various parts of the tank to simulate wear. I thin painted small irregular
“paint chips” using a brown craft paint and a small brush (note: others might
opt to use the hair spray and toothbrush process to create these paint chips).
At this point, I assembled
the complete model (as well as I could) and began the weathering process. For
weathering, I applied various washes and dry brushed flat aluminum paint on
various parts of the tank to simulate wear. I thin painted small irregular
“paint chips” using a brown craft paint and a small brush (note: others might
opt to use the hair spray and toothbrush process to create these paint chips).
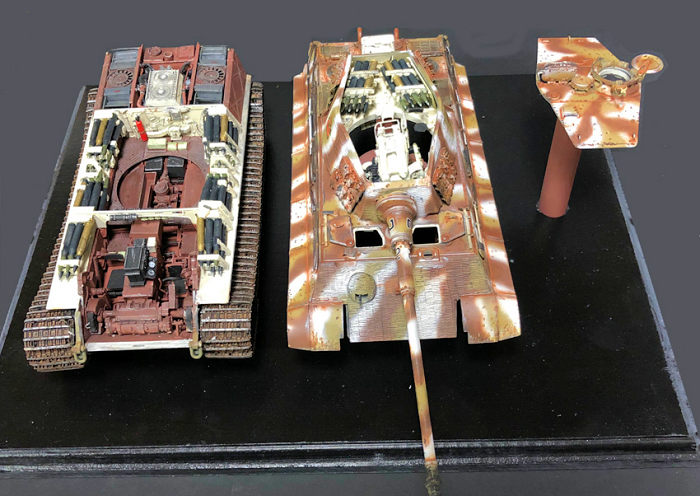
Once I finished the complete model, I was ready to mitigate the fit problems via a display method. Again, Andy’s video helped me. He suggested displaying the kit on a wooden plague base painted black. On the left side, I placed the open lower hull assembly with tracks, running gear, etc. Next, I found some ½ inch, thin-walled plastic pipe at Home Depot for the purpose of raising the upper hull on these to about the height that it would be on the real tank. I spray painted these with Rotbraun as a nice contrast to the black base. Next, I white-glued the turret top to a single piece of pipe next to the upper hull/turret assembly – again, at the relative height that it would be on the complete tank. The end result is a rather impressive display of the tank and it’s interior components (note: one could also use a wider display base and add into the display the main gun’ breech and all of its mechanisms that are inside the turret for an even more open presentation of the kit, but I chose to leave these inside the turret for my display).
| CONCLUSIONS |
This is a complex, time consuming kit that demands patience and careful assembly. The detail is amazing, but if one is not careful, there WILL BE fit issues. Andy did not mention any of these fit issues in his assembly videos, so I can only conclude that my fit issues were due to some thing(s) I did wrong in the assembly process.
 As an aside, building
this kit reinforced for me a great World War II history lesson: one of the
contributing reasons the Germans lost the war was their war machines were just
too complex. Not only did this create maintenance nightmares for the troops in
the field, but, in the end, the difficulty/cost of producing these machines
hindered the Germans from building enough tanks and other equipment to
match/counter those produced by the “arsenal of democracy” (total production of
German Panzers IV- VIB, which one would deem as the most worthy of
“tank-on-tank” battles, was about 22,000. In contrast, the US built over 48,000
M4 Sherman tanks – a greater than 2:1 advantage).
As an aside, building
this kit reinforced for me a great World War II history lesson: one of the
contributing reasons the Germans lost the war was their war machines were just
too complex. Not only did this create maintenance nightmares for the troops in
the field, but, in the end, the difficulty/cost of producing these machines
hindered the Germans from building enough tanks and other equipment to
match/counter those produced by the “arsenal of democracy” (total production of
German Panzers IV- VIB, which one would deem as the most worthy of
“tank-on-tank” battles, was about 22,000. In contrast, the US built over 48,000
M4 Sherman tanks – a greater than 2:1 advantage).
In closing, this kit is NOT for the faint of heart, nor for the inexperienced modeler. But if you really want to know what the inside of a German Tiger II tank looked like (and you have a lot of time on your hands), buy one of these and jump into the challenging, daunting task of building it.
| REFERENCE |
REFERENCESAndy’s Hobby Headquarters, Building the New 1/35 Takom King Tiger with Full Interior Part 1, Worldwide Web, March 2019.
Tiger II, Wikipedia, Worldwide Web, March 2019.
6 May 2019
If you would like your product reviewed fairly and fairly quickly, please contact the editor or see other details in the Note to Contributors.
Back to the Main Page Back to the Review Index Page Back to the Previews Index Page