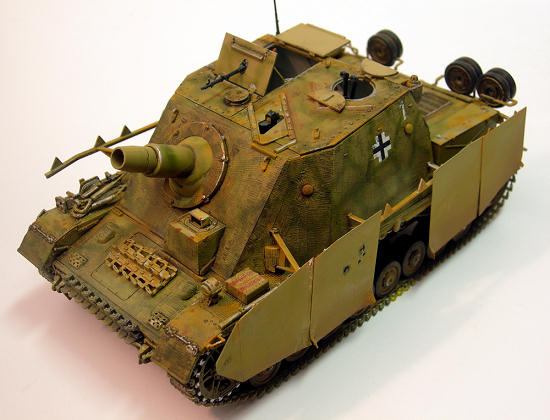
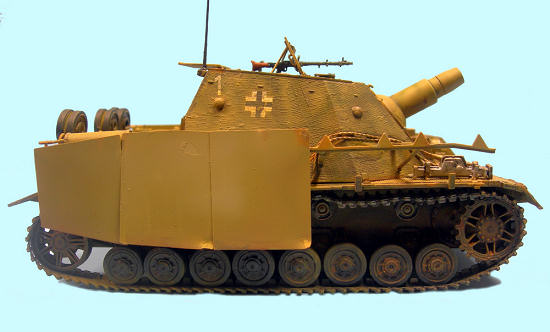
Dragon 1/35 Sd.Kfz.166 Stu.Pz.IV “Brummbär”
Mid Production with Zimmerit
|
|
6500 |
|
PRICE: |
$51.50 |
|
DECALS: |
Four options |
|
REVIEWER: |
|
|
NOTES: |
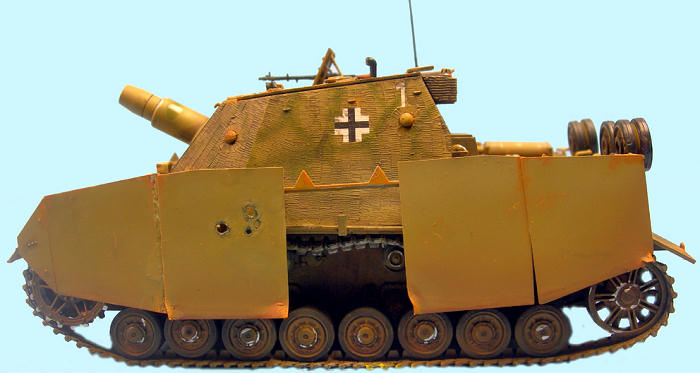
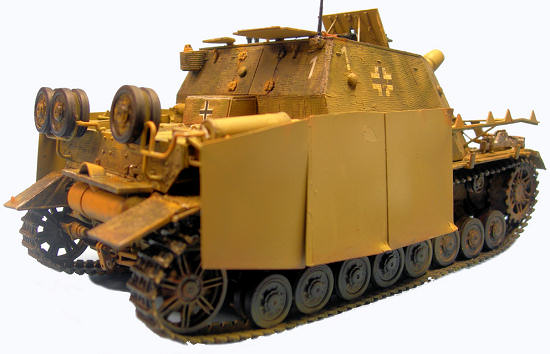
DS Tracks, Metal Side Skirt Armor Plates |
|
HISTORY |
The Sturmpanzer IV
(also known as Sturmpanzer 43 or
Sd.Kfz. 166) was a German armored
infantry support gun based on the Panzer IV chassis. It was used at the Battles
of
The Sturmpanzer IV was a development of the Panzer IV tank designed to provide
direct infantry fire support, especially in urban areas. The result was the
Sturmpanzer IV, which used a Panzer IV chassis with the upper hull and turret
replaced by a new casemate-style armored superstructure housing a new gun,
Skoda’s 150mm (5.9 in) Sturmhaubitze (StuH) 43 L/12. It fired the
 same shells as
the 150mm sIG 33 heavy infantry gun. The vehicle carried up to thirty-eight
rounds, along with separate propellant cartridges. It used the Sfl.Zf.1a sight.
The vehicle also carried an MG34 machine gun that could be fastened to the open
gunner's hatch, much like the arrangement on the StuG.IV Ausf.G. Early vehicles
carried an MP40 sub-machine gun inside, which the crew could fire through firing
ports in the side of the superstructure.
same shells as
the 150mm sIG 33 heavy infantry gun. The vehicle carried up to thirty-eight
rounds, along with separate propellant cartridges. It used the Sfl.Zf.1a sight.
The vehicle also carried an MG34 machine gun that could be fastened to the open
gunner's hatch, much like the arrangement on the StuG.IV Ausf.G. Early vehicles
carried an MP40 sub-machine gun inside, which the crew could fire through firing
ports in the side of the superstructure.
The driver's station projected forward from the sloped frontal armor plate and
used the Tiger I's Fahrersehklappe 80
driver's sight. The fighting compartment was (badly) ventilated by natural
convection, exiting out the rear of the superstructure through two armored
covers. Side skirts were fitted on all vehicles.
Early vehicles were too heavy for the chassis, which lead to frequent breakdowns
of the suspension and transmission. Efforts were made to ameliorate this from
the second series onwards, with some success.
In October 1943 it was decided that the StuH 43 gun needed to be redesigned to
reduce its weight. A new version, some 800 kilograms (1,800 lb) lighter than the
StuH 43, was built as the StuH 43/1. Some of the weight was saved by reducing
the armor on the gun mount itself. This gun was used from the third production
series onwards. Zimmerit coating was applied to all vehicles until September
1944.
The first unit to take the Sturmpanzer IV
into battle was Sturmpanzer-Abteilung 216. It was formed at the end of April
1943 and transferred in early May to
The Allied landing at
 Sturmpanzer-Abteilung 217 was formed on 20 April 1944 at the
Grafenwöhr
Training Area from cadres provided by Panzer-Kompanie 40 and Panzer-Ersatz
Abteilung 18, although it did not have any armored fighting vehicles until 19 'Stupas'
were delivered at the end of May. It departed 1/2 July for
Sturmpanzer-Abteilung 217 was formed on 20 April 1944 at the
Grafenwöhr
Training Area from cadres provided by Panzer-Kompanie 40 and Panzer-Ersatz
Abteilung 18, although it did not have any armored fighting vehicles until 19 'Stupas'
were delivered at the end of May. It departed 1/2 July for
Sturmpanzer-Kompanie z.b.V. 218 was raised in August 1944. It was sent to
Warsaw where it was attached to
Panzer Abteilung (Fkl) 302. It
remained on the Eastern Front after the
Warsaw Uprising was suppressed and was eventually wiped out in
Sturmpanzer-Kompanie z.b.V. 2./218 was raised simultaneously with Sturmpanzer
Kompanie z.b.V. 218, but was transferred to the
Paris area on 20 August. Nothing is known of its service in
 Sturmpanzer-Abteilung 218 was ordered formed on 6 January 1945 with three
companies with a total of 45 Stupas, but it received
Sturmgeschütz III
assault guns during February instead.
Sturmpanzer-Abteilung 218 was ordered formed on 6 January 1945 with three
companies with a total of 45 Stupas, but it received
Sturmgeschütz III
assault guns during February instead.
Sturmpanzer-Abteilung 219 was originally to be formed from
Sturmgeschütz-Brigade 914, but this was changed to
Sturmgeschütz-Brigade 237 in September 1944. In mid-September 1944
the brigade transferred to the
Döllersheim Training Area to reorganize and re-equip. Only ten Stupas
had been received when the battalion was alerted on 15 October to participate in
'Unternehmen
Eisenfaust', the German coup to forestall
The Germans produced 306
Brummbärs
from April, 1943 to March, 1945. The vehicle had a crew of 5, carried up to 38
rounds of 150mm ammunition and 600 rounds of 7.92mm. The combat weight was
28,200 kg.
|
THE |
Dragon continues its trend of issuing either totally new kits or upgraded,
improved versions of its older German WWII armor kits, many with Zimmerit. This
new kit corrects the some flaws in Dragon’s previous kit of this vehicle (No.
6460, upon which this kit is directly based) and provides the zimmerit on the
major components – the hull sides, the glacis sides, hatches and small detail
bits. Other than the changed parts (a total of 33 with 9 new clear styrene ones)
the kit is a repeat of the earlier one. It retains the “2-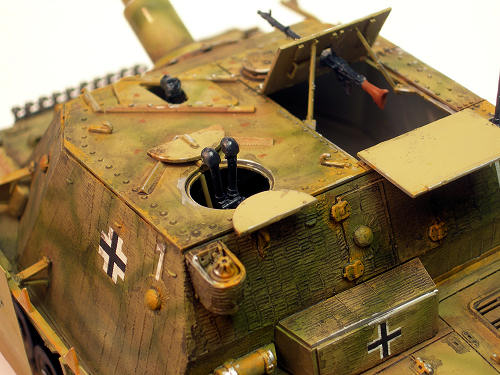 in-1" feature by again
providing the optional command “crow’s foot” antenna and mount to go on the
stock vehicle.
in-1" feature by again
providing the optional command “crow’s foot” antenna and mount to go on the
stock vehicle.
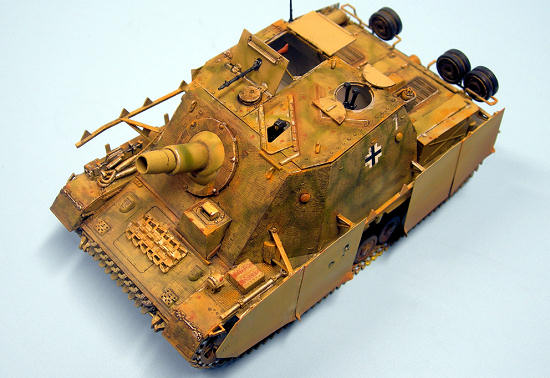
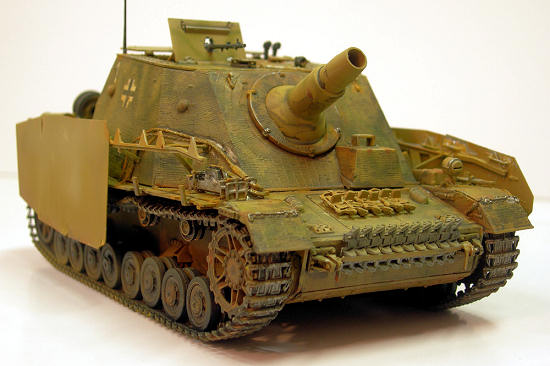
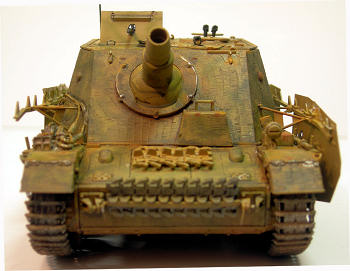
This kit features beautifully detailed, injection molded zimmerit that
faithfully reproduces the radial pattern on the front of the real vehicle; a
fully detailed gun and breach assembly; metal side-skirt armor plates that can
be installed separately to replicate the original side plates often added by the
Germans; and, best of all (at least to this modeler), the fantastic one piece
“Dragon Styrene 100” (DS) tracks.
In all, the assembly of some 665 styrene, photo etched brass and nickel,
and clear parts (light by the latest Dragon standards) awaits the modeler who
decides to tackle this kit.
The kit includes decals and painting instructions for four options, three for
Stu.Pz.Abt. 216:
Since my only prior experience with modeling the Brummbär was the old Monogram
1/32 kit back in the seventies, I was anxious to see what the present day
modeling companies could do with this unique vehicle, so I started the
construction process.
|
CONSTRUCTION |
 Based on previous experience with Dragon’s complex kits, I grabbed my red pen
(to mark off each completed step) and began following the step-by-step assembly
sequences in the Dragon instructions. Per all Dragon kits of late, be on the
alert for “versions” or options you might want to include in your particular
model, as there are a boatload of optional/unused parts in each of these kits,
many of which will be left over when you finish.
Based on previous experience with Dragon’s complex kits, I grabbed my red pen
(to mark off each completed step) and began following the step-by-step assembly
sequences in the Dragon instructions. Per all Dragon kits of late, be on the
alert for “versions” or options you might want to include in your particular
model, as there are a boatload of optional/unused parts in each of these kits,
many of which will be left over when you finish.
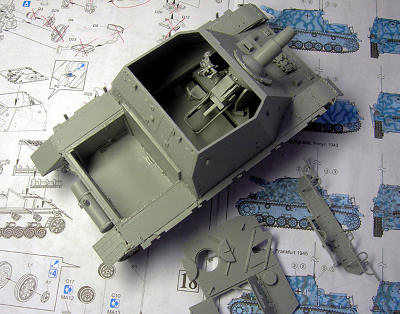
As with most armor kits, I finished the lower hull, the suspension and all the
running gear first (steps 1-7). I then moved to the upper hull and fighting
compartment. Here I opted to display the main top hatch in the open position
with the MG34 mounted in the gun shield. The MG is Dragon’s standard, well
detailed rendition that they package in many of their armor kits.
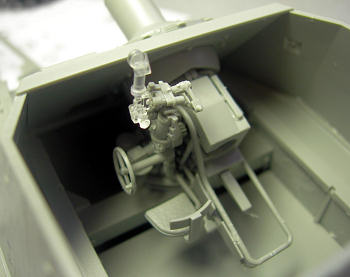 Steps 11-15 are for assembly of the main gun, which is composed of about 43
parts. This “kit within a kit” is engineered such that the modeler can elevate
or depress the gun when it is installed in the fighting compartment. After
gluing the gun into the compartment, I glued the complete assembly to the lower
hull, along with the rear engine deck and lower hull rear. At this stage, I
opted for the non-command vehicle and decided to use the styrene, kit-supplied
radio antenna rather than my standard practice of using a length of steel guitar
wire. My initial impression is that the kit part is a little too thick, and I
will probably revert to my previous practice with my next radio-equipped Dragon
armor kit. In this step, one encounters several PE parts, but their use is well
worth the effort as they are nicely scaled (thickness-wise) for their particular
applications.
Steps 11-15 are for assembly of the main gun, which is composed of about 43
parts. This “kit within a kit” is engineered such that the modeler can elevate
or depress the gun when it is installed in the fighting compartment. After
gluing the gun into the compartment, I glued the complete assembly to the lower
hull, along with the rear engine deck and lower hull rear. At this stage, I
opted for the non-command vehicle and decided to use the styrene, kit-supplied
radio antenna rather than my standard practice of using a length of steel guitar
wire. My initial impression is that the kit part is a little too thick, and I
will probably revert to my previous practice with my next radio-equipped Dragon
armor kit. In this step, one encounters several PE parts, but their use is well
worth the effort as they are nicely scaled (thickness-wise) for their particular
applications.
I then assembled the various tools that are mounted to the upper hull deck (for
example, the 7 piece vehicle jack) and glued them on the kit.
 At Step 21, one must decide on whether or not to build the kit with the optional
side skirts. I opted for the side skirts, so I went to Step 22. Here there is a
little bit of confusion with Parts F9/10 and E18/20/21, which are the steel
support arms for the armor plates: one has to be careful how these are mounted
to ensure the proper angle for parts F13/14, which are the horizontal rail
hangars for the side skirts.
At Step 21, one must decide on whether or not to build the kit with the optional
side skirts. I opted for the side skirts, so I went to Step 22. Here there is a
little bit of confusion with Parts F9/10 and E18/20/21, which are the steel
support arms for the armor plates: one has to be careful how these are mounted
to ensure the proper angle for parts F13/14, which are the horizontal rail
hangars for the side skirts.
The side armor skirts are etched nickel, and require the attachment of 3 styrene
hooks per armor plate. I used superglue for this, but I probably should have
somehow etched the attachment points to improve the joining of the styrene and
nickel parts (and a superglue accelerator is a must for this assembly).
I also decided to leave a few of the skirts off, as was a common scene of
battle-worn vehicles, and for those I included, I took some small needle nose
pliers and created dents and bends in the lower edges to simulate typical battle
damage associated with these skirts.
At this stage, the model was ready for the paint shop.
|
COLORS & MARKINGS |
I opted to use Adam Wilder’s “Color Modulation” painting technique (described in
an article on missing-lynx.com). I used
Tamiya acrylics for the initial steps,
diluted 50-50 with lacquer thinner. Since all of the versions represented by the
kit have the Panzer Yellow base, I opted for this paint scheme, with some minor
dark green camo.
The color modulation approach requires three main levels of color - light,
medium, and dark – to provide gradation in the vehicle’s color. I applied an
overall coat of Tamiya XF-64 Red Brown lightened with a few drops of XF-60 Dark
Yellow. Once this dried, I airbrushed a coat of XF-60, making sure to limit the
amount of this paint on the darker, lower areas. I then added XF-55 Deck Tan
 to
XF-60 to further lighten the color, and tried to again limit the spray to the
upper areas of the model. The contrasts between the dark and lighter areas were
now starting to become noticeable. For the final stage, I mixed X-2 White to
that mixture, and then re-sprayed the upper half of the model.
to
XF-60 to further lighten the color, and tried to again limit the spray to the
upper areas of the model. The contrasts between the dark and lighter areas were
now starting to become noticeable. For the final stage, I mixed X-2 White to
that mixture, and then re-sprayed the upper half of the model.
The next phase involved painting all of the smaller details (e.g., hatches,
covers, vents, grills) with lighter yellow and tan shades to make these details
“pop.” For this stage, I used inexpensive acrylic craft paints, purchased from a
local crafts store, and a relatively wide modeling brush to get smooth coats on
the model.
The next phase uses oil paints on the light and dark areas to provide additional
gradation and further break up the surface. I used a cardboard pallet to blend
the oil paints as well as to soak up the linseed oil in the paints so they will
dry with a matte finish. I mainly used the oils around the upper edges of the
hull and external boxes. Once applied, I blended these with a flat brush dipped
in a small amount of thinner, being cautious not to use too much thinner.
I then moved to “chipping,” which I still have not mastered. The approved
approach is to lay down small areas of light tan to sharp edges on the model and
areas that would receive such wear. I opted for a detail brush for this step. I
then used the same brush to apply dark brown in the center of each chip area to
try and replicate exposed metal. I am not sure my results are very convincing,
but I will plod on in hopes that one day I get this down. I then applied stripes
of Testors Dark Green in a random, typical camo pattern all over the vehicle’s
upper sections.
I coated the entire model with full-strength Future Floor Polish, and then
applied both dark brown and black washes to the entire vehicle, including the
tracks (which I had sprayed with Testors Steel). I keep a Q-tip handy to quickly
wipe away any excess wash
 that gets on the model.
I then applied the kit decals with Solvaset and let them dry. At this stage, I
was ready to restore the model’s matte finish, so I shot the entire model with
Testors Dullcote.
Once again, one of the potential drawbacks of the DS flex tracks is simulating
the ever-present sag in German tracked vehicles that are not moving. But Dragon
includes a few extra links in these tracks so you can superglue them to the
return rollers and replicate the sag very nicely.
The final step in painting the model was to brush-paint the hull-mounted tools.
Since I had already mounted them to the turret, I also opted to hand-paint the
spare track links and the tow cables. I then highlighted prominent edges on the
model with a silver artist’s pencil to simulate worn metal.
|
CONCLUSIONS |
Another great addition to Dragon’s zimmert-coated German WWII armor. This is one of their nicer kits, in my opinion, and I highly recommend it to any and all armor nuts with a little bit of modeling experience under their belts.
|
REFERENCES |
1.
“Brummbär,”
Wikipedia, January 2010.
2.
“Tanks of World War II,”
Onwar.com, 2009.
If you would like your product reviewed fairly and quickly, please contact me or see other details in the Note to Contributors.