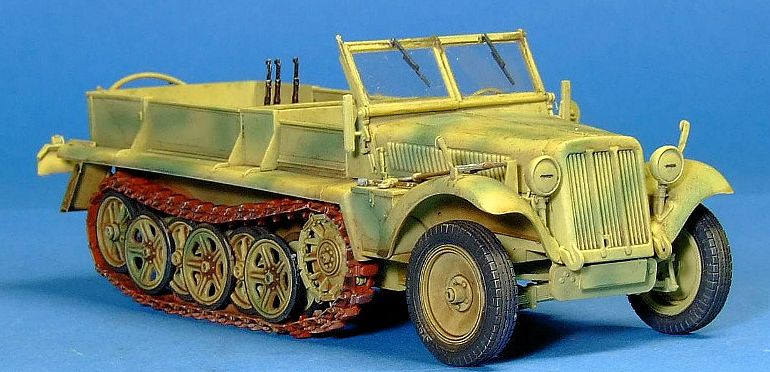
Dragon 1/35 SdKfz 10 Ausf B (1942 production)
| KIT #: | 6371 |
| PRICE: | $56.00 SRP |
| DECALS: | Three options |
| REVIEWER: | Dale Rannals |
| NOTES: |
| HISTORY |
The Sd.Kfz. 10 (Sonderkraftfahrzeug - special motorized vehicle) was a German
half-track that saw very widespread use in World War II. Its main role was as a
prime mover for small towed guns such as the 2 cm FlaK 30, the 7.5 cm leIG, or
the 3.7 cm PaK 36 anti-tank gun. It could carry eight troops in addition to
towing a gun or trailer.
 The basic engineering for all the German half-tracks was developed by the
Reichswehr's Military Automotive Department, but final design and testing was
farmed out to commercial firms with the understanding that production would be
shared with multiple companies. Demag was chosen to develop the smallest of the
German half-tracks and spent the years between 1934 and 1938 perfecting the
design through a series of prototypes.
The basic engineering for all the German half-tracks was developed by the
Reichswehr's Military Automotive Department, but final design and testing was
farmed out to commercial firms with the understanding that production would be
shared with multiple companies. Demag was chosen to develop the smallest of the
German half-tracks and spent the years between 1934 and 1938 perfecting the
design through a series of prototypes.
The chassis formed the basis for the Sd.Kfz. 250 light armored personnel
carrier. Approximately 14,000 were produced between 1938 and 1945, making it one
of the most widely produced German tactical vehicles of the war. It participated
in the Invasion of Poland, the Battle of France, the Balkans Campaign and fought
on both the Western Front and the Eastern Front, in North Africa and in Italy.
The Sd.Kfz. 10 was unique among German half-track designs as it used a hull
rather than a frame. Power was provided by a Maybach 6-cylinder, water-cooled,
231.3 cu in (3.791 liters) gasoline engine of 90 horsepower (91 PS). It had a
semi-automatic Maybach Variorex-transmission with seven forward and three
reverse gears. The driver selected the desired gear and initiated the shift by
depressing the clutch. It could attain 47mph (75 km/h), but the driver was
cautioned not to exceed 40mph (65 km/h). In
1942 the Luftwaffe limited its vehicles to a non-tactical speed of only 19mph
(30 km/h) to extend the life of the rubber track pads.
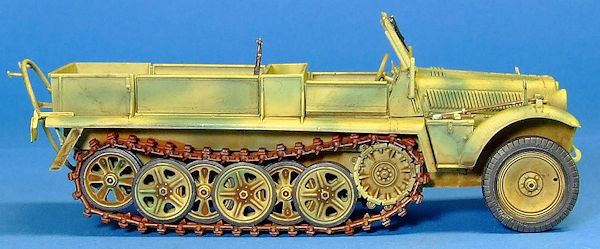
Both tracks and wheels were used for steering. The steering system was set up so
that shallow turns used only the wheels, but brakes would be applied to the
tracks the farther the steering wheel was turned. The drive sprocket had the
track-saving but more complicated rollers rather than the more common teeth. The
rear suspension consisted of five double road-wheels mounted on swing arms
sprung by torsion bars. An idler wheel, mounted at the rear of the vehicle, was
used to control track tension. The front wheels had transversely mounted leaf
springs and shock absorbers, the only ones on the vehicle, to dampen impacts.
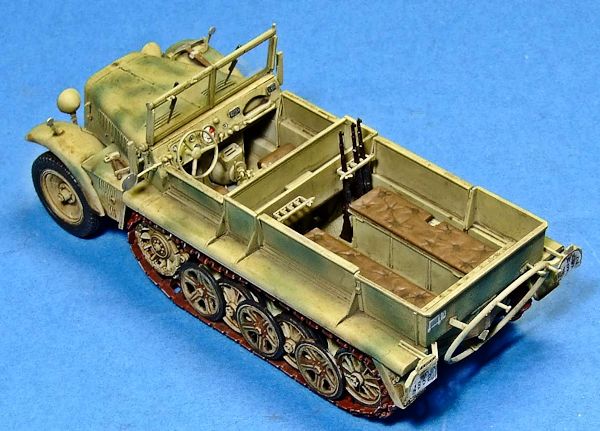
 The upper body had a baggage compartment separating the driver's compartment
from the crew compartment. Bench seats on the sides of the vehicle, with
under-seat storage, could accommodate six men. The windshield could fold forward
and was also removable. A convertible canvas top was mounted at the upper part
of the rear body. It fastened to the windshield when erected. Four side pieces
could be mounted to protect the crew from the weather.
The upper body had a baggage compartment separating the driver's compartment
from the crew compartment. Bench seats on the sides of the vehicle, with
under-seat storage, could accommodate six men. The windshield could fold forward
and was also removable. A convertible canvas top was mounted at the upper part
of the rear body. It fastened to the windshield when erected. Four side pieces
could be mounted to protect the crew from the weather.
Initially it was planned to use the Sd.Kfz. 10 as a towing vehicle for various light guns and trailers, but it was authorized as a substitute for the Sd.Kfz. 250 light armored personnel carrier in 1939. The Ausf. B model saw its use broadened to tow heavier weapons like the 5 cm PaK 38 as well as their ammunition trailers. They also served in the maintenance and supply companies of motorized and tank units. Nine were delivered to Romania in 1942 as tractors for anti-tank guns.
| THE KIT |
This is one
of Dragon's newer kits in the
Sd.Kfz. 10 line-up.
Inside the typical Dragon-sized box contains some
360-ish
parts laid out across 15 sprues (14 gray and one clear).
In addition, one slide-molded hull, 2 bags of teeny MagicTracks, a PE
fret, decals and instructions.
 The parts themselves are superbly molded with no flash that I could find.
Very delicate parts too, some of which threatened to break just by
looking at them, let alone handling them.
Impressive indeed. Plenty of
options are included: normal two-piece tires or the multi-slice type, the engine
hood can be positioned open or closed, two different types of rear ends, and the
crew compartment sides can be positioned up or folded down, and the tiny Mauser
rifles can have their bolts open or closed.
There are also two different types of battery boxes to choose from,
though the instructions show just the one, the other is not labeled “not for
use” in the sprue layout drawings.
The parts themselves are superbly molded with no flash that I could find.
Very delicate parts too, some of which threatened to break just by
looking at them, let alone handling them.
Impressive indeed. Plenty of
options are included: normal two-piece tires or the multi-slice type, the engine
hood can be positioned open or closed, two different types of rear ends, and the
crew compartment sides can be positioned up or folded down, and the tiny Mauser
rifles can have their bolts open or closed.
There are also two different types of battery boxes to choose from,
though the instructions show just the one, the other is not labeled “not for
use” in the sprue layout drawings.
The instructions are typical Dragon.
A fold-out affair printed in blue and black.
Fourteen assembly steps, the aforementioned sprue layout, and a painting
and marking guide round things out.
Interestingly, the instructions show the use of paint masks for the windshield
in step 14, though none were included in my box.
The one thing in omission here would be a foul weather tarp, though I
admit it would be a shame to hide all the detail inside.
| CONSTRUCTION |
Construction starts with the road wheels and front tires.
I opted for the multi-slice ones just to see how they build up.
There are 5 slices for each tire instead of two for the other.
They do make a fine rendition, though to be fair, the simpler ones have
very nice tread pattern detail and are, well, simpler.
The rear end assembly is next, and since I didn't know the difference
between the two, I chose one and moved on.
The front suspension and torsion bars came next and the hull was set
aside to dry.
 The engine and transmission are very nice
models on their own. I assembled
only enough of the engine as I had too, as I was going to pose the hood down.
For the hood-up option, I would suggest some kind of fire-wall busy work
(wiring, etc), as it is the only thing really lacking.
The transmission parts are very tiny and fiddly and lack position
location points. Naturally for me,
I messed things up and positioned the differential too low so that the drive
shaft doesn't line up properly. Not
a huge deal, as things are sufficiently busy in that area that it is hard to
notice.
The engine and transmission are very nice
models on their own. I assembled
only enough of the engine as I had too, as I was going to pose the hood down.
For the hood-up option, I would suggest some kind of fire-wall busy work
(wiring, etc), as it is the only thing really lacking.
The transmission parts are very tiny and fiddly and lack position
location points. Naturally for me,
I messed things up and positioned the differential too low so that the drive
shaft doesn't line up properly. Not
a huge deal, as things are sufficiently busy in that area that it is hard to
notice.
The engine, transmission, and dash (another
fiddly assembly) were all positioned in the hull and the front and rear fenders,
hood halves, and front grille glued on.
The hood pieces deserve merit here.
Very thin plastic with fantastic louvers molded throughout.
A work of art in a piece of plastic.
Well done Dragon! The crew
compartment side panels are another area were the instructions are rather vague
though. Panels frames are attached
to the hull and then the side panels are glued to them.
I really had to study the drawings to figure out what they were trying to
tell me. Front seats were added,
but here again the vague placement issues reared it's head.
Behind the drivers seat sit a fuel tank.
The instructions show attaching a filler cap/spout along the front edge,
but not specifically where. Not
knowing I placed it right of center and moved on.
But now it interfered long with the placement of the drivers seat .....
The spout needed to go along the right edge it seemed.
So I broke it back off, cleaned up the area as best I could, and
reattached it so I could attach the seat.
This may be a no-brainer for those familiar
 with these vehicles, but it
would be a complete non-issue with the simple addition of a placement divot or
even an outline of where it is supposed to go.
with these vehicles, but it
would be a complete non-issue with the simple addition of a placement divot or
even an outline of where it is supposed to go.
There are a lot of tiny parts in this kit.
Well, not so much tiny, but very very delicate.
Things like the mirrors are so frail I am surprised I did not break them
removing them from the sprue, let alone cleaning up the attachment points.
The kit got to a point where I had to be very careful of how I handled
it, and yes .....several pieces were re-attached, a few several times.
There is a sun visor that joins to the windshield top that I knocked off
so many times I just gave up on it.
At this point I put everything aside and
turned my attention to the supplied MagicTracks.
Two bags of teeny track pieces, thankfully devoid of any sprue or
attachment points (hence, no clean-up ....... YAY!).
One bag contained the track links proper; these connect together and the
other bag, track pads, glue atop the link joint making, if you are careful, a
fully workable track. This worked
fairly well, I only got sloppy with the glue a couple times, there are therefore
a couple links glued together, but all in all it went well. Once I had two
lengths of the specified number of links, I took them and sprayed a rust color
on them and let them dry. A couple
dirty washes and some dry-brushing of Testors Steel and they were good to go.
They look better in person… the reddish hue pops out too much in the pics.
| COLORS & MARKINGS |
As I mentioned earlier, the instructions show the use of paint masks for the
windshield, but none were supplied in this kit.
Not a big deal, as the windows are rectangular and masking is easy with
Tamiya tape.
With my trusty Badger 150, the entire vehicle was given a coat of Model Master
Panzer Yellow....... all the assembled wheels and anything still left on sprues
were given the same treatment.
I then airbrushed on some panzer green squiggles randomly along the body.
The seats needed some attention: I was sure they were not Panzer Yellow,
but no color call-outs exist in the instructions for these.
So off to the internet I went.
From the pictures I found, the seats were dark ....... from black to
darkish brown. I painted the seats
in-vehicle with MM Italian Military Brown, chosen for the simple
 reason to just
give some color variations to the kit.
The rubber portions of the road wheels were hand painted a very dark
gray.
I attached all the wheels but left off the drive sprocket ...... This would be
attached with the tracks later on.
reason to just
give some color variations to the kit.
The rubber portions of the road wheels were hand painted a very dark
gray.
I attached all the wheels but left off the drive sprocket ...... This would be
attached with the tracks later on.
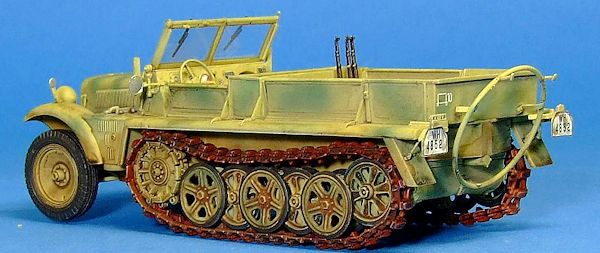
On went the decals, and I must admit, they were a royal pain.
They wanted to immediately stick where ever they touched plastic, no
matter what wetting agent I used.
Thankfully decals are few, but the plate numbers were the worst.
Dragon supplies individual numbers, which is great in that you can model
any specific vehicle you want, but getting them spaced and level while they
fought never to give up ground was difficult to say the least.
The numbers should be longer, but I had had enough at four and moved
along. Strangely, the front plate
decal curled up on me a few days after it had dried.
I removed it.
The pioneer tools went on next, but since I managed to lose a bracket piece for
the right front fender, I didn't put them all on.
The rifles were painted a dark brown (Testers Rubber .... little bottle)
and their bolts a very dark gray.
When dry I attached them to the rack in the back area.
I worked the tracks around the drive sprocket and attached it to the hull.
I positioned things so the final track connection was on the bottom run
and this was finished off with one last little track pad.
The magic tracks are impressive and can be easily manipulated for the
desired sag.
| CONCLUSIONS |
This is a very impressive kit. The
fidelity of the parts is amazing.
Care and a light hand is required but the result can be fantastic.
It looks great straight out of the box as every area is superbly
rendered. Super-detailers could of
course go crazy all over this vehicle and the results could be stunning.
For sure a very neat kit and one that helps add size perspective sitting
next to the tanks in your collection.
Recommended.
| REFERENCES |
The Internet
Thanks to Scott, Modeling Madness, and of course www.dragonusa.com for the review kit. You can find this one at your local shop or have them order it for you.
If you would like your product reviewed fairly and fairly quickly, please contact the editor or see other details in the Note to Contributors.