Dragon 1/35
VK.45.02(P)H
| KIT #: | 6657 |
| PRICE: | $60.00 SRP |
| DECALS: | Generic insignia |
| REVIEWER: | Dale Rannals |
| NOTES: |
| HISTORY |
The
VK4502(P)H was the second design from the Porsche firm’s ill-fated entry into
the competition to produce what eventually emerged as the Tiger II.
After
the failure of the
VK4501(P),
Ferdinand Porsche began work on an updated version of
its design. However, it became
clear that an up-armored version of the Porsche Tiger would not meet future
requirements. To this end, Dr. Porsche proposed designs with no fewer than four
different engines, two different drives (hydraulic and electric), and two
different hull configurations: one with the turret forward, the VK4502(P)V, the
other with the turret aft, the VK4502(P)H.
 Why
position the turret aft? Well, one
of the problems with very long tank guns is that they tend to cause problems
when crossing rough terrain or moving in cities. Studies by all armor producing
nations show that too often a long gun barrel digs into the ground with
unpleasant results for the crew and the tank.
The solutions are either use a shorter gun - which obviously limits the
firepower capabilities of the tank - or move the turret farther back on the
chassis. This solves the problem of overhang but also causes problems with
balance and visibility and creates larger "dead ground" spots in front of the
tank that the crew cannot protect with turret armament.
Why
position the turret aft? Well, one
of the problems with very long tank guns is that they tend to cause problems
when crossing rough terrain or moving in cities. Studies by all armor producing
nations show that too often a long gun barrel digs into the ground with
unpleasant results for the crew and the tank.
The solutions are either use a shorter gun - which obviously limits the
firepower capabilities of the tank - or move the turret farther back on the
chassis. This solves the problem of overhang but also causes problems with
balance and visibility and creates larger "dead ground" spots in front of the
tank that the crew cannot protect with turret armament.
An overly ambitious design, the VK4502(P)H
used the same drive train as the Tiger P, that is, two engines driving
two electric generators to power electric motors driving the tracks.
It was overly complicated and was a heavy user of copper, which was
needed elsewhere in wartime
 introduced
to the initial production Henschel Tiger II's, but this would not have been a
problem on the Porsche design due to the additional surround of armor on the
hull top around the turret (at
least on the Vorne version).
introduced
to the initial production Henschel Tiger II's, but this would not have been a
problem on the Porsche design due to the additional surround of armor on the
hull top around the turret (at
least on the Vorne version).
Just to
make more sense of it all:
VK:
“Vollketten” or fully tracked
45: the ton class of
the design
02: the design number
P: Porsche
V: “Vorrne” or forward
H: “Hintern” or rear
| THE KIT |
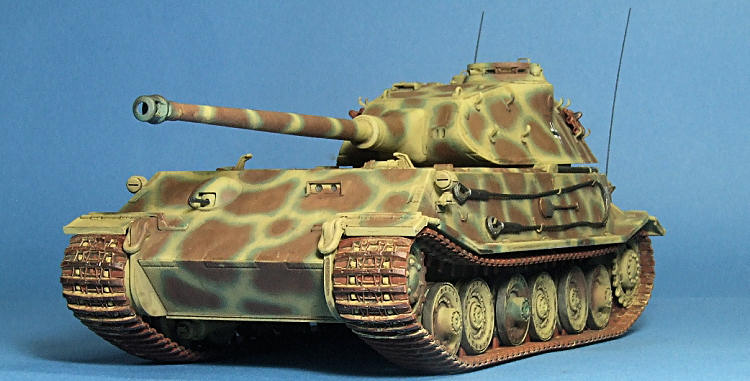
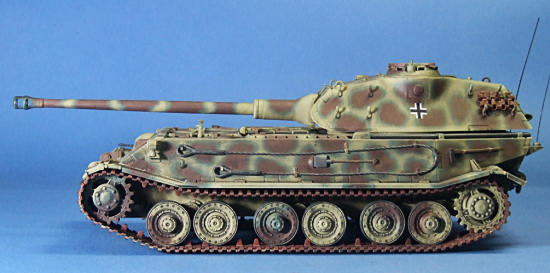
This kit depicts the
Porsche design with the turret mounted at the rear and is the first 1/35 kit of
this
 The upper
hull is new tooling which captures the repositioning the engine to the middle of
the hull and the turret aft. Small detail on the hull is sharp and includes
countersunk screws, and the weld marks on the interlocking plates.
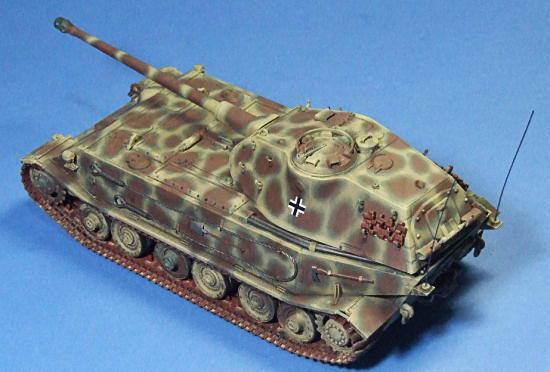
The graceful Porsche turret and the two different commanders’ copulas are
cool examples of slide-mold technology.
Each of these is a single piece of styrene and one has to wonder how they
do it.
The upper
hull is new tooling which captures the repositioning the engine to the middle of
the hull and the turret aft. Small detail on the hull is sharp and includes
countersunk screws, and the weld marks on the interlocking plates.
The graceful Porsche turret and the two different commanders’ copulas are
cool examples of slide-mold technology.
Each of these is a single piece of styrene and one has to wonder how they
do it.
A sizeable PE fret is included, the key parts of which are the three large mesh
screens on the engine deck and brackets for tools and tow cables.
Three barrels are included, one style in both styrene and turned
aluminum, and a second style in styrene only.
Two sizes of twisted metal wire are available for the tow cables.
One clear sprue is included, but it is a mystery as the instructions do
not mention it.
The instructions are a large fold-out affair with clear line drawings and run to 11 steps. Two 3 view drawings are included, one showing an overall yellow machine and the other a yellow/green camouflage. The only decals are German crosses for the sides and rear. Color call-outs, all four of them, are in Gunze Sangyo and Model Master. Unfortunately, the instructions were the one disappointing part of this build. They are incomplete and inaccurate. Incomplete in that there are parts (and one whole assembly) not even shown, and inaccurate in that some parts that will be needed are labeled “not for use” in the sprue layout diagram on the front page. The builder is seemingly left to figure things out on his/her own. I feel this is an unacceptable omission for a company usually as thorough as Dragon. More on this later.
| CONSTRUCTION |
Construction
started with the assembly of the torsion bars and road wheels.
This was all very familiar to me as they are exactly the same as the
Porsche Tiger kit I recently completed.
I pushed the road wheels onto the torsion bars (it’s a nice tight fit)
when I glued the torsion bars to the hull so I could level things out, i.e.:
make sure all the wheels touch the ground.
When dry I removed the wheels to makes things a bit easier to paint.
 Next I turned my attention to the upper hull.
It is an impressive single piece of plastic to which quite a bit of
detail is added. This however, is where
my first run-in with the poor instructions came in.
Handles for the engine compartments are magically shown installed, though
there are no part number call-outs for it at all.
I looked through all the steps to see if it was shown somewhere else to
no avail. I searched through the
sprues to find the handles that matched the holes, but really?
One shouldn’t have to do this.
Vague instructions from a short run or garage kit maybe, but not from
Dragon. Many of the PE parts are
installed here; these being the hold-downs for the tow cables and tools, and the
grilles for the engine intakes. The
intakes screens are nice, but I would have rather not dealt with the tool
holders.
Next I turned my attention to the upper hull.
It is an impressive single piece of plastic to which quite a bit of
detail is added. This however, is where
my first run-in with the poor instructions came in.
Handles for the engine compartments are magically shown installed, though
there are no part number call-outs for it at all.
I looked through all the steps to see if it was shown somewhere else to
no avail. I searched through the
sprues to find the handles that matched the holes, but really?
One shouldn’t have to do this.
Vague instructions from a short run or garage kit maybe, but not from
Dragon. Many of the PE parts are
installed here; these being the hold-downs for the tow cables and tools, and the
grilles for the engine intakes. The
intakes screens are nice, but I would have rather not dealt with the tool
holders.
The turret assembly was rather frustrating as it contains one of the
biggest omissions of the instructions.
You get a choice of two different commanders copulas…..I wasn’t sure of
the difference, so I picked one and moved on.
The turret lifting lugs aren’t ever shown in the instructions, though the
mounting holes are there and the lugs are shown in the 3-view and box top
illustrations. I found and added
these. Now one gets the choice of
three main gun barrels …. I picked the aluminum one and attached the flash hider
and mantlet to it. But then the
instructions show it attaching to the turret front with nothing to mount it on.
I found what looked to be main gun pivots (marked “not for use” in the
sprue layout) and inspected the interior of the turret
 top for a
way to mount them but saw none. I
finally fabricated a mount on the inside to which I could attach the gun on the
outside. It worked, but will
forever be at one elevation. It was
only later that I realized the mounts for the pivots are on the turret bottom
piece ….. I never looked at that until I was about to glue it to the top.
I should have, obviously, and it would have saved me a lot of grief, but
again, why is it not shown at all in the instructions??
top for a
way to mount them but saw none. I
finally fabricated a mount on the inside to which I could attach the gun on the
outside. It worked, but will
forever be at one elevation. It was
only later that I realized the mounts for the pivots are on the turret bottom
piece ….. I never looked at that until I was about to glue it to the top.
I should have, obviously, and it would have saved me a lot of grief, but
again, why is it not shown at all in the instructions??
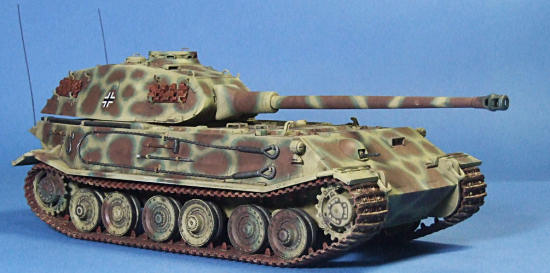
Ah, but we’re not done with the turret yet.
No Sir. On the sides of it
are positioning marks for something.
Again, nothing is shown in the instructions about them.
Not being a true tread-head, yet, it took me a few minutes to realize
these are for hanger brackets that spare tracks are hung on, providing extra
protection. I could have sanded
them off since no extra tracks are provided, but I like the look of them and I
had some spare tracks (from a Hobby Boss VK4502P (V) kit that was next on the
workbench) so I located and glued the brackets on.
However, I screwed up here too as I found out later that the spacing
isn’t quite right to hang the tracks properly, so my tracks are sitting on
instead of hanging from them. I
should have glued one bracket on, positioned the track, and then set and glued
the second bracket on. Oh well………..
At this point I had a fairly complete tank.
Minus the tracks, wheels, and tools, I was ready for the paint shop.
| COLORS & MARKINGS |
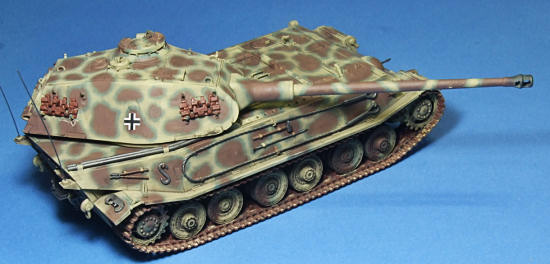
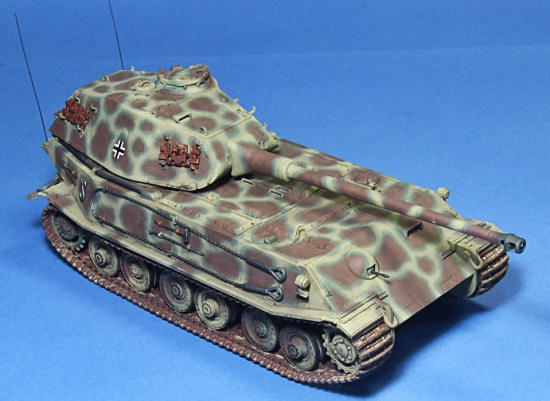
An
overall coat of Panzer Yellow was applied to pretty much everything.
I then attacked the hull and turret with some Panzer Green, sprayed in
irregular tightly spaced splotches.
This took a while as I stopped several times to get a good overall look at the
size and spacing. I’ve made the
mistake before of painting circles or splotches in one session only to discover
later that they decrease (or increase) in size or spacing from one side to the
other. If that’s the effect you
want, great …. But otherwise it looks odd.
I wanted more of a brown hue to the third color, so I mixed some Italian
Brown with Panzer Red (all my paints are Model Master, btw) and sprayed that
inside the green splotches, covering most of the green except a small outside
border. I sprayed the
 wheels
with these three colors randomly and then brush painted some Metalizer Magnesium
on the outside rims. Decals were
added next ….. these consisting of just two German crosses on the turret sides.
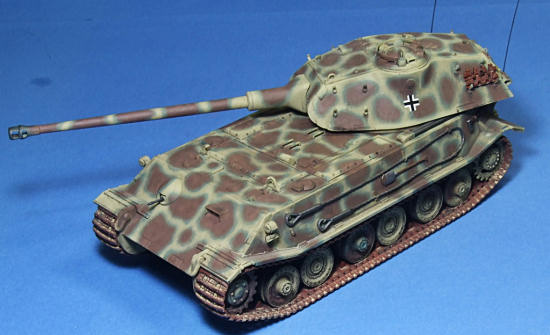
A thin black oil wash was added to everything after it all dried to pop
out the details. I left the weather
to a bare minimum as I wanted to depict a fairly factory fresh example.
wheels
with these three colors randomly and then brush painted some Metalizer Magnesium
on the outside rims. Decals were
added next ….. these consisting of just two German crosses on the turret sides.
A thin black oil wash was added to everything after it all dried to pop
out the details. I left the weather
to a bare minimum as I wanted to depict a fairly factory fresh example.
The tracks I painted a rust color overall.
To this I added a thicker black wash to again pop out detail.
I then tried something new; something I read in a review here a few weeks
back. I took one of my Tamiya
weather sets and scraped some of the light brown colors into a small jar of
water. It dissolved quickly and
made a great water wash. I added a
tiny drop of dish washing liquid to break up the surface tension and applied
this to the tracks. I was satisfied
with the results and will be doing this again.
I then took a #2 pencil and rubbed across the tracks to show some wear. I
didn’t go overboard with the tracks to stay in the “factory fresh” motif.
I attached the tracks to the tank and noticed they seemed too short and
too tight, not much sag at all. It
was my fault. The drive wheels are
mounted on an eccentric and I must have glued them on too far “out”.
After realizing this I would recommend gluing a piece of flat stock to
the wheel on the inside of the hull, allowing the wheel to pivot.
Then after attaching the tracks you could pivot this wheel until you get
the proper sag on your tracks and then super glue the wheel in this position.
May seem obvious to some, but it took this screw up for me to figure it
out.
The final details were finally added.
Tools and tow cables and any PE hold-down brackets needed were attached.
I stretched some sprue and painted it black and attached two pieces as
radio antennas.
| CONCLUSIONS |
Yes, the instructions caused some grief. Yes, I made more than my fair share of mistakes. In spite of it all, I really liked this kit. The plastic is superbly molded and detailed. It makes into a fine replica of a very interesting design branch of German heavy tanks.
| REFERENCES |
The Internet
June 2012
If you would like your product reviewed fairly and fairly quickly, please contact the editor or see other details in the Note to Contributors.