
Dragon 1/35 Sd.Kfz 184 'Ferdinand'
| KIT #: | 6133 |
| PRICE: | 32.80 from HLJ |
| DECALS: | Three options |
| REVIEWER: | Pierre-André Boillat |
| NOTES: | nice kit, but Dragon has done better since. |
| HISTORY |
| THE KIT |
Having built the Italeri Elefant several years ago
(and sold it in-between), I was looking forward to replace this classic with a
more recent, up-to-date kit. As I’m far from enthusiastic about single-link
tracks (240 of the kit’s 430 parts), I had postponed the build for a long time
until I decided to give it a go,
especially after a friend told me
that such tracks are not as awful as one could think they
 are.
As it turned out, he was quite right, but I still prefer one-piece vinyl ones
(especially the later type that can be glued instead of welded), or, as
Trumpeter and lately Tamiya have started providing us with – segmented elements
with in-built “sagging” which IMO are the greatest thing since sliced bread.
are.
As it turned out, he was quite right, but I still prefer one-piece vinyl ones
(especially the later type that can be glued instead of welded), or, as
Trumpeter and lately Tamiya have started providing us with – segmented elements
with in-built “sagging” which IMO are the greatest thing since sliced bread.
A
good thing about building an early Ferdinand at the Battle of Kursk is that
these vehicles didn’t have a Zimmerit coating, which was introduced shortly
after. I had done one on my Italeri Elefant (using Tamiya putty and a discarded
lighter’s wheel as an improvised “Zimmerit tool” – to good effect – but I was
nonetheless glad to spare myself the extra work).
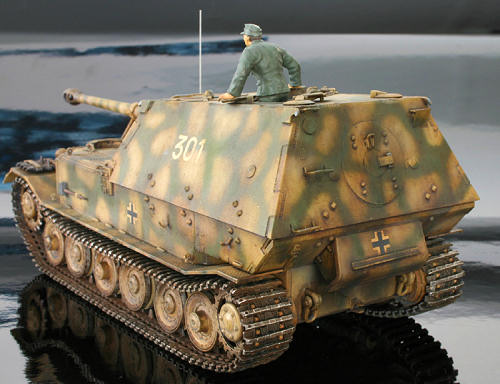
Due to the Ferdinand’s rather simple shape, the
kit does not have as many exterior details as your regular battle tank (for
example, most tools were carried in a box on the vehicle’s side), so getting the
main body together isn’t a very difficult task. However, the kit lacks any
towing cables, and I can’t understand this obvious omission.
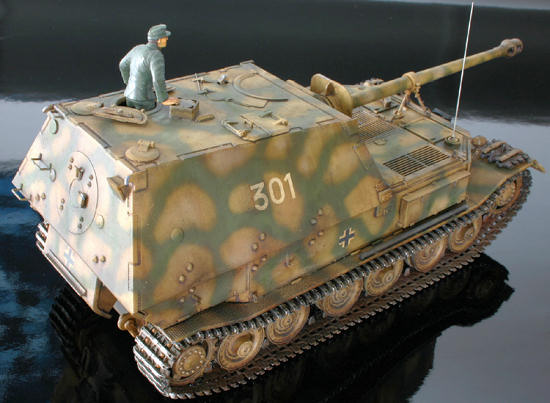
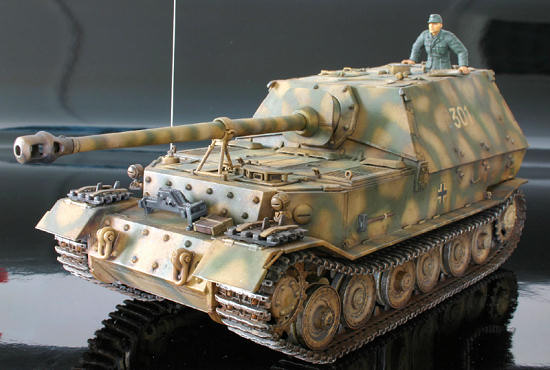
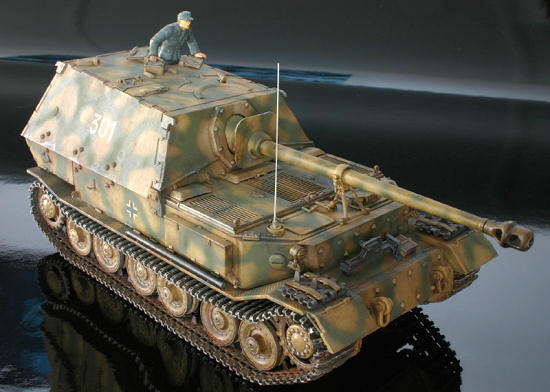
The gun’s barrel is made of plastic and requires some filling. Decals (of rather poor quality) are provided for three vehicles of the same unit. The painting instructions don’t match the box art, I couldn’t find any photographic evidence for the provided schemes – and I noticed (too late) that this particular Panzerjäger-Abteilung carried its tool boxes on the rear exhaust cover, so I chose another option, which I’ll explain in the painting section.
| CONSTRUCTION |
The kit goes together fairly well, with no
fitting problems. A typical Dragon gimmick is
a tendency for
“over-engineering”, which for example appears in the mobile suspension arms…
something that’s of little use with single-link tracks that
allow
no movement once glued together, and may cause alignment problems (I had to
pay extra attention so all road wheels would touch the ground). This feature
could be useful when placing the model on a diorama, but it will require a
careful placement of the model
 on
its base prior to final assembly.
on
its base prior to final assembly.
The
instruction manual says that the road wheels have black rims. This is of course
incorrect, as they were all-steel types with no rubber belts. After painting
them in sand yellow, I polished the rims with Rub-and-Buff (the fastest and
easiest way to avoid brushing mishaps).
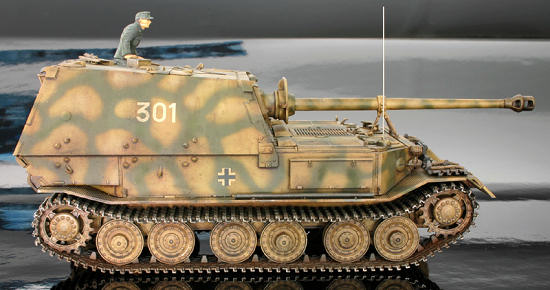
Another tricky part is the correct placement of the front sprocket wheels so
there’s enough room for the tracks between them and the mud guards. Even if I
paid attention to this, I had to break the mud guards and bend them upwards to
allow access to the upper part of the sprocket wheels, something I could have
avoided by assembling the kit in the typical upper / lower hull fashion.
Speaking of the tracks, these come in grey plastic and will have to be painted
“on sprue” before assembly. Cutting them out and cleaning them with a cutter was
(as I told my wife) the modelling equivalent of removing the stones from 10
pounds of cherries, but it was done in an hour or so. Assembling the tracks (in
segments that were attached to the tank before the glue was completely dry and
still allowed to force them into shape) went surprisingly well thanks to the
magical Tamiya extra-thin cement.
 To
sum it up, here’s the assembly / painting sequence I chose for this model:
To
sum it up, here’s the assembly / painting sequence I chose for this model:
| COLORS & MARKINGS |
As
said above, I wasn’t fond of the kit’s proposed painting options (not forgetting
the unit-specific tool box issue which proved that Dragon hadn’t done its
research too well), and wanted to make the more typical “loose grid” pattern
found on many early Ferdinands. On most pictures available to me, the vehicles
carried just a pair of tactical numbers on the combat compartment’s sides and
the German crosses. I couldn’t see any unit markings. Not being able to find
enough documents for a particular tank, I went for the “plausible if not
accurate” option and eventually grabbed white German numerals from the decal
dungeon. 90 Ferdinands at
| FINAL CONSTRUCTION |
| CONCLUSIONS |
This kit carries a 2001 copyright, and is quite typical of older Dragon
products. With good detail, nice fit and a large-yet-bearable number of
parts, it perfectly recaptures the real Ferdinand’s both massive and
aggressive shape. In spite of a few shortcomings (lack of towing cables and
figures, partly unclear instructions and a historical research job that
leaves several questions open, I’d say it’s a pretty good kit (that’s
currently out of stock, according to HLJ).
| REFERENCES |
Militaria Magazine
– la bataille de Koursk 1+2
Batailles & Blindés Hors Série # 10 – Koursk tome 2 / la pince nord
Various internet research.
January 2009
If you would like your product reviewed fairly and quickly, please contact the editor or see other details in the Note to Contributors.