| HISTORY |
Germany began to build a modern army after 1933. The important part of Wehrmacht motorization was manufacturing of three-axle 3.1 trucks. The most numerous of them was the Henschel 33. It was in production lines since 1934 to 1942. The modification D1 had a 6-cylinder petrol engine.
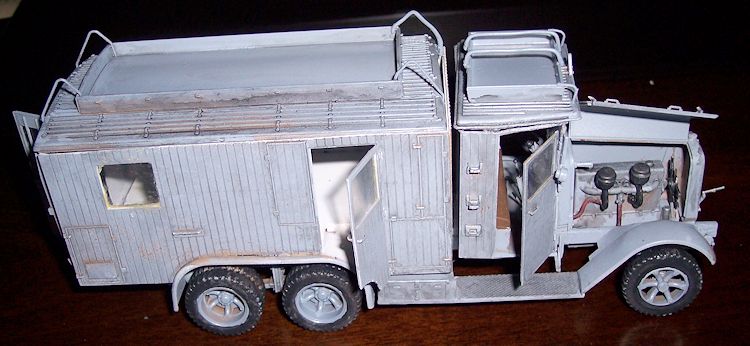
All in all, there were produced about 22,000 Henschel 33’s. Some chassis had special bodies. One of them was the Kfz. 72 van body. These machines were used as transmitters and receivers carriers as the powerful A/B mobile radio stations.
Specifications:
Empty weight, kg 4800
Length: 7170 mm
Width: 2500 mm
Height: 3000 mm
Wheel base: 3750+1100 mm
Track front: 1800 mm
Track rear: 1740 mm
Engine: Henschel 6-cylinder
Max speed: 55 km/h
Range: 280 km
| THE KIT |
 The
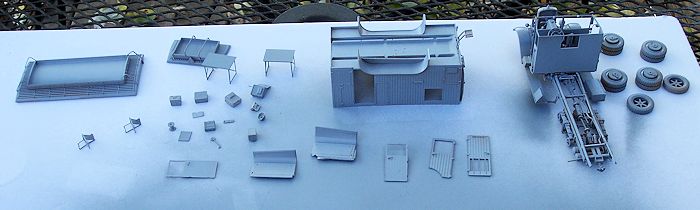
kit comes in a tray and lid type box. Inside is 7 light tan plastic
sprues, one of clear plastic, a small decal sheet and the 12 page
unbound instruction booklet.
The instructions begin with a one paragraph
history in Ukrainian and English, followed by
a paint listing of Model Master brand of paints. Below this are
CAUTIONS in the 2 languages and ICM’s street address and phone/fax
number.
The
kit comes in a tray and lid type box. Inside is 7 light tan plastic
sprues, one of clear plastic, a small decal sheet and the 12 page
unbound instruction booklet.
The instructions begin with a one paragraph
history in Ukrainian and English, followed by
a paint listing of Model Master brand of paints. Below this are
CAUTIONS in the 2 languages and ICM’s street address and phone/fax
number.Page 2 of the instructions has the parts tree illustrations. Some of the parts are shaded out indicating that those parts are excess and not needed to complete the kit. There are a few international assembly symbol explanations at the bottom of the page. Pages 3 to 11 give a total of 31 assembly step drawings. Page 12 has two 3-view illustrations in full color for marking and painting schemes.
One scheme is for at truck in Poland, September 1939. However no unit is mentioned. It is in overall panzer gray with a yellow triangle on the cab roof. It carries Luftwaffe license plate number WL 9421. The second scheme is also in overall panzer gray with the yellow triangle on the cab roof. It is also a Luftwaffe truck with license number WL 104975 in the Ukraine, 1941. Again we are not told the unit it was with.
| CONSTRUCTION |
Construction begins with the engine, which is quite nice. It is made up from 20 parts. Instructions say to paint it overall panzer gray with black fan belt, fan, exhaust pipes, generator and ends of the starter, which is steel color in the center.
It became immediately apparent that the plastic in this kit is very brittle and when removing the parts from the trees they often shattered. The attachment points on some parts were very heavy and at times protruded out onto the part itself. This necessitated extra sanding and cleaning. The wheels to axles is a very weak glue joint. I recommend super glue on these.
Next came the frame with the running boards attached and a storage bin, oil tank and wooden jack block mounted on them. The tow shackle was added to
 the rear now also. The running board brackets are very thin and
flimsy and needed strengthening. This was done by adding super glue
to them.The front leaf spring and axle assembly is now assembled in
this step. There are quite a few little bitty parts in these
assemblies and very careful cleanup and handling is required. The
final assembly in this first
step was of four double wheel and tire
assemblies. I left these off to add to the model later after
painting them off the model first.
the rear now also. The running board brackets are very thin and
flimsy and needed strengthening. This was done by adding super glue
to them.The front leaf spring and axle assembly is now assembled in
this step. There are quite a few little bitty parts in these
assemblies and very careful cleanup and handling is required. The
final assembly in this first
step was of four double wheel and tire
assemblies. I left these off to add to the model later after
painting them off the model first.These were steps 1 to 5.
Step 6 adds the engine, cab floor, exhaust system, lower steering column and the fuel tanks. It is not clear just how the exhaust system mounts to the frame and I had to dry test it a few times to figure out the best position of it. The instructions say to paint the exhaust rust color.
Steps 7 and 8 are the assembly of the transmission, rear axles etc. There are no less than 43 parts in all this and some of the parts are extremely small. It is not all that clear where these parts are to be positioned. The exploded drawings are vague at times. I think a lot of this could have been done with more molded in detail, rather than all those individual parts. There are a lot of rod-like parts to the transmission and they fractured a few times due to their brittleness. I had to repair or replace them with stretched sprue.
Step 9 has you drop the drive train and rear axles into the frame assembly. Rear leaf springs and their suspension and small detail parts are added now too. The U shaped parts no. A25 and A26 were impossible to remove from the parts tree. There was a + shaped sprue inside these that no tool I have could remove without shattering them. I lost the pieces to two of them when they flew into my shag rug. I made new ones from wire and then glued them in place with super glue.
In step 10 you are supposed to add the wheels and tires. However, these I left off for painting off the model and addition towards the end of the build. Some other small parts are added to the frame here also. I haven’t a clue what these parts are supposed to be.
Step 11 is assembly of the gear shift levers and foot pedals to the cab floor. I shattered one of these levers and made a new one from stretched sprue.Also the steering wheel is glued onto the upper steering shaft. The instructions call out the steering wheel to be painted wood color and the knobs on the levers to be black.
Step 12 has you assemble the instrument panel.
Step 13 adds a canister and a lever to the fire wall part. I broke part no. D12 in two when it shattered trying to remove it from the sprue. Fortunately, there are 2 of these in the kit and only one is needed. The clear windscreen panes to be added now, but I am leaving them off until final painting, so not to get paint spray on
 them.
them.Step 14 is the assembly of the bench seat for the driver’s cabin. The cushion gets painted brown.
Step 15 is assembly of the bench seat onto the cab floor, the fire wall, side door panels, rear cab wall and cab roof. The rear cab window is supposed to be added now, but I left it off for final assembly. The cab parts do not line up well and after assembling the walls I found that the roof did not sit level. I super-glued it on one side, let it set good, then pulled it down on the other side and super-glued it.
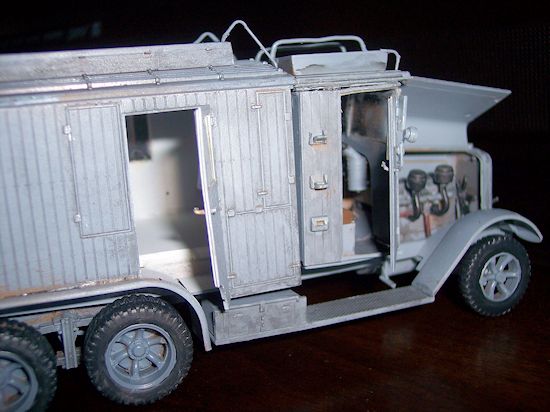
In steps 16, 17 and 18 have you add the cab doors. These can be posed either open or shut and have tiny door handles that mount both inside and outside of them. The fit of the doors is very good. You are supposed to glue the windows into the doors now, but again I left these off till final assembly. The cab doors have door handles and window crank handles inside and out. The doors on the rear radio room cabin only had exterior door handles. I stretched sprue and made some for the inside of these 2 doors.
Step 19 has you add the radiator and front fenders to the chassis. The radiator fill cap is super tiny and easy to lose. The radiator is called out to be painted steel.
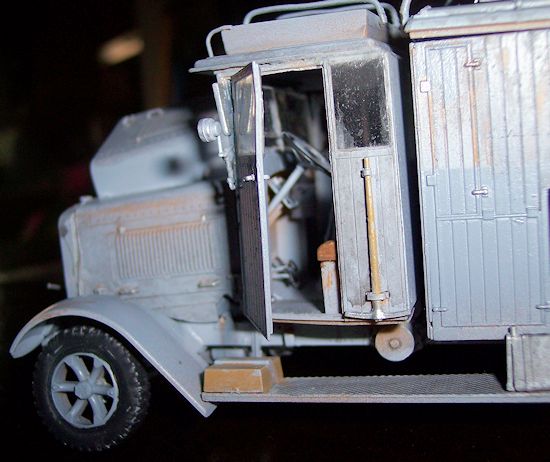
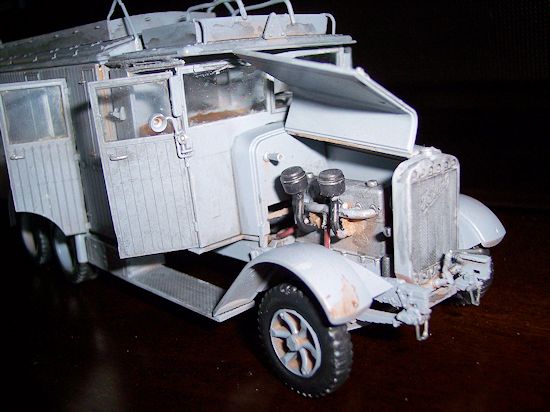
Step 20 is the engine hood. This can be posed open or shut to so the engine. The engine could stand some wiring if you want extra detail in there. I found out that the driver’s side half of the hood is a lousy fit and will not snuggle down over the engine. So, I left this side open to show the engine and closed the driver’s side hood half.
Step 21 is assembly of the radio room compartment. It consists of the four walls, the floor and rear fenders. The fenders fit into notches in the sides of the floor part. These stick up above the floor piece. The floor piece has two long troughs in it that are the backside of the mounting blocks that attach to the frame. It makes the floor look like hell. I made a continuous floor out of plastic card and added it. Normally I don’t embellish on a kit I am reviewing. I keep it strictly out of the box. However, it’s add this new floor now or not at all. No other changes were made to the kit. The inside of the radio room was all painted flat white with an aerosol spray can of paint.
Steps 21 and 22 are the assembly of the side and rear door. Glass is not assembled at this time and held off until later. The compartment windows are off until final assembly also.
Step 24 is adding the single compartment roof part. I’m leaving this loose for now until I paint the inside of the compartment white color. There were extra parts in the kit that are shaded out in the instructions as being excess. However, these make up into nice storage boxes, so I added them to the walls of the radio
 room
compartment. There are these 3 boxes on the E tree. There is no
interior detail supplied for the compartment. I have the DML German
field command post (kit no. 3823) that will be added to the kit
later after this review. The truck must be kept out of box for now.
The DML set gives you a table, 2 chairs and radios, a field
telephone along with three operator figures. I also have German
field radios in a VLS resin set that I could alternately add instead
too.
room
compartment. There are these 3 boxes on the E tree. There is no
interior detail supplied for the compartment. I have the DML German
field command post (kit no. 3823) that will be added to the kit
later after this review. The truck must be kept out of box for now.
The DML set gives you a table, 2 chairs and radios, a field
telephone along with three operator figures. I also have German
field radios in a VLS resin set that I could alternately add instead
too.Step 25 adds the roof racks to the driver’s cabin and the rear compartment. There are tie down loops that go on these racks. I managed to break most of these loops into pieces trying to remove them from the trees. So, I fabricated new ones from wire stock and super-glued them in place.
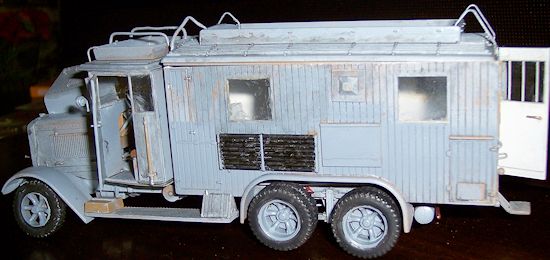
The horn is added to the firewall, license plates added to the sides of the compartment and some equipment racks. A pick is added next to the driver’s door along with rear view mirrors. The horn gets painted flat black and the pick gets a wood handle with a steel head. I did the handle with light tan acrylic paint by Tamiya.
Steps 26 and 27 are the assemblies of the headlights and floodlights. These get painted silver inside and have clear lenses.
Step 28 is the assembly of the triangular apparatus that goes on the cab roof. This gets painted yellow.
Step 29 is assembly of the tubular front bumper and adding the headlight assemblies to it. A flag frame also goes onto this bumper. Parts for this bumper are very fragile and they had many many attachment points to little discs along their length. A pain to remove and clean up the attachment points. The jack is now added to the running board on the driver’s side, along with lift handles on the hood sides.
There is no step 30 shown. Step 31 is assembly of some boards that mount to the left of the rear doors of the radio compartment. I haven’t a clue what the heck these are????
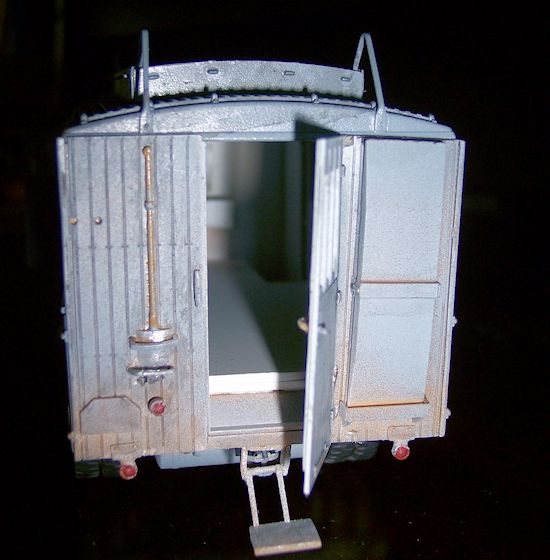
Step 32 is the assembly of 4 parts that make up the rear step that goes below the rear door of the radio compartment.
Step 33 is assembly of the foot steps that mount next to the passenger side door of the cab. I assume these are used to climb up and load the roof rack on the cab? License plates are added to the rear of the radio compartment and it’s side. The rear license plate is the wrong shape. It is molded rectangular, but should have its upper corners angled! Tail lights now go on and a shovel is mounted to the left of the rear door. The shovel got a light tan paint job with silver blade.
| COLORS & MARKINGS |
 My
Iwata air brush is refusing to spray for me. So, I sprayed the model
with an overall coat of Testor’s medium gray paint from an aerosol
can and let it dry for several days. This gray was later washed with
a grimy black acrylic paint that brought out the molded detail.
My
Iwata air brush is refusing to spray for me. So, I sprayed the model
with an overall coat of Testor’s medium gray paint from an aerosol
can and let it dry for several days. This gray was later washed with
a grimy black acrylic paint that brought out the molded detail.A friend who also has built this kit told me that the decals shatter and are useless. So, rather than try the kit decals to see if this is true, I am going to find some other license plates in my decal spares box.
The inside of the radio room cabin was painted with white paint from a Testor’s aerosol can and detail painting was performed with a hand brush. The exhaust pipe was painted rust color, the engine was painted with some steel and black details after first giving all of it the grimy black wash. The driver’s seat was painted brown and the steering wheel was painted flat black around the outside ring and the center horn button was painted silver. The tires were painted the grimy black color.
| CONSTRUCTION CONTINUES |
I now added all the clear window parts. Glued all the doors on in open positions. I painted the tail lights bright red. The triangle on the roof of the cab got painted yellow. The decals for the weight information on the cab doors and the license plate numbers were added and decal snuggling solution added to the cab door ones to make them adhere into the cracks between the boards that make up the cab doors.
| CONCLUSIONS |
 This
model was constructed after a lot of extra cleanup and fabricating
some parts to match ones that shattered when trying to remove them
from the trees. The plastic is just too brittle in the kit. Also, it
was not all that clear just where parts wound up on the model. A lot
of things did not line up good and needed clamping and adjusting to
get them to fit halfway decent. The exploded assembly drawings were
not all that clear at times. There were way too many attachment
points to the sprues with quite a few parts. These attachment points
pertruded out onto the parts numerous times too.
This
model was constructed after a lot of extra cleanup and fabricating
some parts to match ones that shattered when trying to remove them
from the trees. The plastic is just too brittle in the kit. Also, it
was not all that clear just where parts wound up on the model. A lot
of things did not line up good and needed clamping and adjusting to
get them to fit halfway decent. The exploded assembly drawings were
not all that clear at times. There were way too many attachment
points to the sprues with quite a few parts. These attachment points
pertruded out onto the parts numerous times too.This kit is definitely not for the novice and was a lesson in frustration at times throughout the build. However, with a lot of care and work it can be made into a presentable model.
I only recommend it to modelers that have quite a few AFV kits that they have built in the past that have a lot of parts and this complexity.
Review kit courtesy of Squadron Products via your editor. Get yours at your local shop or on-line retailer.