| HISTORY |
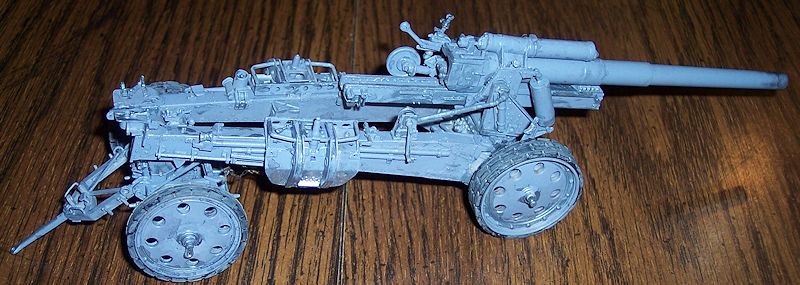
Trumpeter 1/35 s.F.H. 18 15cm Howitzer
| KIT #: | 02304 |
| PRICE: | $34.95 SRP |
| DECALS: | ? |
| REVIEWER: | Ray Mehlberger |
| NOTES: |
| HISTORY |
The 15 cm schwere Feldhaubitze 18 or sFH 18 (German: "heavy field howitzer, model 18"), nicknamed Immergrün (“Evergreen"), was the basic German division-level heavy howitzer during WWII, serving alongside the smaller but more numerous 10.5 cm leFH 18. It was based on the earlier, WWI-era design of the 15 cm Sfh 13, and while improved over that weapon, it was generally outdated compared to the weapons it faced. It was, however, the first artillery weapon equipped with rocket-assisted ammunition to increase range. The sFH 18 was also used in the self-propelled artillery piece schwere Panzerhaubitze 18/1 (more commonly known as the Hummel).The sFH 18 was one of Germany's three main 15 cm calibre weapons, the others being the 15 cm Kanone 18, a ciros-level heavy gun, and the 15 cm Sig 33, a short-barreled infantry gun.
| THE KIT |
The kit comes in a shrink-wrapped tray and lid type box. Inside are 6 light gray trees of parts, 2 loose gun trail leg parts, 2 large and 2 small black vinyl tires, 2 metal tubes, a turned barrel with rifling in the muzzle and a length of metal chain. (275 parts total)
| CONSTRUCTION |
Construction begins with assembly of steps 1 to 4, which is the gun base
section This went fairly fast. Care should be taken doing all this as there are
many small parts involved. In step 4 make sure you attach a part no. A-10 to
both of the C-2 parts.
Step 5 is the instructions for assembly of the main large wheels. The
instructions want you to add the tires here, but I left them off until after
painting.
 Step
6 shows to glue the big wheels onto the axle. Again I left these off until after
painting.
Step
6 shows to glue the big wheels onto the axle. Again I left these off until after
painting.
Steps 7 and 8 is the assembly of the gun yoke. This went well until I
lost part number C33. I scratchbuilt one and added it afterwards. Shaft part no.
D26 should be left unglued and sandwiched between the 2 parts that are A9 so
that it moves.
Steps 9 to 11 are the assembly of the barrel tray and recoil piston. I
managed to loose on of the 2 parts that are part no, A17 and I fabricated a new
one. The plastic eating monster that lives in my shag rug doesn’t return
anything he grabs….sigh.
In step 12 you opt to use either the plastic barrel (which is in two
halves) or the solid turned metal one. No contest…I used the metal one. It has
to be super glued to the front of part no. F9 and the breech assembly after the
breech is constructed out of 4 parts.
Step 13 adds the sliding breech block. The instructions show just one of
part no. F2 to attache to the side of part no. F9, but there are two of this
little plate with rivet pattern on it and the second one should go on the other
side of F9 too.
 In step
14 you slide the gun barrel assembly into the assembly you built in step 11.
Make sure you push it all the way forward until the pin on the top of the breech
engages the hole in the cylinder You also assemble the two elevation cylinders,
using plastic parts and the 2 metal tubes in the kit. The part no. A14 plastic
tube should pertrude from the metal tubes by 1/8th “ and be attached to the
sides of the gun assembly down to hooks molded on the front of the gun yoke.
In step
14 you slide the gun barrel assembly into the assembly you built in step 11.
Make sure you push it all the way forward until the pin on the top of the breech
engages the hole in the cylinder You also assemble the two elevation cylinders,
using plastic parts and the 2 metal tubes in the kit. The part no. A14 plastic
tube should pertrude from the metal tubes by 1/8th “ and be attached to the
sides of the gun assembly down to hooks molded on the front of the gun yoke.
Step 15 has some very tricky assembly. Dry fitting is suggested first to
get things right.
Step 16 is a lot of small parts added. Predominantly the sights, control
wheels etc. I lost part no. A46 to
 the
rug monster. Thank goodness there was a spare one in the kit.
the
rug monster. Thank goodness there was a spare one in the kit.
Step 17 and 18 are for the two gun trail arms. Assembly of parts C26,
C28, C8,C7, A12 and A13 together is tricky and easy to get wrong. I had to drill
the front hole on the side of this trail arm slightly higher as it crowded the
shovel.
There are two parts A25 in the kit. These are long slats that go into
the bottom of the trail arms. The rest on ledges inside there.
Steps 19 to 22 add equipment boxes and many other fitting to the trail
arms. I had to drill out the holes in parts D38 & D39 to accept the crank handle
part no. D33 as the holes were too small. Then the shaft on the crank handle was
too long, so I cut off a bit of it.
I discovered after looking at pictures of this howitzer on the net that
part no. B17 is an aiming pole, that should be painted white with red stripes
around it. However, it is impossible now to paint it that way because it is
glued on the gun trail arm and partially buried under a ground spade later…sigh.
In step 23 you assemble the 2 ground spades. I lost a couple tiny parts
for one of these spades and fabricated 2 new ones.
 In
step 24 you assemble the 2 small wheels. Again the vinyl tires were left off
until after painting.
In
step 24 you assemble the 2 small wheels. Again the vinyl tires were left off
until after painting.
Step 25 is the assembly of the ground pressure plate with multiple holes
molded in it. The step says “Batholith” in English and Chinese. I don’t know
why, or what the hell that means????
Step 26 & 27 is assembly of the small trolley that attaches to the ends
of the trail arms.
Step 28 is assembly of the towing arm that hooks into the front of the
trolley.
I now spray painted all the sub-assemblies with Testors gray primer.
I added all 4 of the vinyl tires, the trail arms to the gun, the wheels
to the main axles and a piston (part no. D29) that went from the side of the gun
cradle to the right trail arm. The trolley was added to the cylinder in the
trail arm ends. The two ground spades were added to the tops of the each of the
trail arms.
 The
length of steel chain was soaked in BLACKIN-IT liquid to turn it black. It was
then cut into 2 equal lengths and glued letter X between the hooks on the bottom
of the trail arms and the back of the trolley.
The
length of steel chain was soaked in BLACKIN-IT liquid to turn it black. It was
then cut into 2 equal lengths and glued letter X between the hooks on the bottom
of the trail arms and the back of the trolley.
I used the black wash out of a RUST ALL set on the whole howitzer and
some FLOQUIL model railroad GRUNGE colored paint on all the vinyl tires. I used
a Tamiya black pastel powder around the muzzle of the gun.
| CONCLUSIONS |
This model turned out very nicely. However, it is definitely not a kit for the novice modeler and by no means a week-end project. Highly recommended and the detail is beautiful.
November 2013
Thanks to Stevens Intermational
for the review kit. If you would like your product reviewed fairly and fairly quickly, please
contact
the editor or see other details in the
Note to
Contributors.