Dragon 1/35 Panzer IV Ausf F1
| KIT #: | 6315 |
| PRICE: | $79.95 SRP |
| DECALS: | Ten options |
| REVIEWER: | Scott Lyle |
| NOTES: |
| HISTORY |
Adolf Hitler renounced the Treaty of Versailles in March 1935, officially lifting the ban on weapon development imposed on Germany by the Allies after the First World War. Years prior to that however, the German Wehrmacht had begun an ambitious tank building program. The machine gun armed Panzer I was basically a training vehicle while the Panzer II was to be a reconnaissance tank. The Panzer III was to take on enemy tanks, while the Panzer IV was to support the Panzer IIIs and work with the infantry to knock out enemy anti-tank guns and machine gun nests while being heavily armored enough to absorb some damage.
 With
design work beginning in January 1934, the Panzer IV was initially to be
armed with a 75mm L/24 howitzer and weigh no more than 24 tons. Of the
three companies that submitted bids Krupp emerged the winner with their
prototype looking something like an upsized Panzer III but with a
suspension that consisted of eight road wheels per side arranged into
four double bogie, leaf-sprung units.
With
design work beginning in January 1934, the Panzer IV was initially to be
armed with a 75mm L/24 howitzer and weigh no more than 24 tons. Of the
three companies that submitted bids Krupp emerged the winner with their
prototype looking something like an upsized Panzer III but with a
suspension that consisted of eight road wheels per side arranged into
four double bogie, leaf-sprung units.
During the early campaigns of the war the Panzer IV was usually utilized as it was intended, accompanying the infantry and acting against enemy strong points. In tank vs. tank actions it would stay behind the Panzer IIIs and lob shells at enemy tanks with its low velocity gun.
Operation Barbarossa saw the Wehrmacht experience initial massive successes, but as the campaign ground on the sobering realization that the Soviet Union seemed to have a limitless capacity to generate men and tanks began to sink in. On top of that the appearance of the Soviet T-34 and KV-1 tanks, superior to anything in the German arsenal, put a shock through the German command. To keep pace new tank designs were hurried along but in the meantime the Panzer IV received more armor and the larger, more powerful 75mm L/43 gun. Debuting in the spring of 1942, the long-barreled Panzer IV Ausf. F2s gave the Panzerwaffe a measure of equality with Soviet armor. A second “Happy Time” even arrived in the spring of 1943 when the Wehrmacht, led by Panzer IVs, routed the Soviets’ attempt at a deep offensive. Panzer IVs formed the backbone of the German Panzer force at Kursk as the new Panther tank was not yet available in large numbers.
Short-barreled Panzer IVs were sent to North Africa in 1941 but in such a fluid campaign, had little effect. When the long-barreled versions arrived however they soon became the most powerful tank in the desert until the arrival of the Tiger I. Unfortunately they never numbered more than about 30, hence their overall effectiveness was limited.
 In
Northwest Europe Panzer IVs, like all German armor, were on the
defensive virtually from D-Day on. Subjected to relentless air attacks,
Panzer crews had to become masters of camouflage and movement at night.
The long-barreled tanks gave a good account for themselves, only really
having to fear the 17 pdr Sherman Fireflys and the M10 and Achilles tank
destroyers. After the rout of the Falaise Cauldron however, the Panzer
IVs were reduced to a token force.
In
Northwest Europe Panzer IVs, like all German armor, were on the
defensive virtually from D-Day on. Subjected to relentless air attacks,
Panzer crews had to become masters of camouflage and movement at night.
The long-barreled tanks gave a good account for themselves, only really
having to fear the 17 pdr Sherman Fireflys and the M10 and Achilles tank
destroyers. After the rout of the Falaise Cauldron however, the Panzer
IVs were reduced to a token force.
Postwar the tank soldiered on in the inventories of the Finnish and Spanish armies. In 1965 ex-French tanks that had been acquired by Syria were used during the “Water War” with Israel. Stationed on the Golan Heights, they fired down onto Israeli positions until silenced by the 105mm guns of the Israeli Centurions. The last Panzer IV in action was appropriately destroyed by the 75mm gun of an Israeli Sherman during the Six Day War in 1967.
| THE KIT |
Fresh off of building Tamiya’s BT-7 I opted to
next tackle one of Dragon’s Panzer IV kits and upon opening the box one
immediately sees a difference between the philosophies of the two companies.
Whereas Tamiya gives you a handful of sprues with a minimum of spare parts,
Dragon’s box is flooded with sprues – seventeen to be e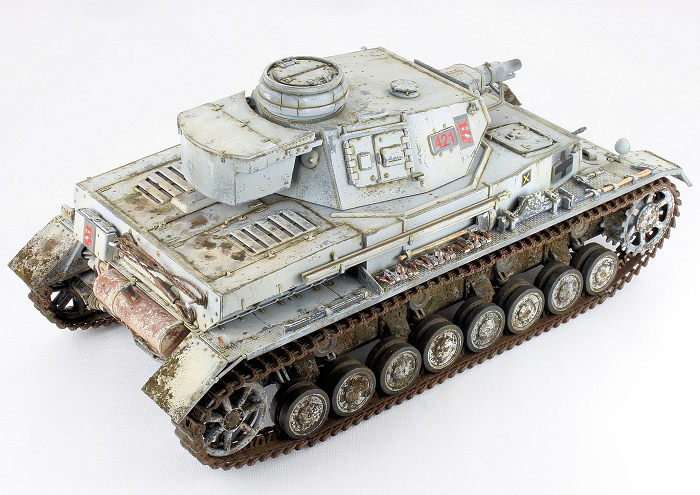 xact.
Not that this is a bad thing. While Tamiya sometimes frustrates us by not
producing the different variants of their modeling subjects, Dragon usually
produces virtually every variant of their modeling subject. Thus they
produce a lot of sprues that they mix and match into each kit, and if you
end up with a few leftover parts, so be it.
xact.
Not that this is a bad thing. While Tamiya sometimes frustrates us by not
producing the different variants of their modeling subjects, Dragon usually
produces virtually every variant of their modeling subject. Thus they
produce a lot of sprues that they mix and match into each kit, and if you
end up with a few leftover parts, so be it.
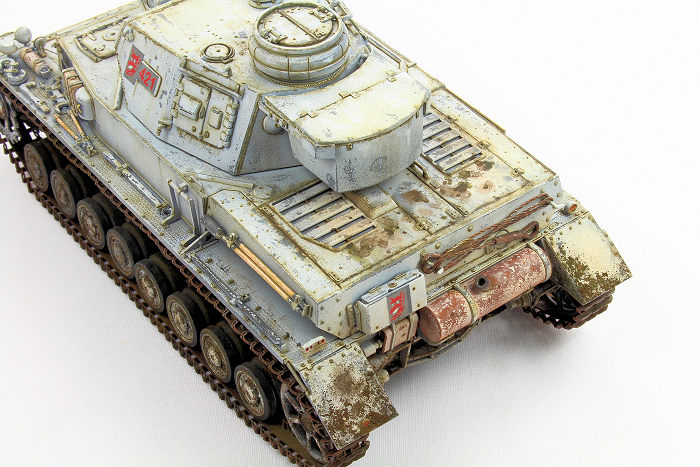
One thing for sure, Dragon makes you use your knife and glue. The box top states there are over 690 parts. The level of detail on these parts is fantastic however. Tiny weld seams abound. The bottom of the hull is fully detailed, as are the undersides of the fenders. Screw heads on the turret have tiny slots, and if you look at the bolt heads on the return roller housings under magnification they look like crown nuts, not hex nuts.
Along with the seventeen sprues, one of which is transparent, you get a fret of photo etch parts, a length of metal rope, two bags of magic tracks and decals for ten different tanks painted panzer gray, dark yellow, desert sand, winter whitewash and every color in between. Everything you could ask for and then some!
| CONSTRUCTION |
The first step is to assemble the sprockets, idlers, return rollers, and 16 road wheels. Unable to cope with the monotony of that as a first step, I moved onto to Step 2 to start building up the front and rear of the lower hull. Step 3 sees you fasten the bogie housings to the lower hull while Step 4 completes the detailing of the rear of the lower hull, including the nicely detailed muffler made up of seven parts.
Step 5 has you add the aforementioned wheels to
the hull, but I usually leave those off until after painting, and since they
weren’t assembled anyway, I moved on. Steps 6, 7, and 8 start building up
the upper hull while Step 9 assembles the rear engine grills. Steps 10 & 11
continue with the rear hull deck, and that’s where my first error occurred.
I misinterpreted the instructions and thought I could glue the hull deck to
the lower hull before attac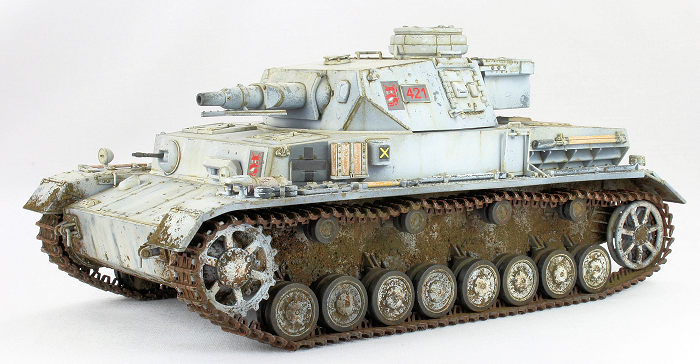 hing
the rear engine grills from Step 9. That would be wrong! This error forced
me to shoehorn them into place through their openings, which was annoying
and required a type of tweezers that humans haven’t invented yet. Attaching
them to the upper hull deck first would have prevented all that.
hing
the rear engine grills from Step 9. That would be wrong! This error forced
me to shoehorn them into place through their openings, which was annoying
and required a type of tweezers that humans haven’t invented yet. Attaching
them to the upper hull deck first would have prevented all that.
Steps 12 & 13 are very busy steps where you add all of the shovels, axes, ipad charging stations (just seeing if you’re paying attention…), etc to the fenders, but when you’re finished with that, the hull is complete. Moving on to Steps 14 through 17 you tackle the turret, which is beautifully detailed with weld seams and tiny screw heads. You can pose all three of the hatches opened or closed, as well as the various vision ports. The main gun breech is well detailed enough that you could leave the various hatches open without risking too much embarrassment to the interior detail sticklers...
Leaving off the wheels and tracks, it was off to the spray booth.
| COLORS & MARKINGS |
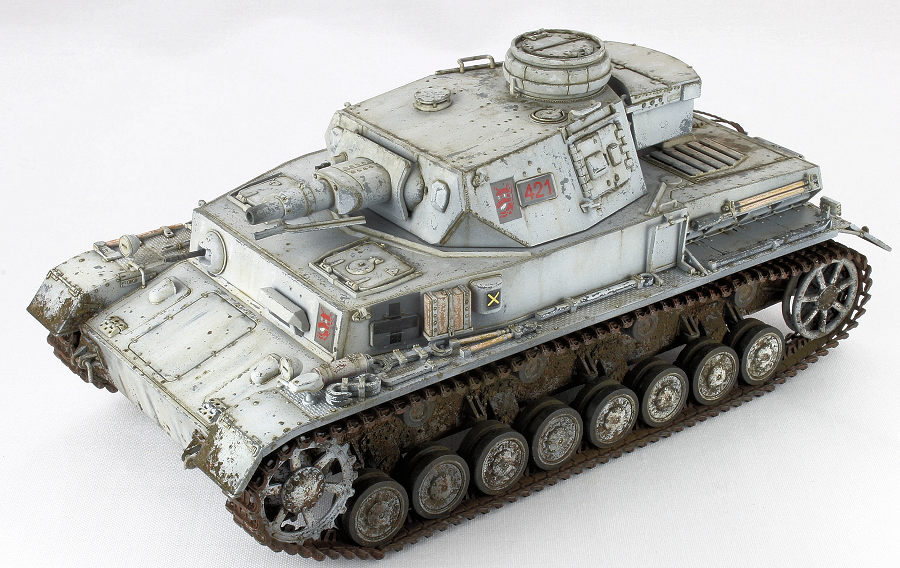
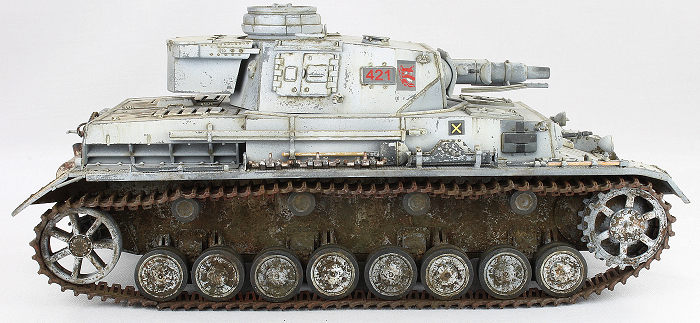
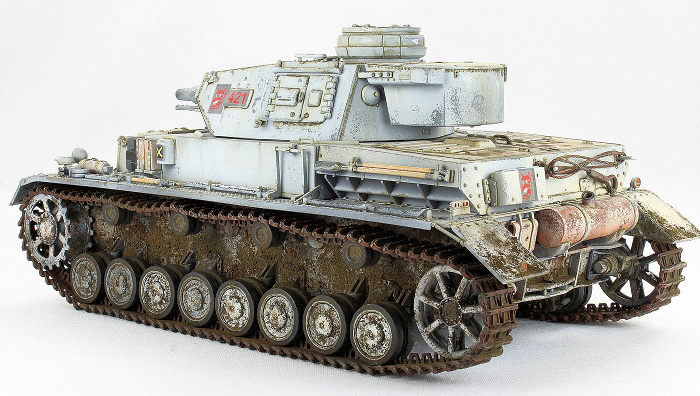
After having fun with the “hairspray technique” with the Tamiya BT-7 I decided to try another worn and chipped winter whitewash finish. I first primed the model with Tamiya’s Liquid Surface Primer. For the German Panzer Gray basecoat I sprayed on Tamiya’s XF-54 Dark Sea Gray darkened with a few drops of Tamiya XF-1 Black. I then brush-painted Testors Acrylic Gloss on to the areas to receive decals, then sealed said decals with another coat of Gloss.
Tresemme Ultra Fine Mist was next misted onto the
model straight from the can and allowed to dry overnight. I then airbrushed
Tamiya XF-2 Flat White (note: thin the paint with water or their acrylic
thinner – do not use lacquer thinner, it will eat through the hairspray)
onto the model, laying it on more heavily on the turret and upper hull and
hardly at all on the lower suspension. Using an old bristly brush and water
I began lightly scrub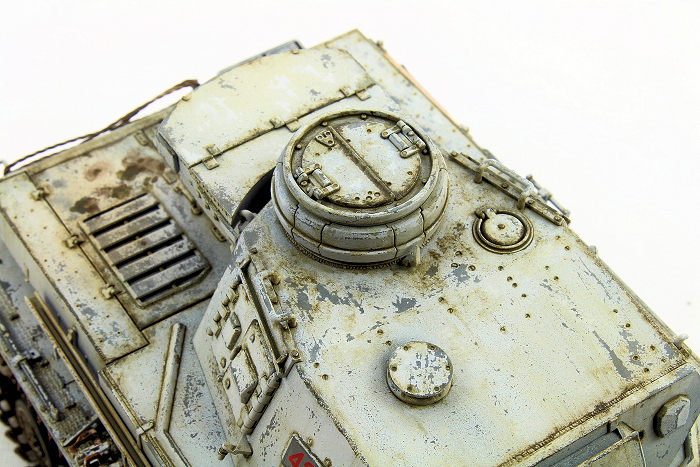 bing
hatches, the engine deck, various edges and any other areas that might get a
lot of wear. The technique yields chips based on how hard you scrub and for
how long. It took me a few nights to go over the whole model, but the
results are excellent. You can get chips large and small, anywhere you want.
bing
hatches, the engine deck, various edges and any other areas that might get a
lot of wear. The technique yields chips based on how hard you scrub and for
how long. It took me a few nights to go over the whole model, but the
results are excellent. You can get chips large and small, anywhere you want.
Once complete with that I added a pin wash using AK Interactive’s Dark Yellow Wash, and followed that by airbrushing AK Interactive’s Grey for Light Green over the whole model for a filter. That was followed by a few different applications of pigments. I opted for dark shades to create the look of a tank coated in different types of dark mud. Turning the tank on its side I applied some MIG Pigments’ Dark Mud and Russian Earth to the bogie housings and areas under the fenders. This was continued onto the lower front and rear of the hull, and to a lesser extent on top of the fenders. I used MIG Pigments Fixer with an eye dropper to fix them all in place.
Once the pigments were dry I blended some dark brown oil paint onto the outer edges of the turret and engine deck to replicate chipping and wear. Some more subtle streaks were added to the various vertical surfaces, and dark stains were added to the horizontal surfaces on the engine deck to replicate oil and fuel stains.
At this point I finally tackled the wheels, assembling them and painting and chipping them like the rest of the model. To aid in the upcoming assembly of the tracks I put the drive sprockets to one side, but the rest of the wheels, idlers and return rollers were glued to the hull. I then gave them the same pigment treatment as before.
 Next up
were the tracks. Dragon’s Magic Tracks are “handed” left and right, but do
not click together. Laying out short runs of them, they stay together just
enough for you to glue them together with liquid cement. One the glue sets
up for a couple of minutes I positioned them on the tank, stuffing little
pieces of tissue paper between them and fenders to get them to “sag”
realistically. Leaving the sprockets off until this point helped; now is the
time to put them on so you can choose how to engage their teeth with the
tracks. Letting the glue set overnight, the next day I disassembled them all
for painting.
Next up
were the tracks. Dragon’s Magic Tracks are “handed” left and right, but do
not click together. Laying out short runs of them, they stay together just
enough for you to glue them together with liquid cement. One the glue sets
up for a couple of minutes I positioned them on the tank, stuffing little
pieces of tissue paper between them and fenders to get them to “sag”
realistically. Leaving the sprockets off until this point helped; now is the
time to put them on so you can choose how to engage their teeth with the
tracks. Letting the glue set overnight, the next day I disassembled them all
for painting.
I first painted them Vallejo Panzer Aces Track Primer by brush, then followed that with a coat of AK Interactive Track Wash. Some dark brown and rust shades were next roughly dry-brushing on, followed by a light dry-brushing of Testors Steel. They were then mounted to the tank.
At this point just a few final steps remained. The rear lights were painted red and then given a coat of gloss followed by some pigments to tone them down. The antenna was attached but I positioned it down in its trough as I thought it looked too thick. Some more touches were added here and there, and the model was done.
| CONCLUSIONS |
I always found the look of the short-barreled Panzer IVs paradoxical; squat and purposeful yet too much tank for such a small gun. Dragon’s kit is a beauty, chock of full of great detail and thoughtful touches. If Tamiya’s armor kits are the Spitfires, Dragon’s are the Hurricanes – not quite as beloved but more numerous and rock solid. Buy them in confidence, build them, and weather them up. Life is good.
| REFERENCES |
- Osprey Publications, New Vanguard #28, “Panzerkampfwagen IV Medium Tank 1936-45”
- Squadron/Signal Publications, Armor in Action #12, “PzKpfw IV in Action”
- Wikipedia, the online Encyclopedia
26 March 2019
Copyright ModelingMadness.com
If you would like your product reviewed fairly and fairly quickly, please contact the editor or see other details in the Note to Contributors.
Back to the Main Page Back to the Review Index Page Back to the Previews Index Page