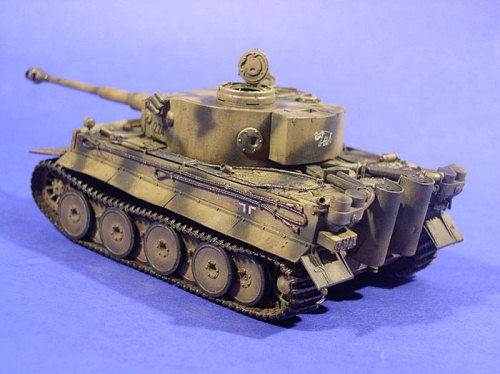
Skybow 1/48 Tiger I (early)
| KIT #: | 3833 |
| PRICE: | $25.98 MSRP |
| DECALS: | Three options |
| REVIEWER: | Ralph Koziarski |
| NOTES: | This boxing included P.E. grills and two figures |
| HISTORY |
I’m by no means an expert on German armor, but when one hears the word panzer, one tends to think of the Tiger. Many allied tankers and infantrymen, and no doubt civilians, lost their lives to these beasts. They were slow, heavy and underpowered, but their thick armor protected them from all but the strongest allied anti-tank guns, and their 88mm cannon could go through most any armor as if it wasn’t there at all. The Tigers were first introduced in late 1942 to the North African desert and the Russian Steppes where they made short order of most British, American and Soviet Tanks. We often hear stories of how two or three Sherman tanks would be needed to take out one Tiger. Approximately 1300 tigers were built between 1942 and 1944. Fortunately for the allied cause, there were never enough to go around.
There are many excellent resources on the Tiger, and I would direct any reader wishing to learn more to pick up a book on the topic or even peruse the internet.
| THE KIT |
Skybow, a new player in the 1/48 AFV field has recently released kits of both an early and late production Tiger. This review is of the early production model. The kits have been applauded by many modelers as some of the best in the scale, and when I saw one packaged with resin figures and PE set for only a little more than the Tamiya release I knew I was buying it. I, along with many others now sit back and eagerly await Skybow’s release of the Firefly Vc Sherman.
 The first thing I noticed
about Skybow’s kit is the packaging; a rather large box for such a small model,
which comes with a opening flap on its lid that lets you peek inside at the
parts through a plastic window, which is actually the inner packaging. The vacu-form
plastic inners make a good source of sheet stock for scratch-building. Once
inside you are greeted with 5 light-green sprues of crisply molded parts, the
two halves of the hull, a plastic baggy of tiny screws and two somewhat lame
looking polyvinyl tracks. My model also included two resin half-figures from
Warriors and a PE fret for the grill covers. For $28 (US), I was floored by the
bargain. My only complaint with what you are provided with in the box is the
instruction booklet. The instructions consist of a series of glossy photographs
of assembly steps. These can be somewhat confusing for less experienced modelers
since some of the parts used in any given step are shown already stuck onto the
model. Thus, smaller components like grab handles and latches can be easy to
miss in the assembly sequence. Some care during assembly will alleviate the
previous problem, but the lack of adequate painting instructions is a bigger
problem. You are given a sheet of very small photos of the completed model from
the sides, front and back; however, there is no top view to show what the
camouflage patterns look like there, and you’ll either need to either
extrapolate the pattern from the side views or get some outside references.
The first thing I noticed
about Skybow’s kit is the packaging; a rather large box for such a small model,
which comes with a opening flap on its lid that lets you peek inside at the
parts through a plastic window, which is actually the inner packaging. The vacu-form
plastic inners make a good source of sheet stock for scratch-building. Once
inside you are greeted with 5 light-green sprues of crisply molded parts, the
two halves of the hull, a plastic baggy of tiny screws and two somewhat lame
looking polyvinyl tracks. My model also included two resin half-figures from
Warriors and a PE fret for the grill covers. For $28 (US), I was floored by the
bargain. My only complaint with what you are provided with in the box is the
instruction booklet. The instructions consist of a series of glossy photographs
of assembly steps. These can be somewhat confusing for less experienced modelers
since some of the parts used in any given step are shown already stuck onto the
model. Thus, smaller components like grab handles and latches can be easy to
miss in the assembly sequence. Some care during assembly will alleviate the
previous problem, but the lack of adequate painting instructions is a bigger
problem. You are given a sheet of very small photos of the completed model from
the sides, front and back; however, there is no top view to show what the
camouflage patterns look like there, and you’ll either need to either
extrapolate the pattern from the side views or get some outside references.
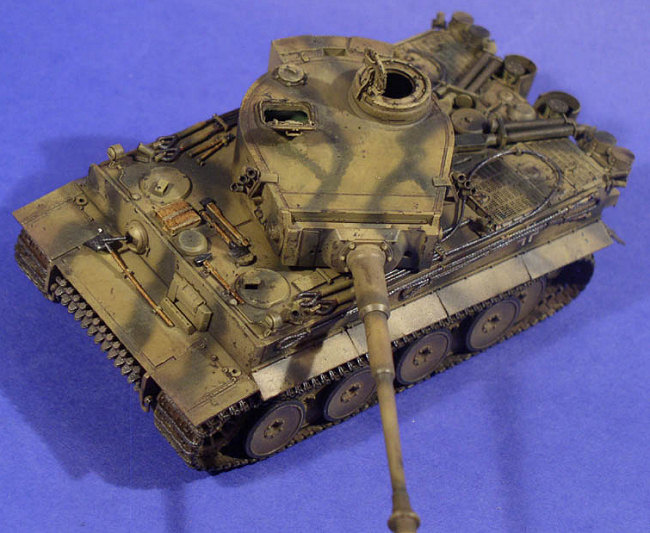
With the minor gripes about the instructions aside, it should be noted that the kit is of a very high quality. The moldings are crisp, and many fine details like wires leading to the bosch lamps, which are sometimes not even found on 1/35 scale Tigers are included. The hull and turret parts feature a nice armor texture which I think looks just about right after they are painted, wheels and other components feature fine weld bead and rivet detail, and smaller elements such as the pioneer tools, hatch interiors, S-mine dispensers, and smoke dischargers are also finely molded. Conversely, the tracks leave a left me a little cold. While they are certainly not the worst, they look poor compared to the rest of the model. Also, it could be just me, but they appear to be slightly too narrow.
The decals in this kit allow for three options, and are printed in reverse. This means that the decal paper, once wet is placed face down onto the desired part and pulled away, leaving the decal on the model. This style of decals is supposed to minimize the amount of carrier film, but I saw no difference from the regular kind we’re all used to.
| CONSTRUCTION |
I began the build by assembling the elements of the lower hull. Unlike Tamiya’s quarter scale tanks, this one is plastic so you won’t need any super-glue. At this time I also cut of all the wheels from the sprues and assembled the idlers and drive sprockets. The wheel configuration on a Tiger is quite complex, so follow the directions closely here. Skybow has you use the little screws to attach the wheels to the axles so they can rotate. The instructions warn you not to screw them in too tightly, ignore that one at your own peril.
I stripped the axles by tightening the screws too much, so I decided to glue them on since rotating wheels just make painting more difficult for me anyways. After about two hours of work I had all the wheels on and left everything to settle until the next evening.
With the glue on the
wheels nice and dry, I was ready to put on the tracks. Many modelers apply the
tracks after painting the 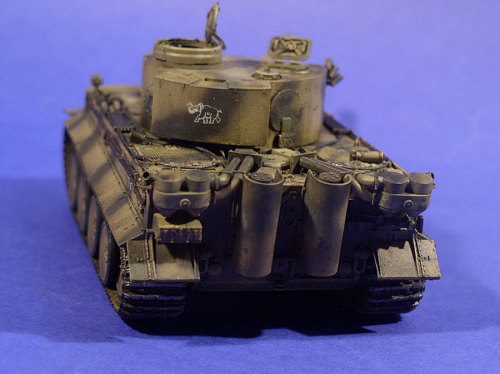 model, but the method I use to weather armor works
best if the entire kit is assembled. Additionally, gluing on the track now
allowed me to glue it to the top of the running gear to more accurately simulate
the sag of the tracks. I glued part of the track to the drive sprocket, applied
glue to the tops of the third through sixth road wheels, and the idler and the
slid the track in with enough give to wrap around the bottom. Once the tops were
dry I applied glue to the bottoms of all the road wheels and closed the track
loop. This method worked without a hitch on the left track, but the right track
was very tight and I noticed that the rear idler was starting to bend inwards. I
loosened the track as much as I could to stop the idler from bending, but now
have a small (almost unnoticeable) gap on the bottom. It was also at this point
that I noticed how narrow the tracks look. The outer row of wheels almost
appears to stick out past the edges of the tracks, and while they were very
close to the edge on real Tigers, I think the end connectors stuck out just a
wee bit more than here. Skybow has a set of indy-link tracks available for those
who want them, but I decided that I was fine with the way things were.
model, but the method I use to weather armor works
best if the entire kit is assembled. Additionally, gluing on the track now
allowed me to glue it to the top of the running gear to more accurately simulate
the sag of the tracks. I glued part of the track to the drive sprocket, applied
glue to the tops of the third through sixth road wheels, and the idler and the
slid the track in with enough give to wrap around the bottom. Once the tops were
dry I applied glue to the bottoms of all the road wheels and closed the track
loop. This method worked without a hitch on the left track, but the right track
was very tight and I noticed that the rear idler was starting to bend inwards. I
loosened the track as much as I could to stop the idler from bending, but now
have a small (almost unnoticeable) gap on the bottom. It was also at this point
that I noticed how narrow the tracks look. The outer row of wheels almost
appears to stick out past the edges of the tracks, and while they were very
close to the edge on real Tigers, I think the end connectors stuck out just a
wee bit more than here. Skybow has a set of indy-link tracks available for those
who want them, but I decided that I was fine with the way things were.
Following the track fiasco, the rest of the assembly went smoothly. I glued on the rear hull plate and then the upper hull and then decided to glue together the turret. The turret is made of three main parts, and a two part gun mantlet. These went together and then I glued on the escape hatches, smoke dispensers, gun pins and crew hatches. The crew hatches have some very nice interior detail so I decided to pose them open. Finally I glued on the gun. Anybody who has built armor models knows that gun barrel is a pain in the butt since there are usually long seems to clean up after the two halves get glued together. Skybow provides us with a very nice one piece gun that includes a hollow muzzle break. The only cleanup required here is to scrape off two small mold seams.
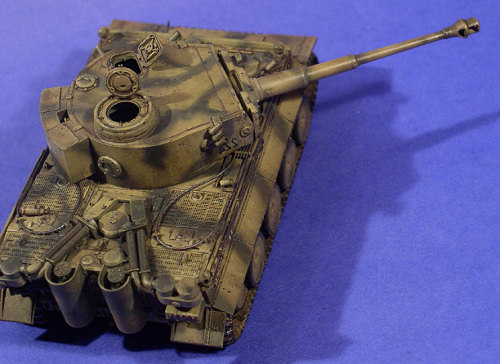
With the turret done it was time to get to the meat and potatoes of the kit: all the fine details on the hull. I began by gluing on the front glacis, and the driver’s and radio-operator/machine gunner’s hatches, I then moved my way rearwards and put together the exhaust stacks, and filter pipes, both of which are very nicely rendered by Skybow. I then applied the PE grills with super-glue. They rear grills fit fine, but the forward, larger ones were a little bit too large. This wasn’t a problem because the sides were just folded down. Following these major parts I glued on the S-mine launchers (careful not to miss the 5th one behind the turret), engine deck grab handles (easy to miss again. Look very closely in step 13 in the instructions), towing latches, head lamps, pioneer tools, tow lines and other miscellaneous details. Finally I thinned down the fenders, cut them apart into individual sections and bent them up a little bit in hot water and glued them on. After three evening sessions of perhaps two hours each, I was ready for painting. I didn’t use the figures since they’re dressed in winter gear and I painted my Tiger in a spring/summer scheme.
| COLORS & MARKINGS |
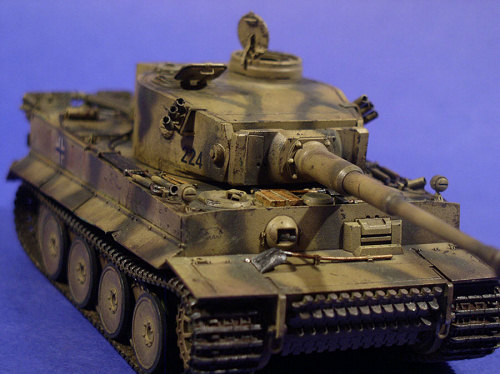
As always I used Tamiya paints to
paint my model. There are decals for three schemes; two from the Eastern Front,
both with a dunkelgelb basecoat and then either reddish-brown or dark green
field camouflage, or a Tiger from the North African campaigns in overall DAK
yellow over-sprayed onto dark grey. I settled on one of the vehicles from Russia
and began by spraying on a coat of dark yellow lightened with some buff. I
sprayed the whole vehicle in this color and then loaded my airbrush with
straight dark yellow, spraying it in irregular patterns on the horizontal
surfaces and wheel dishes, and then in thin vertical streaks down the sides and
rear of the turret and hull. The idea here is to give the finish a distressed
look by using multiple shades of the same
 color. The trick here is to have the
shades far enough apart so they’re visible, but not so much that there is a high
contrast. I find that a ratio of 7:3 base/lightener for the lightened shade
works best. Later I sprayed on the camo pattern with Tamiya’s dark green thinned
50:50 with alcohol. The next step was to apply some scratch and chip marks.
Chipped paint is the armor modelers’ version of darkened panel lines, in that a
little bit goes a long way. It is easy to overdo and many modelers don’t do it
at all. As a matter of fact this was the first time I ever tried it. I mixed up
some black and burnt umber artists acrylic paint from the American Folkart line
and then added just a touch of silver for some luster. I didn’t thin this paste
with any water, but just dipped in a ratty old brush I have, whose bristles have
become stiff so that it resembles a sink scrubber, and lightly tapped some areas
of the tank with the black brown mixture. I focused this near the hatches and
rear deck, areas where crew traffic would be highest.
color. The trick here is to have the
shades far enough apart so they’re visible, but not so much that there is a high
contrast. I find that a ratio of 7:3 base/lightener for the lightened shade
works best. Later I sprayed on the camo pattern with Tamiya’s dark green thinned
50:50 with alcohol. The next step was to apply some scratch and chip marks.
Chipped paint is the armor modelers’ version of darkened panel lines, in that a
little bit goes a long way. It is easy to overdo and many modelers don’t do it
at all. As a matter of fact this was the first time I ever tried it. I mixed up
some black and burnt umber artists acrylic paint from the American Folkart line
and then added just a touch of silver for some luster. I didn’t thin this paste
with any water, but just dipped in a ratty old brush I have, whose bristles have
become stiff so that it resembles a sink scrubber, and lightly tapped some areas
of the tank with the black brown mixture. I focused this near the hatches and
rear deck, areas where crew traffic would be highest.
When the paint had dried I applied future to where the decals would go and put them on as described above. The decals were sealed with more future and then a MM acrylic flat coat was applied. Applying decals with the paper-side up took some getting used to, but the results looked no different from normal decals. I don’t know what the fuss is about with this reverse printing method.
After the decals were on I again used my artist’s acrylics to prepare a wash. For armor I use a combination of burnt umber and black, with more black for dark colored vehicles, and more brown for lighter, more yellow vehicles. I mixed about 80% umber with 20% black and add water until I have a dirty black/brown soup. I dipped a small brush into this and applied it loosely over the tank, concentrating on recessed areas. It helps to work on one side, dry it off some with a blow-dryer and the turn the tank over to work on the other side. This prevents the wash from pooling at the bottom. After the wash was applied I went over it with slightly cleaner (but never clean) water to break up the puddles of drying paint, and to create lighter colored streaks on the vertical surfaces.
This process is difficult to describe with text, and anybody wishing to try it out should experiment on a spare kit. One point to remember is that unlike an aircraft model, you don’t want your wash inside a panel line only; instead you want the darkened paint under the wash to gradually blend into the color without the wash over it.
Once the wash had dried, I began to dry-brush some of the raised details with dark-yellow. I didn’t drybrush the lower half of the vehicle yet, and tried to avoid the corners of the tank. Some well known armor modelers like to dry-brush progressively lighter shades of the base coat onto all the hard edges of the vehicle, finishing with a coat of almost white paint. While this makes all the edges pop-out, I think the effect looks like sugar-glazed AFV in the end. A caveat here: while dry-brushing, I broke off both the lamps twice. Their stems are fragile so keep that in mind and take more care than I did.
When the dry-brush was finished I loaded some lightened dark-yellow into my airbrush and thinned it with 90% isopropyl alcohol. I misted this coat onto the model to tie everything together and reduce the harshness of some of dry-brushed details and paint chips. I was now ready to begin working on finishing the suspension.
There are many ways to
weather a tank’s suspension. It is usually at this point that I begin to run out
of tricks, but I have adopted a method similar to that used by famous modelers
Tony Greenland and Steven Zaloga, as I find it to be the easiest to pull off. I
mixed my black and burnt umber acrylics yet again and this time I loaded them up
into my airbrush and added water until the consistency of skim milk. I sprayed
the whole outer face of the track with this brownish/black color and then
sprayed the visible inner track surfaces, in the process catching the ends of
the wheels with the dirt. When finished I had a brown track and a irregular rim
of brown paint about ¾ of the way in towards the center of each wheel. I also
sprayed this about half way up the rear plate and most of the way up the front
spare track. Once thoroughly dry I dry-brushed the wheels and front and rear
plates with Tamiya’s dark earth. I then dry-brushed the wheels with dark-yellow,
and used my artist’s acrylics to make a grimy silver (black and silver) to
dry-brush the outer faces and edges of the tracks with. Finally I mixed used a
shade of very dark grey (never use black paint here)
 for the visible rubber
portions of the wheels (why bother painting what can’t be seen), which I painted
with a detail brush. I then sprayed on a coat of polly-scale flat only on the
“dirty” for a dead flat finish to contrast the egg-shell flat of the upper hull.
for the visible rubber
portions of the wheels (why bother painting what can’t be seen), which I painted
with a detail brush. I then sprayed on a coat of polly-scale flat only on the
“dirty” for a dead flat finish to contrast the egg-shell flat of the upper hull.
The final step on the bottom was to lightly dry-brush the tracks with Humbrol’s silver. Once again, show restraint as a little goes a long way. Once I had this done I went back to paint the pioneer tools. I painted the wooden portions with Tamiya’s desert yellow and the metal bits with Polly Scale’s engine black. When the tools were dry I dry-brushed the metal parts with Humbrol silver, and used a toothpick to smear around some burnt-umber oil paint on the handles to simulate wood grain. The tow cables went through several coats of rust and black and silver until I decided that my above mentioned grimy silver mix looked best on them (next time I’ll leave them off the model until after they’re painted)
The final touch was some black pastel dust on the cannon, exhausts and smoke dispensers. Also for good measure, I added just a touch of brown pastels to the recessed portions of the track face. Looking at what I’ve just written, the painting and weathering process appears to be very difficult, convoluted, and hell, endless! But, don’t let my long-windedness deter any of you from trying an armor model if you haven’t already done so. Total finishing time was no more than 5 hours, and a good 1/3rd of that was spent experimenting.
| CONCLUSIONS |
I’ve never been a big fan of the Tiger, but I had to pick this kit up after I saw how well detailed it looked, and how cheap it was. For only a few dollars more than the Tamiya kit, I got a super detailed Tiger with PE and two figures (which will be used on my Panther). Tamiya has reopened the flood-gates to quarter scale armor with their recent glut of kits, and while the Tamiya kits are nice, it is very high quality products like Skybow’s Tiger which may finally convince the more hard-core armor modelers that 1/48 armor is here to stay, and isn’t just a flash in the pan. I’ve only recently started building 1/48 scale armor, and I must say that these kits are a blast. If more kits as detailed as the Tiger become available soon, then I may not need to build in 1/35th anymore.
November 2006
If you would like your product reviewed fairly and fairly quickly, please contact the editor or see other details in the Note to Contributors.