Bronco 1/35
Adler armored car
|
KIT #: |
CB-35032 |
|
PRICE: |
$45.00 MSRP |
|
DECALS: |
Three options |
|
REVIEWER: |
Bill Koppos |
|
NOTES: |
A good one |

The resurgence of Germany's armed forces in the
early 1930's resulted in a need for new vehicles to train the new armored
troops that would form the core of the new German power.
What was needed were cheap easily produced
vehicles to introduce these neophytes to the tactics and methods of
Blitzkreig. The Panzerkampfwagen I was one of these, the
Machinengewehrcraftwage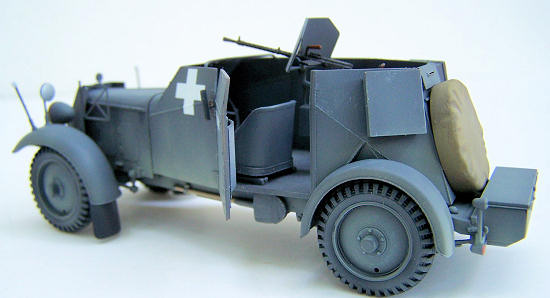 n Kfz.13, our subject matter, was another. We shall
find it much easier to call this vehicle the Adler armored car.
n Kfz.13, our subject matter, was another. We shall
find it much easier to call this vehicle the Adler armored car.
Adler was a German auto maker in the '30's, putting out
standard type jalopies, the chassis of which was used to mount an armored
body designed by Deutsche Edelstahl,production being from Daimler-Benz and
Adler. The body was kind of an armored tub, being of 8mm thickness, the
radiator being also covered. Power was a 6 cylinder of 60 Horsepower,
driveline just 2-wheel rear drive. A single machine gun was mounted on a
pedestal behind an armor shield. A driver and a gunner comprised the crew.
Not really a Panzer but with vehicles like this tactics could be worked out
and better yet, lines of them on parade looked very good for the propaganda
newsreels.
Assigned mostly to recon units, war quickly proved there
was a need for better machines. 8mm of armor will only stop "ball" rifle
ammo and shell splinters, any Armor-piercing round will go through it.
2-wheel drive and a high center of gravity guaranteed poor cross country
performance. So after the Polish and French Campaigns these little guys were
in combat no more. But while they were in there, they wielded the title
"armored vehicle" well enough to make those lightly-armed enemies nervous.
I always thought this was a cool-looking vehicle,
especially in Polish Campaign white-cross
markings. This complicated criteria was enough for me to buy the kit as soon
as it appeared on the LHS shelf. Bronco provides 5 nicely molded plastic
sprues and 1 photo-etch fret. The tires are regular plastic, thank you. 1
sprue is almost entirely weapons, Jerry cans, jacks, etc. you won't use,
and add to your spares box. Plans are nice, glossy and large with color
painting/decaling guides.
Decals are comprehensive enough and allow for 3 vehicles
to be done, an early training machine, my Polish white-cross job, and a
French invader. Flash and sink marks are non-existent. Ejector pin marks are
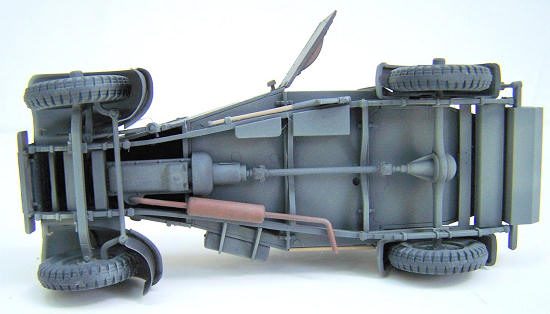
hidden well., except for under the floor. It is a curbside, no engine being
provided, just the undersides. All-in-all, looks good to me.
We start with the frame, rear axle, springs, driveshaft,
and general chassis stuff. The frame is molded with the front fenders in
place. Under these we bend and glue photo-etched braces. These are small and
our first PIA. They ar e very hard to bend being very tiny. I never really
got them right and will cover them with mud later. (Photo-Etch is NOT my
strong point). Now the hood and radiator is assembled. Fit of the plastic
parts is so far quite good. In step 3 some interior work is done, seats and
machine-gun mounts being built, photo-etch being involved here too. I left
the machine gun and shield off till later. Under the instrument panel, the
steering column and wheel have no support at all, just shown glued right to
the firewall.
e very hard to bend being very tiny. I never really
got them right and will cover them with mud later. (Photo-Etch is NOT my
strong point). Now the hood and radiator is assembled. Fit of the plastic
parts is so far quite good. In step 3 some interior work is done, seats and
machine-gun mounts being built, photo-etch being involved here too. I left
the machine gun and shield off till later. Under the instrument panel, the
steering column and wheel have no support at all, just shown glued right to
the firewall.
I cemented a small styrene square to the bottom of the IP as a bracket to
hold the steering column, adjusting the height to give the driver some knee
room. In step 4, the Machine gun limiter (to prevent the gunner from
shooting the driver in the head) is tackled. This is a very delicate part
(remove very carefully from the sprue) with tiny etched frames to be bent
around the ends. Here I cheated and glued the plastic limiter ends to the
walls, and just put the plates under it without attempting the bend. I have
limits too. At this point before the body parts can be attached, you should
cut off the attachment points for the radio antenna of the sister kit radio
car version, and sand the areas smooth. Now the armor bodies may be glued to
the flooring. I left my doors off for now, to be painted separately, as I
could not decide on having them open or closed yet. This also makes it
easier to paint the inside details later like the seats and levers.
 Steps 6 and 7 assemble the hood, armored tub and rear fenders to the
chassis. The rear fenders have more of those PIA photo-etch braces to bend
and put on. After several purple-aired attempts to do this, they were cast
away, and if anybody ever notices they're missing I'll eat my shorts.
Steps 6 and 7 assemble the hood, armored tub and rear fenders to the
chassis. The rear fenders have more of those PIA photo-etch braces to bend
and put on. After several purple-aired attempts to do this, they were cast
away, and if anybody ever notices they're missing I'll eat my shorts.
We turn her over for steps 8,9 and 10, doing the front end linkages, muffler
and wheel attachments. So far the fit of parts has all been very good, but
we slow down a touch here. The small tie rods must be glued to the wheels in
front, allow these to dry well before proceeding. The pins the wheels attach
to are very small and delicate., I built the rears up with some CA glue to
tighten things up. After the backs were glued I reinforced them with more CA
around the joints.
The fronts must be put on and connected with the steering arm and tie
rod. I "steered" them to th right a hair to seem less robotic. then I
applied regular liquid cement here, did a wheel alignment, and set the
whole caboodle to dry for the night.
Well, that's the hard part, the rest is downhill sledding., toolboxes,
headlights, fender width indicators, shovel, mirror. I left off the spare
tire and rear liscence plate bracket for later painting. I loaded up the
mainframe, doors and gunshield and headed out to spray some gray.
As I usually do, I started with a coat of good old Testor's
glass jar flat black, this time with some Panzer Gray (PG) mixed in. Get
this in all the corners nooks and crannies, in the interior and underneath,
especially up under the hood where there is emptiness, to camouflage this
fact. Then I went with Model Master Enamel PG with a little white added,
covering the whole vehicle, but leaving just a hint of the dark undercoat to
show through at weld lines and hood hinges, etc. Underneath, I left more black showing for a dirtier, shadowy look. Now I mixed some RLM 65 Lichtblau
(Luftwaffe light blue that is) in a thin mix with PG, and hit th e centers
of the panel areas, doors, hood, fenders and gunshield. I just wanted a
subtle variation in tone here and tried not to overdo it. What you now have
is 3 layers of color, adding depth and interest to a one color vehicle.
e centers
of the panel areas, doors, hood, fenders and gunshield. I just wanted a
subtle variation in tone here and tried not to overdo it. What you now have
is 3 layers of color, adding depth and interest to a one color vehicle.
I chose the Polish Campaign Adler, National markings for
Germany at the time being a plain white cross. First I sprayed the Testor's
Metallizer Sealer glosscoat just to the decal locations. The Decals are the
flat finish type, which usually look scary, but work out OK. These were like
that. The lay down nicely and conformed to the surface below, even the front
radiator louvers. Solvaset had no effect on them, but it really wasn't
needed. Now I learned something here. The vehicle name "Marder" was carried
on the doors. I always thought of Marders in terms of the German
Self-propelled gun line, you know, Marder 2, 3 etc. My online dictionary
keeps translating Marder as "Marten", a fur bearing carnivorous creature.
Huh! Ya learn something new every day. Soooo another sealer coat went over
the decals, which blended in well. Now to dirty it up just a bit.
The muffler was rusted up and engine oil pan, tranny and rear
end were "sludged" with black water wash. I painted the shovel "shovel
color" and the other little details like shift knobs, steering wheel, seats,
(Black) width indicators and taillight. Tires are brushed with Vallejo black
with a touch of grey. At this point I went back and put a really dry
drybrushing of RLM 65 all over the main surfaces, to subtly pop out the weld
and rivet lines, and gunshield and wheel hubs. The interior floor was
scuffed with some Tamiya weathering stick mud and aluminum in high wear
areas around the crew positions. A mixture of thinner, Testor's Dullcote,
and Humbrol Buff (easy on the Buff) was sprayed on the lower surfaces,
wheels and undersides very lightly to create a light dusting, to kind of
look like it was on the road on the first day of combat. I was quite happy
with the whole deal and ready to...
 Time to decide on the doors. I fiddled with them a bit, fit
being very good, they will stay on by themselves. I decided to close up the
right and leave the left open. I decided (so much choice) to use the MG13
machine gun, a '30's weapon later replaced by the MG34 (also provided). The
MG13 is an interesting looking thing with a scissors type buttstock and side
box magazine. This being only a 25 round box mag, this Marten has a
fearsome main armament! It was painted steel/black and the MG and gunshield
finally glued on. The spare tire and headlight covers were brush painted
with Vallejo Acrylics, a Khaki base with dark and light highlights. I
attached the spare, and called another one complete.
Time to decide on the doors. I fiddled with them a bit, fit
being very good, they will stay on by themselves. I decided to close up the
right and leave the left open. I decided (so much choice) to use the MG13
machine gun, a '30's weapon later replaced by the MG34 (also provided). The
MG13 is an interesting looking thing with a scissors type buttstock and side
box magazine. This being only a 25 round box mag, this Marten has a
fearsome main armament! It was painted steel/black and the MG and gunshield
finally glued on. The spare tire and headlight covers were brush painted
with Vallejo Acrylics, a Khaki base with dark and light highlights. I
attached the spare, and called another one complete.
Nice kit. A mostly enjoyable build with only a few rough
spots mainly caused by that dastardly photo-etch and the wheels. Fit of the
main plastic parts was excellent. Not that high a parts count for those
looking for a break from a mega- project. To me it sure is mean enough
looking in it's grey-and-cross livery, if it came rolling at me in a cloud
of dust spitting bullets, and I had never
seen a tank before, I would think about buggin' out!
Tanks and other AFV's of the Blitzkrieg Era 1939-41 BT White
1972 (another oldie)
Wikepedia and other Websites
Bill
Koppos
June 2010
Copyright ModelingMadness.com
If you would like your product reviewed fairly and fairly quickly, please
contact
the editor or see other details in the
Note to
Contributors.
Back to the Main Page
Back to the Review
Index Page 2018