
Dragon 1/35 Tiger I (late)
| KIT #: | 6406 |
| PRICE: | $39.99 MSRP |
| DECALS: | Six options |
| REVIEWER: | Greg Ewald |
| NOTES: | Simplified version of initial release with improvements. One piece track, no metal barrel, no figures, no problem. |
| HISTORY |
It was while delving into the history of the late war versions of the Tiger 1 for this build that I ran into an interesting tale of a battle that took place in a small town named Cecina, in the Tuscany region of Italy. (see link in references below) It is a very well documented defeat of Tiger 221 at the hands of a Sherman tank from the 752nd.
The early versions of the Tiger were
very superb in their role as a heavy battle tank, but small modifications to the
turret cupola, the factory application of zimmerit anti-tank mine paste, and the
use of steel road wheels made the 56 ton beast even deadlier. Some units of
Tiger tank groups had a kill ratio of over 12:1, and the tank itself became so
feared by Allied units that a general quash was put on reports mentioning them
in release statements, to avoid generating more “tigerphobia”. The use of
solid steel wheels instead of rubber rimmed helped give the tank a slightly
better chance of not breaking down quite as much in the field, which was the
Tiger’s biggest weakness. It was so heavily armored that even though it could
move along at over 40 kph, the weight on the wheels and the tracks meant that it
would often just fail, leaving no option for the crew in battle but just to
leave the 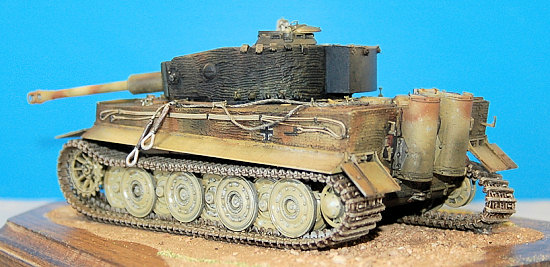 vehicle behind. In a static and defensive role, however, the Tiger was
almost unbeatable, able to knock out enemy armor from a great distance.
vehicle behind. In a static and defensive role, however, the Tiger was
almost unbeatable, able to knock out enemy armor from a great distance.
An older gentleman I met some years ago served in France, and had very vivid descriptions of the Tiger tank. According to him, they typically scattered at the first sight of one, letting the Tigers prowl about with impunity, until they broke down, that is! Most tanks in the Allied inventory could not damage a Tiger without running a serious risk of being destroyed themselves, rounds would just bounce off the heavy armor plating.
Using Russian technological documents made available through captured axis resources, an Allied reference manual was put out in 1943 that graphically described exactly how to knock out the Tiger tank, showing weak points in the otherwise impervious armor. The shot that knocked out Tiger 221 was a textbook maneuver, causing the gasoline tanks to ignite, and forcing the crew to abandon the vehicle. The first round launched by the Sherman had merely dented the glacis plate, and knocked off some of the zimmerit ! The armor of the Tiger was still good enough to enable the entire crew to escape from the tank before it “brewed”.
The Tiger tank is certainly the iconic main battle tank of the German army in World War Two, and is still one of the most recognizable pieces of battlefield equipment ever created. Personally, I think that the resourcefulness of the Sherman crew in outwitting the Tiger by the use of obstruction and dust to take out a tank much heavier worth modeling, even though I had to damage the beautiful model.
| THE KIT |
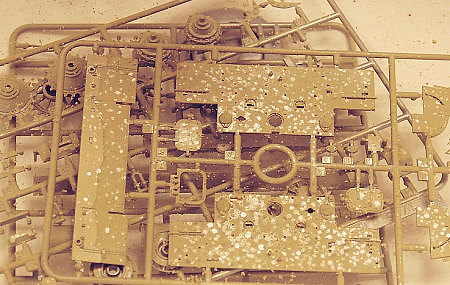
Dragon’s latest Tiger release is a welcome change to the previous offerings. Most of the defects noted in the initial models have been corrected, such as the spacing plates on the exhaust stacks, and the recessed belly access hatches. The only drawback for some dark-side modelers will be the one piece vinyl tracks instead of the link-and-length. You can buy aftermarket sets of the tracks, but I actually prefer the one piece jobs, they have done a magnificent molding of the intricate track system, and it should go on without a fuss.
 I was disappointed to find there were
no figures, and even more shocked to see that there was no metal barrel! Dragon
does make up for this by having the barrel able to travel through the entire
recoil length instead of just fully extended, a necessity for me in modeling
221, as the gun was jammed in the blown-back position after the ammunition
inside exploded from the gas fire.
I was disappointed to find there were
no figures, and even more shocked to see that there was no metal barrel! Dragon
does make up for this by having the barrel able to travel through the entire
recoil length instead of just fully extended, a necessity for me in modeling
221, as the gun was jammed in the blown-back position after the ammunition
inside exploded from the gas fire.
The plastic is perfectly free of flash, and the injection points are ingeniously placed so that they are rarely seen after the kit is assembled. You can tell that quite a lot of thought went into the engineering of this Late Model Tiger, and it really pays off. So much thought went into it that Dragon actually printed a little pamphlet telling you how wonderful the changes are, titled “Inside Story”. I guess they deserve to toot their own horn now and again, although the rationale behind the one-piece tracks is kind of funny, it seems they didn’t want to “enforce such a tedious procedure on modelers” by molding link-and-length. I wonder if they have any land in Florida for sale?
The differences between the three tanks you can build from this kit are, as mentioned below, subtle at best, except for the command version with its aerials and antennae sticking all over. It took me about half an hour to figure out the difference between the late model road wheels and the final version, it turns out that the interior bolt-head pattern is slightly different, by less than a millimeter. Talk about accurate, even the armor JMN’s will like this kit.
| CONSTRUCTION |
What’s the spice of life? Salt, of course (though I do like thyme too), and in order to make this Tiger look like it had been through the battles of France and Italy, salt chipping was in order. I primed and painted the sprues after a nice bath in sudsy water (the plastic, not me), Some parts like the hull were painted primer red first, others like the road wheels were sprayed with rattlecan aluminium prior to assembly. More on this is the painting section below.
Lower hull, axles, and roadwheels:
You will need to decide on which version you are going to make quite early on,
the differences between the late, command, and final version are subtle, yet
distinct. Tiger 221 was a “late” brand, and even though it was the lead tank in
the unit, apparently did not have antennae, there were only three “command”
tanks available to the 504th. The small receiving brackets for the axles need
to be sturdily glued in place, I used gel AC glue to make
 sure they wouldn’t pop
off at a later date. Whatever you do, do NOT rush this bit of the assembly, if
it is off even a bit, the build will haunt you later. With the axles in place
and set aside to dry, it was time to turn to the road wheel bits. Lots and lots
of them. The best way to approach this sort of repetitive thing is to treat each
wheel as a separate kit, take your time to make sure they look perfect on both
sides. Yes, it does take a while, but the payoff in the end is immense. I
usually use a sharpie brand black marker for my rubber road wheels, as I like
the sheen to it, so I figured “what the hey!” and used a silver sharpie for
these steel road wheels. The effect came out perfectly after the wheels were
given a light wash of India ink and water. I did not glue on the road wheels at
this time, if you do, you run a serious risk of being “off track” in the final
assembly.
sure they wouldn’t pop
off at a later date. Whatever you do, do NOT rush this bit of the assembly, if
it is off even a bit, the build will haunt you later. With the axles in place
and set aside to dry, it was time to turn to the road wheel bits. Lots and lots
of them. The best way to approach this sort of repetitive thing is to treat each
wheel as a separate kit, take your time to make sure they look perfect on both
sides. Yes, it does take a while, but the payoff in the end is immense. I
usually use a sharpie brand black marker for my rubber road wheels, as I like
the sheen to it, so I figured “what the hey!” and used a silver sharpie for
these steel road wheels. The effect came out perfectly after the wheels were
given a light wash of India ink and water. I did not glue on the road wheels at
this time, if you do, you run a serious risk of being “off track” in the final
assembly.
Rear End: Make sure you pick the correct rear end plate for your version, as they are quite different. Luckily, there is a good photo of 221 showing it to be a “late” version, not the command type, though the jack is missing (according to the story, it had been removed from the wreck, probably by a local farmer). Place the end plate into the location, and with thin superglue, capillary action will draw the adhesive down the sides and bottom, giving you a seamless fit. Use a slow setting glue for the exhaust stacks, trying to line up all five of the tubes with the housing is a real trick, and you will need tweezers (or even better, hemostats) to assemble these.
 Interior of Hull: There really
isn’t much. While the turret has two seats, and the main 88 is nicely molded,
though a bit prone to breakage during construction (ok, I snapped it twice). For
some odd reason, the machine gun next to the front station is done in 7 separate
pieces, only one of which will be visible. I would rather have had some more
external stores!
Interior of Hull: There really
isn’t much. While the turret has two seats, and the main 88 is nicely molded,
though a bit prone to breakage during construction (ok, I snapped it twice). For
some odd reason, the machine gun next to the front station is done in 7 separate
pieces, only one of which will be visible. I would rather have had some more
external stores!
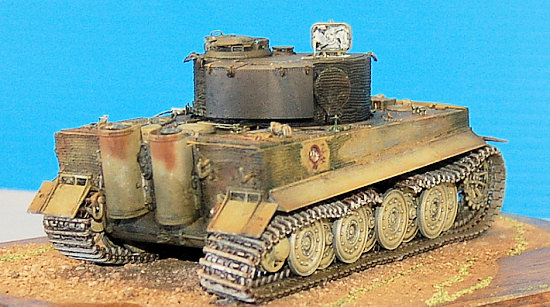
Turret: According to the literature, and from what I have been able to garner off of the History channel, etc, these tank turrets weren’t welded all that cleanly. Dragon pulls off the weld marks perfectly, neat enough to pass inspection, but certainly done fast enough to get that tank out into the field. Get your long pants on before you tackle the cupola, and whatever you do, don’t drink any coffee.
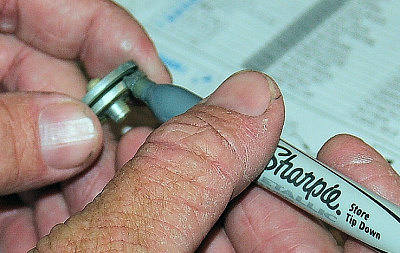
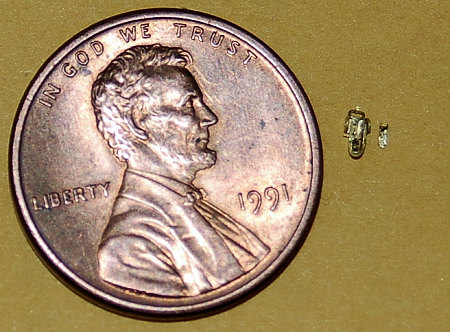
32 pieces make up just the commander’s hatch (not including the gun and mount), some of which are brittle brass photoetch. I recommend annealing the metal by hitting it lightly with a propane torch or the like to make the bending easier. Holding the photoetch in a pair of pliers, get it nice and hot, then let it cool down slowly, do not dunk it into water to cool it off quickly!
No location marks are given for the spare track link upper receivers, put in the bottom bits, and then extrapolate the top fittings. Hitting the Tiger sites for photos is a must, as unlike Tamiya, Dragon does not include any pics of the actual tank. I left my spare links off the turret, because I could not tell for sure if they were on the turret on day two of the conflict or not, and I liked the “bare” look to the damaged beast. (Note: upon examining the blown up photos of the port side, some spare tracks are indeed visible, my bad) I scratched up the lower track receivers, and bent the upper hinges to replicate damage.
Exterior Hull: The metal pieces are
wonderful for tie-downs, holding the well-molded shovels, hammers, etc. Since my
Tiger was in the process of being stripped by the locals, I left most of the
tools off, but attached the brackets. Once again, don’t get jittery prior to
doing this bit of photoetch, you can almost hear the carpet monster grinning
while you tackle these little fiddly bits. The towing cables can be built using
the styrene version or the alternative metal strand wire supplied by Dragon,
once again, the upper hull of 221 had been blown up a bit, so I went with a
mixed bag, squinting at the resource photos as much as possible, often asking
others “Hey, what does that look like?”
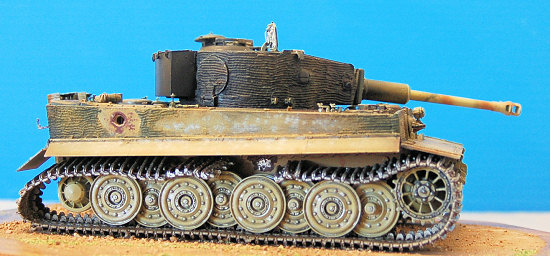
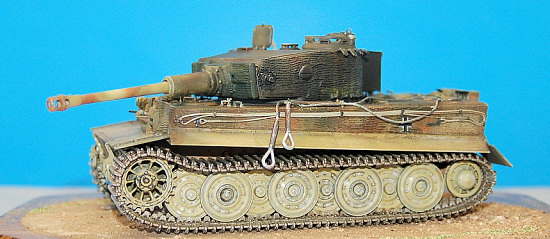
Zimmerit: There have been many attempts made by modelers to accurately reproduce the anti-magnetic paste. Since the zimmerit applied on the late model Tiger tank was done by the factory, there are fewer wavy lines as in the field -applied jobs. I’ve tried bondo, milliput, and a myriad of other pastes, but have settled on DAP’s “Presto Patch”, a modified water based exterior compound. The zimmerit paste used on the vertical surfaces of the Tiger was tinted yellow ochre by the manufacturer, and you can easily do the same by mixing in yellow ochre acrylic paint to the Presto Patch. Using a piece of a razor saw cut with a pair of tin snips to the right width, apply the paste in small amounts. You will have to apply the paste prior to assembling many of the exterior parts, such as the exhaust stacks, etc. The nice thing about tinting the zimm first, is that when you do your chipping or damage marks, you don’t have to touch it up with paint.
| COLORS & MARKINGS |
 I started by painting the pieces on
the sprues. For the bottom pieces, such as the road wheels and axles, I used
flat aluminium, so that I could make the salt-chipping effect work with an
overcoat of dark yellow. The lower hull was first painted primer red, then
salted and painted Dark Yellow. After the salt was removed, I did a light
overspray of dark yellow to tone down the contrast, as I wanted the hull to look
worn, not like it had acne. You have to use a non-water based paint to do this
sort of salt chipping, I used a Tamiya rattlecan, as the easiest way to remove
the dried salt is to soak it in water for fifteen minutes or so, then gently
brush off.
I started by painting the pieces on
the sprues. For the bottom pieces, such as the road wheels and axles, I used
flat aluminium, so that I could make the salt-chipping effect work with an
overcoat of dark yellow. The lower hull was first painted primer red, then
salted and painted Dark Yellow. After the salt was removed, I did a light
overspray of dark yellow to tone down the contrast, as I wanted the hull to look
worn, not like it had acne. You have to use a non-water based paint to do this
sort of salt chipping, I used a Tamiya rattlecan, as the easiest way to remove
the dried salt is to soak it in water for fifteen minutes or so, then gently
brush off.
Camouflage: This was a real
problem to tackle for me. The photos that are available to work from are grainy
B/W’s, and don’t reveal much in the way of detail of the operational camouflage
of 221. Some sources say that the turret was not numbered at all, but others
differ. In this case, I was lucky as the upper hull was scorched pretty badly,
and even if the number had been there, they would have been covered in soot or
burned. After consulting with a number of jmn’s (expertentigerkraftenwaffe), I
painted the tank in a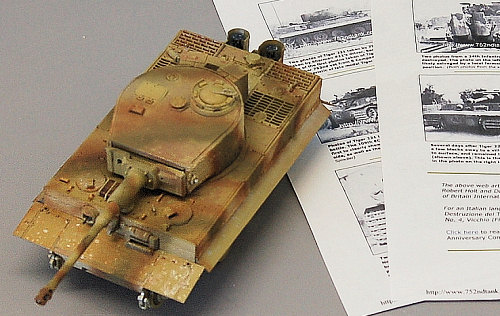 standard three-tone camo with my new Badger Hybrid in a
freehand style, it came out so nicely I hated to weather and char it. Oh well,
the price of modeling! The charring from the explosion was done using a number
of airbrushed washes, and smoke itself.
standard three-tone camo with my new Badger Hybrid in a
freehand style, it came out so nicely I hated to weather and char it. Oh well,
the price of modeling! The charring from the explosion was done using a number
of airbrushed washes, and smoke itself.
“Smoke ‘em if you got ‘em”: Holding
a bit of burning plastic about 8” or so below the turret (unattached to the
hull, of course), you can get some great vertical soot lines, which can then be
sealed with a clear flat to keep them from smudging too much. Be sure to
temporarily turn off your smoke detector, or run the risk of having your S.O.
come charging out of the bedroom at 5 a.m. with a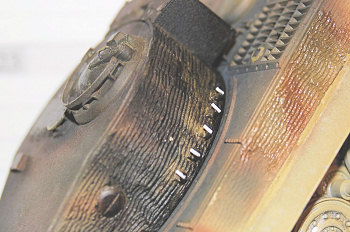 serous look on her face. Whoops. If it is warm enough outside, I recommend doing
your styrene burning in the clean air (In Phoenix? Who are we kidding?).
serous look on her face. Whoops. If it is warm enough outside, I recommend doing
your styrene burning in the clean air (In Phoenix? Who are we kidding?).
Only one marking is visible on the damaged tank, the German cross on the port side. The Dragon decal settled into the zimmerit just fine with three applications of Micro-Sol, and then an overcoat of Future.
I applied a wash of India Ink, soap, and water to the entire vehicle in stages, blotting as necessary, and referring back to the original photos from time to time.
| FINAL CONSTRUCTION |
Using a set of calipers, I measure the area to be drilled out for the hole on the starboard side, and the ding in the front glacis panel. Attacking a 40 dollar tank with a moto-tool isn’t exactly easy, just grit your teeth and smile. I think I made the hole a little too big, but it seems to scale out o.k., and the end result is pleasing. I did have to tinker around with the painting around the damaged areas, removing zimmerit as necessary and coming back with acrylic silver and gunmetal to simulate damage.
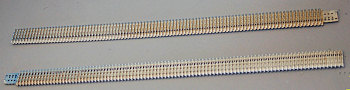 The Tracks: I know I said earlier
that I really liked the soft tracks on tank kits. I would like to take this
moment to change my mind here…these are a bugger-all to work with. Ill-fitting
and tough to nail down? The least of your problems! While Dragon has done a
marvelous job in molding them (hey, that is what it says in the pamphlet), the
tracks seem to have a will of their own when it comes to settling down, it’s
like they have a permanent coat of Jeri-Curl sprayed on. Hitting them with my
wife’s hair dryer helped a lot (“what’s that smell, Greg?”), and I ended up
priming them with auto rattlecan grey, and then spraying a coat of “stainless
steel” on both sides. Let that cure overnight, then coat liberally with Min-Wax
wood stain, colour “Red Oak”, wait a few minutes, and blot off the excess.
Viola! Used Tiger tracks!
The Tracks: I know I said earlier
that I really liked the soft tracks on tank kits. I would like to take this
moment to change my mind here…these are a bugger-all to work with. Ill-fitting
and tough to nail down? The least of your problems! While Dragon has done a
marvelous job in molding them (hey, that is what it says in the pamphlet), the
tracks seem to have a will of their own when it comes to settling down, it’s
like they have a permanent coat of Jeri-Curl sprayed on. Hitting them with my
wife’s hair dryer helped a lot (“what’s that smell, Greg?”), and I ended up
priming them with auto rattlecan grey, and then spraying a coat of “stainless
steel” on both sides. Let that cure overnight, then coat liberally with Min-Wax
wood stain, colour “Red Oak”, wait a few minutes, and blot off the excess.
Viola! Used Tiger tracks!
Seal everything with a good coat of clear flat, and you are on your way to completion of this ferocious beast.
Display: The Tiger is a boxy
looking thing, so I went with a more ‘organic’ approach to the static display.
This involved spending a bit of time down at a craft store, under the watchful
eye of a number of housefrau’s, and picking out a suitable wooden base.
 Paying
quickly, and rushing out the door before tripping over anyone’s walker, I made
it home to apply a series of stains and clear coats to get the base dark enough
to set off the tank. White glue was brushed on, and some scale sand and
road-dirt finished off the simple set up.
Paying
quickly, and rushing out the door before tripping over anyone’s walker, I made
it home to apply a series of stains and clear coats to get the base dark enough
to set off the tank. White glue was brushed on, and some scale sand and
road-dirt finished off the simple set up.
The starboard tracks had been blown apart by a third shell from the Sherman, so the vinyl tracks had to be carefully cut apart and arranged so as to look like functioning links. Did I already mention I didn’t care for the flexible tracks? Oh, I thought so. What a nightmare! They should make car bumpers out of this stuff, it is almost impossible to cut or damage without resorting to an acetylene torch. The unused spare links from the turret provide the blown apart tracks visible in the photos.
After more than 100 hours of construction, the Tiger now sits calmly on the shelf, and even damaged, it still looks rather menacing. I can’t imagine the cajones it took to stand up to this steel monster in actual combat. Hats off to the 752nd!
| CONCLUSIONS |
This is quite possibly the best Tiger tank kit available on the market right now, though purists will want to obtain aftermarket tracks, Dragon’s Late Production Tiger 1 is a joy to build, and was very welcomed by my dark-side addiction. If you like Tiger tanks, pick this kit up right away, and pay no attention to my whining.
| REFERENCES |
 The great members of Modeling
Madness, for their help in my confusion.
The great members of Modeling
Madness, for their help in my confusion.
http://www.752ndtank.com/cecina.html
http://www.fprado.com/armorsite/tigers-02.htm
http://www.afvnews.ca/zimmerit.html
http://www.worldwar2aces.com/tiger-tank/tiger-tank.htm
Greg Ewald
February 2008
Copyright ModelingMadness.com
If you would like your product reviewed fairly and fairly quickly, please contact the editor or see other details in the Note to Contributors.
Back to the Review Index Page 2018