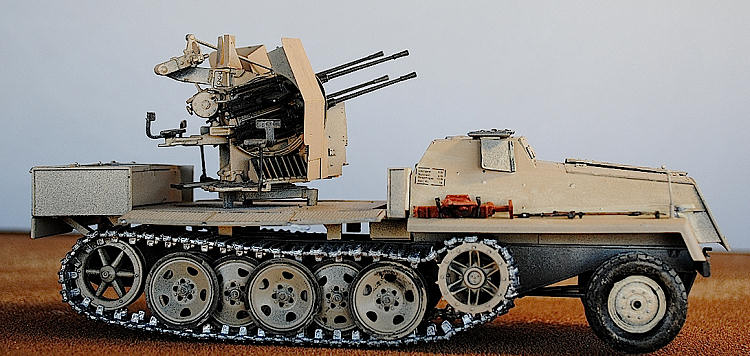
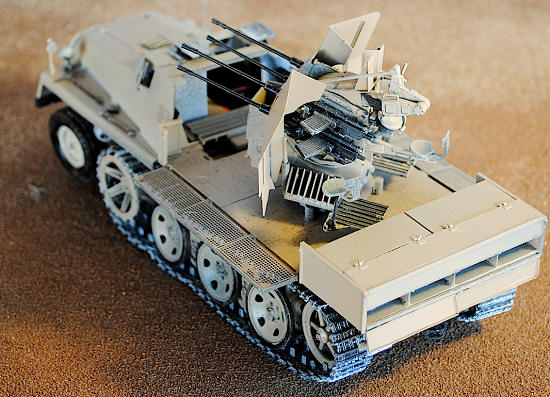
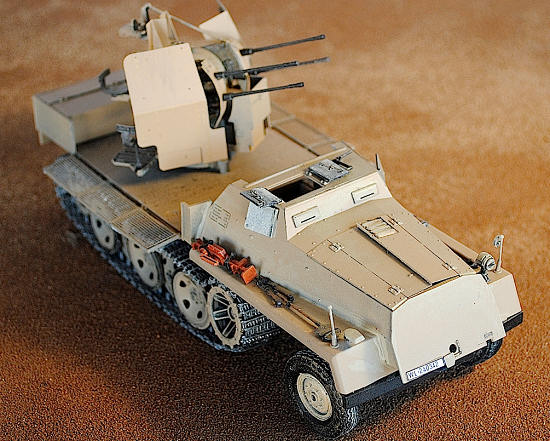
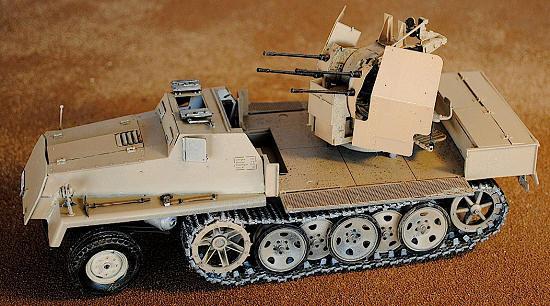
Great Wall Hobby 1/35th German sWS with 2cm Flakvierling
| KIT #: | 3525 |
| PRICE: | $65.99 SRP |
| DECALS: | Random vehicle, late war (44-45) |
| REVIEWER: | Greg Ewald |
| NOTES: |
Separate PE fret, study the
instructions carefully. Make sure you have plenty of your drink of choice on
hand, this is a long build. |
| HISTORY |
 The halftrack family of the
30’s and 40’s in Germany was a many splintered thing. I think they spent as
much time trying to see what they could glom onto these poor vehicles as
they could, and the 2cm Flak gun was yet another attempt to make something
do what it wasn’t supposed to. I did a lot of digging on this one, and could
only find proof that one (1) was built, though there are some records of
more maybe-sorta-kinda produced. I think by the end of the war, the
construction warehouses were telling the nutjobs who were running the
country into the ground whatever they wanted to hear. “Sure, we built a
dozen of those yesterday ! Time for a pilsner isn’t it?” The only reason I
know they built one for a fact, is that I came across a photo of it in a
ditch/berm. Looks like it broke down.
Mounting a Flak gun on such a weak chassis is like putting racing slicks on
a Pinto. Why bother?
The halftrack family of the
30’s and 40’s in Germany was a many splintered thing. I think they spent as
much time trying to see what they could glom onto these poor vehicles as
they could, and the 2cm Flak gun was yet another attempt to make something
do what it wasn’t supposed to. I did a lot of digging on this one, and could
only find proof that one (1) was built, though there are some records of
more maybe-sorta-kinda produced. I think by the end of the war, the
construction warehouses were telling the nutjobs who were running the
country into the ground whatever they wanted to hear. “Sure, we built a
dozen of those yesterday ! Time for a pilsner isn’t it?” The only reason I
know they built one for a fact, is that I came across a photo of it in a
ditch/berm. Looks like it broke down.
Mounting a Flak gun on such a weak chassis is like putting racing slicks on
a Pinto. Why bother?
The sWS family of halftracks started off as cobbled together farm vehicles, and marched (tracked?) on to the very end of the war and even beyond as being very dependable and sturdy work trucks. Work trucks, not good gun platforms.
| THE KIT |
 As one has come to expect from Great Wall, this is yet another ornate armor
kit, full of detail. You can get an upgrade set of PE that replaces some of
the regular plastic detail of the standard kit, so be prepared to do some
surgery !
As one has come to expect from Great Wall, this is yet another ornate armor
kit, full of detail. You can get an upgrade set of PE that replaces some of
the regular plastic detail of the standard kit, so be prepared to do some
surgery !
Unfortunately, unless you have a Harry Potter Mk.V sneakerscope, much of the
detail will go largely unseen, such as the foot pedals for the driver. (do
we really need these?) Oddly enough,
whilst there is a transfer case and complete rear power train, the engine
compartment is barren of an engine. Yes, there are aftermarkets available,
but it would have been rather easy to just include the bloody engine with
the kit, IMHO, rather than 1mm foot pedals that no one will ever see.
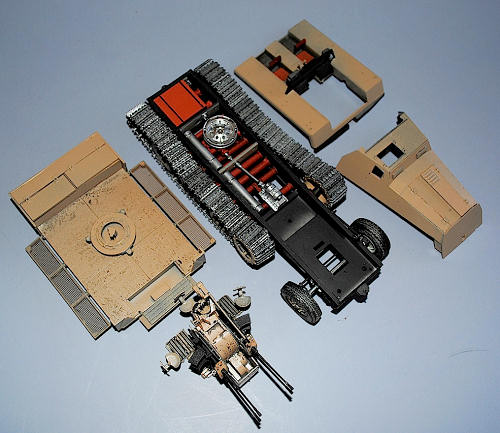
14 sets of sprue, a general decal sheet, and one photoetch fret make up the basic kit, the additional PE comes separately packaged, and with it’s own set of instructions. As noted above: READ the directions thoroughly prior to even beginning construction, or you will be cursing loudly later on.
| CONSTRUCTION |
The first series of steps involve putting together the lower chassis, which
has a remarkably clean fit, though some dubious location points do rear up
now and again. Test fit everything twice or more.
The road wheels are easily assembled, and I am starting to get
addicted to the “sandwich” style tyres for the front…each tyre has six
pieces, plus the hub, but it looks really
 accurate when finished. It’s a
bummer that the mounting points for these tyres onto the steering/spring
assembly are so weak. I mean weak to the point of almost being pointless. If
this is how the Germans really built these trucks, I can see why so many
broke down in rough terrain ! The
transfer case, gas tank, and rear power train go in without a hitch. Get a
good look at them now, because you will be covering them up shortly. Sigh.
accurate when finished. It’s a
bummer that the mounting points for these tyres onto the steering/spring
assembly are so weak. I mean weak to the point of almost being pointless. If
this is how the Germans really built these trucks, I can see why so many
broke down in rough terrain ! The
transfer case, gas tank, and rear power train go in without a hitch. Get a
good look at them now, because you will be covering them up shortly. Sigh.
In step eight, we begin on the cab of the truck, and you will need to decide
just how much of the additional PE detail you want to include. Yep, I put it
all in so I could give a fair and balanced review. If you are smart, and
want to avoid the gray hair that comes with it, give a lot of it a miss.
Quite a lot of cussing was heard by the neighbors coming from my studio
window during this part of the assembly. I heard that one of their dogs may
be scarred for life.
There are a lot of bits and pieces that go on the interior of the upper
hull, decals and such. Once again, make up your mind early on as to just how
detailed you want to be. I guess it is a bragging point you can state to
your bored houseguests that the MP-40 mounts were carefully sanded down and
replaced with bent PE, and the designation markings were applied accurately,
though absolutely invisible to the human eye after completion.
 The viewports are miniature works of art in and of themselves, sort of like
putting on interior controls in a 1/700 scale floatplane.
Aaaarrrgggh. Then we come to my only really big gripe about this kit,
the nice engine compartment with doors that beg to be left open…and NO
ENGINE. I was sure there was a mistake. I must have missed it, right?
Surely, if they were going to have me install PE door/window cranks
they would have an engine for the engine compartment, right?
Denied.
The viewports are miniature works of art in and of themselves, sort of like
putting on interior controls in a 1/700 scale floatplane.
Aaaarrrgggh. Then we come to my only really big gripe about this kit,
the nice engine compartment with doors that beg to be left open…and NO
ENGINE. I was sure there was a mistake. I must have missed it, right?
Surely, if they were going to have me install PE door/window cranks
they would have an engine for the engine compartment, right?
Denied.
O.K., enough of my whining. The flatbed carriage comes next, and you will
need to decide if you want to have it built in “traveling” mode or “firing
mode”. This means do you want the
skirts up or down. Most of the time, I prefer skirts to be up (grin), but in
this case, the firing mode just looks a little cooler to me.
There are another set of decisions to make here as well, regarding
just how far you want to go with the crazy detail. I split the assembly,
doing part of the flatbed in” whacko-uber look at this” mode, and the other
in normal modeling mode, using the plastic kit parts.
Both come out well.
The 2cm Flak Guns: The centerpiece of
the kit, I did go with the W-ULaT photo etch details instead of the kit
plastic bits, and am quite happy I did so…not easy to assemble but oh my, is
it convincing ! A few of the parts
are mislabeled or not labeled at all in the sheet instructions, so some test
fitting and common sense are necessary here.
Now, the major subassemblies are finished. Take a very deep breath,
because it is time to put together…
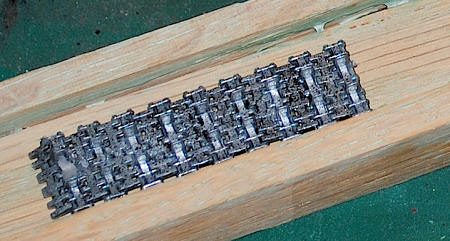 The Tracks: These are not snap
together links. These are individual link tracks that have to be carefully
put together a bit at a time. Trying to do this without a jig would be a
good insanity defense for an upcoming charge, but instead of doing the
crime, just make a simple jig.
I used three pieces of scrap poplar to just make a “U-Channel”.
You can put in a number of the links, and spot weld them in place
with some a/c glue easily, rather than trying to keep them straight on your
workbench. If you have never tried individual link tracks before,
this is a “trial by fire” for sure. I
actually attempted to find aftermarket tracks for this kit, even thought
about buying a different manufacturers model with the standard tracks…but
with some support from a few of you on MM, and lots of beer, I did get them
done finally. I have to admit, they
look like the real thing.
The Tracks: These are not snap
together links. These are individual link tracks that have to be carefully
put together a bit at a time. Trying to do this without a jig would be a
good insanity defense for an upcoming charge, but instead of doing the
crime, just make a simple jig.
I used three pieces of scrap poplar to just make a “U-Channel”.
You can put in a number of the links, and spot weld them in place
with some a/c glue easily, rather than trying to keep them straight on your
workbench. If you have never tried individual link tracks before,
this is a “trial by fire” for sure. I
actually attempted to find aftermarket tracks for this kit, even thought
about buying a different manufacturers model with the standard tracks…but
with some support from a few of you on MM, and lots of beer, I did get them
done finally. I have to admit, they
look like the real thing.
| COLORS & MARKINGS |
As with most armor kits, you
sort of paint as you go. The interior for most of these vehicles was a light
grey, I like to use white primer with a light wash of india ink to pick up
the details. The exterior is the
standard yellow, with a call out in the colour chart for
 the red and green
stripe camo. With the dubious nature
of just how many of these were produced, I skipped the camo part. Honestly,
I didn’t want to camouflage all of that damned PE that I had slaved over !
the red and green
stripe camo. With the dubious nature
of just how many of these were produced, I skipped the camo part. Honestly,
I didn’t want to camouflage all of that damned PE that I had slaved over !
The tracks were painted steel, and then washed with Minwax wood stain for a
nice rusty effect.
| FINAL CONSTRUCTION |
The fiddly bits and shovels, widgets, wombats, fruit baskets and whatever go on easily. Don’t sneeze and knock off any of the detail at this stage.
| CONCLUSIONS |
Well,
there you go. Another over the top detailed armor kit that will drive you
crazy while you are building it, and make you stop and stare when you have
finished it. If you have a few armor
kits under your belt, give this one a whirl, you won’t be disappointed !
| REFERENCES |
June 2011
Thanks to your editor and
www.dragonmodelsusa.com for the review kit.
If you would like your product reviewed fairly and fairly quickly, please contact the editor or see other details in the Note to Contributors.