
CyberHobby 1/35 Kugelblitz Pz.Kfw .IV “Ball Lightning” AA Tank
| KIT #: | 9109 |
| PRICE: | $35.00 MSRP |
| DECALS: | One option |
| REVIEWER: | Greg Ewald |
| NOTES: | Not a kit for the faint of heart, the tracks are somewhat tough. Pin vise, micro-shears, and ac glue are almost a necessity. Four tank crew figures are included. |
| HISTORY |
The need for mobile anti-aircraft guns was massive towards the end of
WW2, and instead of coming out with a standardized version, of course, the
Nazi’s had to make a zillion prototypes of different variations. With the Allies
bombing the living hell out of them day and nächt, the German designers
turned to anything they could think of. Mating a U-Boat turret onto a
Panzer? Sure ! Hey that sounds great ! Well, it didn’t work out too well.
I can’t imagine the backlash in a PZKw 4, which was only a medium tank to begin
with. You’d be deaf after a few rounds were fired, and the Kriegsmarine were
taking all of the new 30mm cannons
 anyway,
so they ended up with the older and somewhat less reliable 30mm Mark 303
Jaboschrecks. I am sure the Luftwaffe was happy about that (not).
anyway,
so they ended up with the older and somewhat less reliable 30mm Mark 303
Jaboschrecks. I am sure the Luftwaffe was happy about that (not).
Placing the gunnery crew into a thinly armored ball that rotated with
two massive cannons I guess seemed like the thing to do, because they were even
planning on mounting them on the Hetzer and the newer Panther tanks. Maybe the
gunners were all deaf after boot camp anyway? There were also future plans that
had FOUR cannons in this cramped ball, two 20mm, and two 30mm’s, ostensibly to
let the now hearing impaired gunners “sight in” with the smaller twenties, and
then fire the thirties for effect. Against fast moving fighter bombers
that were sweeping across the fatherland, this would have been seriously
ineffective. The 30mm lacked the range and the punch of the 88mm’s, though they
could fire faster. So fast, that the tank could run out of ammunition in less
than two minutes. Hmmm, seems like a bright idea to me, as now you need to have
a load of support vehicles full of ammo nearby while you try to shoot down enemy
bombers. Ah, the strategic brilliance of the designers.
Estimates vary on just how many of these idiotic tanks were built, but there were at least two, and some people say as many as six, prior to the collapse of the 3rd Reich. It is not known if any of them were ever used in actual combat, but it is possible that one or two may have fired futilely into the sky darkened by Allied planes at the fall of Berlin. I almost feel sorry for anyone who had to crew one of these P.O.S.’s. Almost, but not quite.
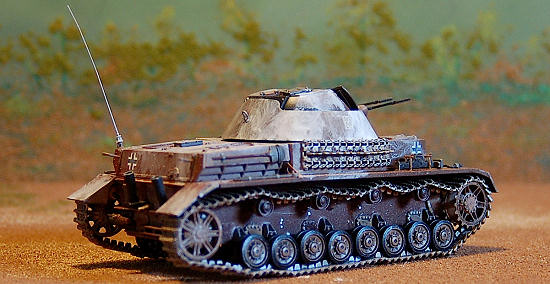
| THE KIT |
It is the standard Dragon Pz.Kfw.IV kit, with additional light
grey bits to make the ball turret. There is no flash at all, which we have come
to expect from CyberHobby, but the injection points are incredibly fat, and
small parts are difficult to separate from the main sprue. Also confusing
is the mixing of sprue I.D. letters…H, P, and E are all on the same sprue !
 The
metal etch is nice, but will need to be annealed prior to bending.
The
metal etch is nice, but will need to be annealed prior to bending.
The tracks are unbelievable, single piece for each link (when you see,
per side, “repeat 90X”, you get nervous), with one side molded in a lighter
gray. This left me a little confused, because comparing the two together, I
could not tell them apart. I guess if you are a real panzernut, you might be
able to? They call them “magic tracks”and I have to admit, even after all
the effort, they capture the look of the droopy Panzer tracks perfectly.
The fit is so-so, especially the mating of the upper hull to the lower.
The location points are barely distinguishable , and many you will have drill
out yourself with a pin vise.
Since the ÜberFlak never really went operational, standard Crosses and markings are supplied for decals. The instructions are nicely printed on glossy stock, but are lacking in specifics on some points. You would probably want to have built a simpler Tamiya Panzer 4 prior to tackling this one.
| CONSTRUCTION |
I started off with priming all of the sprues with Krylon sandable auto
primer. I then painted everything in aluminium, and then did my standard salt
chip finish on the lower hull, sprayed over with red primer and brushed
off. Then, I actually started building this kit. Don’t follow the
instructions at all, but do all of the major assemblies, and then start with the
smaller add ons.
Wheels: The most annoying thing about building tank kits are of
course the road wheels. Especially tanks with rubber rollers. I like to use a
Sharpie permanent marker to simulate the rubber, as it has the same sort of
gleam, and it’s faster and easier to do than masking off each bloody wheel and
spraying. If you are a real glutton for punishment, you could always brush paint
them, 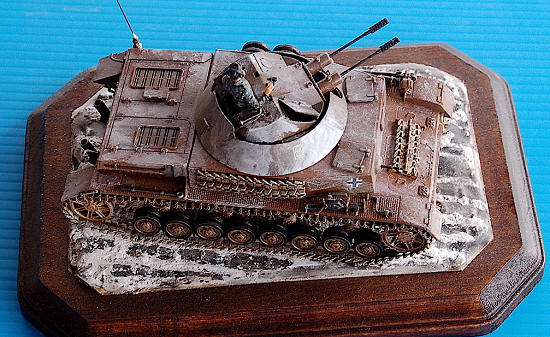 but
then, your significant other wouldn’t see your face for a month or two.
but
then, your significant other wouldn’t see your face for a month or two.
Whatever you do, do NOT glue the drive sprocket and the rear upper main
roller into place, since you will be applying:
Magic Tracks ! : I am more of a fan of “link and length” tracks for most armored vehicles, but I have to admit that the single track bits, all 180 of them, do a better job of creating the sloppy droop that panzers were known for. It probably took me about ten hours per side to assemble these, and that is using ac glue with an accelerator. I like to start with the drive sprocket, gluing on one at a time and then move off to the upper and lower wheels. These you can do by gluing segments of two or three tracks together, and then just attaching them as necessary. This will cut your work time down from “eternity” to “forever”. The reason you don’t want to glue in the front drive and rear main sprockets is that you are going to have to be able to turn them to make sure that the little individual tracks all meet up correctly, capeche? Once you have all of your links in place, you can zap those two into a fixed position, and then get ready to start on the other side. I recommend lots of drinks.
Main Tank Hull: I would not recommend attaching all of the doo-hickies
and whatnot until you have all of the major assemblies assembled, as the factor
for the carpet monster eating a lot of fiddly bits is enormous as you clamp and
glue this thing together. There is a substantial gap in between the upper and
lower hulls that I just did not feel like tackling, but purists will want to
leave off gluing the road wheels on until it has been filled and painted.
The gap between the front surfaces was enough to irritate me.
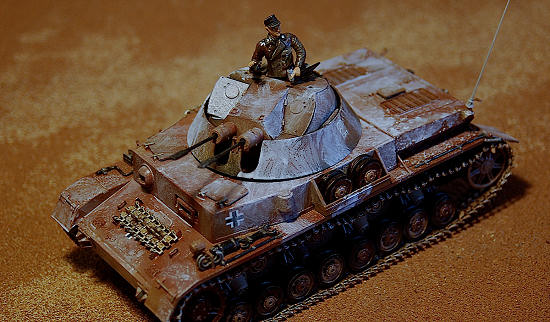
 Ball
Turret: The additional part to this peculiar panzer is well molded, but
takes a lot of work around the main seam. Break out the putty and throw on a
good cd or movie as you sand away and repeat. I would also recommend building
one of the soldier figures included with the kit now, just so you can imagine
just how bloody cramped it must have been inside of this ridiculous thing. There
is no interior detail at all, so unless you are going to crew it, you will want
to glue the hatches shut. The turret bottom ring is almost impossible to get
placed correctly onto the ball locating pins (dimples), and will require some
serious clamping. Luckily, the figures are posed to look confused, which is
fairly accurate for this tank, just in case you do want to use them.
Ball
Turret: The additional part to this peculiar panzer is well molded, but
takes a lot of work around the main seam. Break out the putty and throw on a
good cd or movie as you sand away and repeat. I would also recommend building
one of the soldier figures included with the kit now, just so you can imagine
just how bloody cramped it must have been inside of this ridiculous thing. There
is no interior detail at all, so unless you are going to crew it, you will want
to glue the hatches shut. The turret bottom ring is almost impossible to get
placed correctly onto the ball locating pins (dimples), and will require some
serious clamping. Luckily, the figures are posed to look confused, which is
fairly accurate for this tank, just in case you do want to use them.
Fiddly Bits: The small handles are better off being replaced with wire, as the plastic injection points are so huge as to be a real pain if you try to separate them without micro-shears. I got bored with the schematic of what holes to drill out where (it can be confusing), so opted to remove the locating pins and just put them where I saw them on photos of actual panzer 4’s. (the link below is an awesome starting spot)
| COLORS & MARKINGS |
I left off the shovels, pickaxes and other implements of destruction
until after I had given the tank a once over with Model Master “dark yellow” and
“red brown”. Since I wanted this vehicle to be in a quasi-winter (spring?)
state, it would have to be white
 washed,
and I doubt they took the time to remove all of the tools prior. With Mosquitoes
and Invaders dropping bombs all over, you would have wanted to camouflage this
sucker a.s.a.p. The directions call for a three tone camo, which would
have been appropriate for a production tank, but I was envisioning a rush
job…straight out of the re-fit line and into combat.
washed,
and I doubt they took the time to remove all of the tools prior. With Mosquitoes
and Invaders dropping bombs all over, you would have wanted to camouflage this
sucker a.s.a.p. The directions call for a three tone camo, which would
have been appropriate for a production tank, but I was envisioning a rush
job…straight out of the re-fit line and into combat.
In the same spirit, I did not apply Zimmeritt to the vehicle, as this
would have been too time consuming for the beleaguered German defense, and the
Russian infantry with their sticky mines would have been more interested in the
ammunition trucks anyway. More bang for your buck, so to speak.
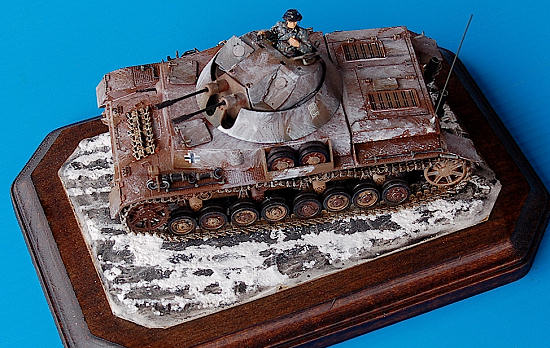
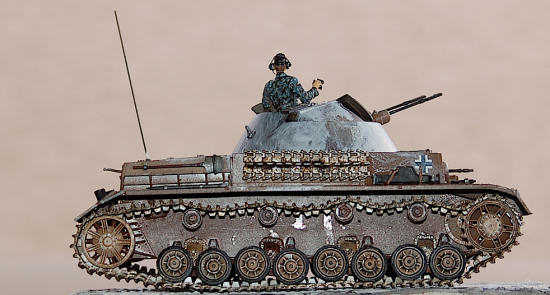
I also built one crew figure, and placed a can of beer in his hand. I
figured he would need it if the cannons actually had to fire. Placed on a simple
stained plaque, with some plaster snow, it actually looks the part of a really
silly tank.
| CONCLUSIONS |
While it took a long time to do the tracks, the result is quite nice,
and looks the part. The problematic fit and sketchy location points, puts this
one in a “three star” category.
This kit, with a lot (I mean a LOT) of work could be a serious contest
winner or prize shelf sitter, a replica of the idiocy of Nazi Germany.
| REFERENCES |
http://www.achtungpanzer.com/kugel.htm#kugel
http://www.panzerworld.net/colours.html
Greg Ewald
April 2010 Thanks to
www.dragonmodelsusa.com
for the review kit If you would like your product reviewed fairly and quickly, please
contact
me or see other details in the
Note to
Contributors.