Cyber Hobby 1/35th
Panther II Heavy Tank
| KIT #: | 9103 |
| PRICE: | $42.99 SRP |
| DECALS: | Several options |
| REVIEWER: | Greg Ewald |
| NOTES: | Yet another winner from Dragon/CyberHobby. Comes with a fair number of figures, too ! |
| HISTORY |
One of the Übertanks designed by the werks towards the end of world war two, the
Panther II really stands out as something else.
Why the designers tried to pack such a massive gun into such small turret
leaves many to wonder if it wasn’t going to be manned by the “SS Gruppe
Kindergartenfolke”! Nazi Oompa –Loompa’s ?
Initially, it was supposed to be outfitted with the venerable 88mm gun, so well
used by generals with common sense, such as Rommel. Other generals wanted to
“upgrade” the tank to use even odder barrels, such as the 75mm Kwk 42.
These guys were born to lose.
 The hull was very similar to that of the Kingtiger (tigerII), and had several
interchangeable parts, including the tracks and wheels. Maybe they planned on
having to change out a fair amount as they retreated across France, who knows.
The hull was very similar to that of the Kingtiger (tigerII), and had several
interchangeable parts, including the tracks and wheels. Maybe they planned on
having to change out a fair amount as they retreated across France, who knows.
Without the silly narrow turret, the tank is actually a marvel of engineering.
The sloped armour would have made all but the heaviest of tank destroyers
insignificant in direct combat, though the Germans kept on with the heavy front
plating, and nothing more really on the deck. This means that the Typhoons and
P-47’s would have slaughtered them using bombs or rockets if they were caught in
the open during daylight hours…so:
It was planned to have a nightfighting version built, with the FG 1250 scope
imaging system installed next to the cupola. This would have been completely
terrifying to any column of Shermans who happened to cross the path of the
Panther II. The 88 would have
shredded them quickly.
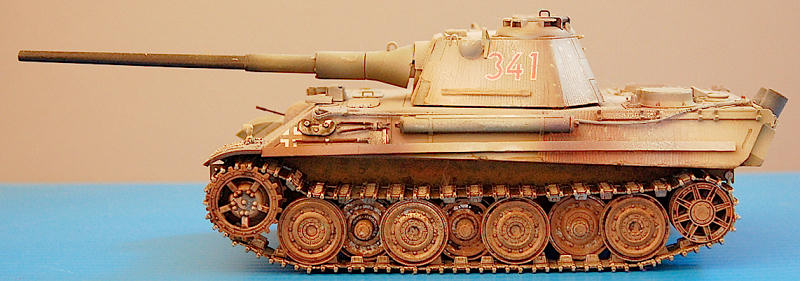
The Panther II is just another glimpse of ingenious design gone completely awry.
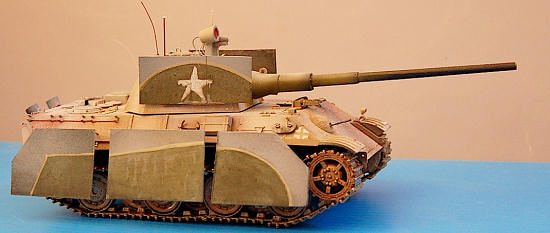
Of course, in my version, the Panther has been modified to resemble an American tank . The Allied Shermans did not have much night vision equipment, and in the dusk or dark, this tank would have not been close enough in view to give the assaulting force time to puzzle over if it was a friendly tank or not. I think they may have used scrounged boards and pipes to make the outline, unlike the nicely welded “fake destroyers” that were used near the Battle of the Bulge. (see link below)
| THE KIT |
The plastic is typical Dragon molding. Fantastic. These guys have this down to a
science, the styrene is easy to cut, sand, polish, and paint.
If you have never done link tracks before, this is a good one to start on, as
the kit is actually pretty easy. Not too many wheels, and big enough to get “ham
hands” around at the same time.
The directions leave a little to be desired, and you will have to extrapolate
some of the info by doing quite a lot of test fitting.
Decals are a standard Panzer sheet. You can do any tank you can imagine that would be fighting in the streets of Berlin, 1945-46.
| CONSTRUCTION |
Well, as with most tanks, you have to start with the basics. I begin by painting
everything matte silver. This is for the chipped effect, and you do have to use
an oil based paint for this. See below for more details.
 Once the parts have been finished to your desired “worn out “ look, it is time
to start at the bottom and work your way up. Wheels!
Once the parts have been finished to your desired “worn out “ look, it is time
to start at the bottom and work your way up. Wheels!
Wheels: Make sure you keep the
assemblies separate, the road wheels, which did not have rubber rims, are
slightly different from each other. I used two boxes to store them in, one for
the inside wheels and the front sprockets, and another for the outer wheels and
the rear sprockets. I wouldn’t glue them into place until you have gone a bit
further, though.
Hull: The hull fits together nicely. Once again, holding off on gluing on the
fiddly bits right now is probably a good idea. Hey, we can always glue them on
later, right? Skip steps 5,6,7, and 8 until you are ready.
Test fit the upper hull to the lower, and make some notes if filler is going to
be required. Do not glue the upper hull to the lower yet!
With the hull test fitted, and hopefully sanded to lose any seams, it is time to proceed to :
| COLORS & MARKINGS |
Painting tanks can be one of two things. Fun, or a real pain in the rear. I like
to try to make it fun and simple.
Step One: Paint everything with
Krylon spray Chrome or Silver as mentioned above.Yep, I use a rattlecan.
Step Two: Spritz the sprues with
your owl watering spray bottle, or if you don’t have an owl, just use any
ordinary spray bottle.
Step Three: Using a salt shaker full of salt (what a surprise), liberally coat
the sprues that now have little water droplets on them with…salt. These need to
be set aside to dry completely. The salt granules will stick to the plastic for
up two 24 hours or so, so don’t rush it.
 Step Four: With the salt dry, paint all of the sprues with flat black. This can
be rattlecan or airbrushed on. I use rattlecans, because it is easier.
Step Four: With the salt dry, paint all of the sprues with flat black. This can
be rattlecan or airbrushed on. I use rattlecans, because it is easier.
Step Five: Now it is time to “prime” the tank parts with either red or yellow
ochre. I guess it would depend on which plant the tank was made at,
but I went with a yellow -tan.
Step Six: After this has completely dried, at least overnight, gently brush off
the salt crumbs. You will now see a series of pieces with small silvery flecks
showing through. Congratulations! If you have a cigar, smoke it! (away from the
spray paint, please)
Painting the tracks: This is done in the same manner as the rest of the tank, but once dry, I give the tracks a light wash of an oil based wood stain. It is my favourite “worn steel” look, and given that these are the travel tracks, not the battle tracks, they should look worn.
| FINAL CONSTRUCTION |
O.K. You now have a chunk of plastic
bits that look like they have been put through the wringer a bit. This is
perfect.
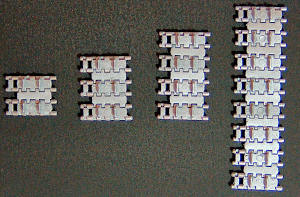 The link track isn’t as tough as people yap about to put together, and for a
tank that has no upper bogies, almost necessary if you want them to be
convincing. The Germans had droop.
The link track isn’t as tough as people yap about to put together, and for a
tank that has no upper bogies, almost necessary if you want them to be
convincing. The Germans had droop.
Assemble the track pieces in small increments, maybe two or three pieces glued
together at a time. The bottom treads can be made into a solid run, as this
heavy of a tank would not have had much divotting in between each wheel. Glue
these track pieces into place. I used a pair of hemostats to get all the bits
and whatnot put in. Tweezers will work, but ‘stats are much easier. Take your
time. This is like tying flies for fishing, you just have to be zen-like about
it. Watch Kelly’s Heroes or
something.
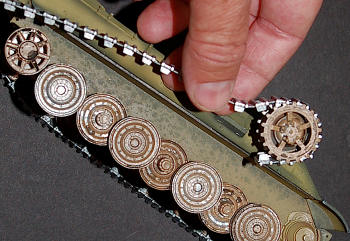 I glued the droop segment of the tracks to the front sprockets, then slid them
into place. This is the easiest way to get a decent track fall.
Install the road wheels and front and rear sprockets (see why I said use
separate boxes? Huh?).
I glued the droop segment of the tracks to the front sprockets, then slid them
into place. This is the easiest way to get a decent track fall.
Install the road wheels and front and rear sprockets (see why I said use
separate boxes? Huh?).
The Gun: A tank without a big gun
is nothing more than a large SUV that is terribly fuel inefficient. Sort of like
a Hummer.
The 88 (?) on this model is of so-so quality. I really wish they would just
include stock turned aluminium barrels in these boxes, but in this case, we have
a bunch of bits that have to be assembled into a long , long barrel.
I had to sand out part D19 quite a bit to get it to mate correctly with the
barrel. Do not glue the gun into the mantlet yet. Wait. Trust me.
 The Turret: Once again, the engineering
of this kit is absolutely amazing, and reflected in the molding of the turret
bits. Every seam is well thought out, and the main turret goes together like on
of those kits you remember from your childhood, before you really cared if the
weld seams were correct for the “panzerkampfwagen 19” or whatever.
The Turret: Once again, the engineering
of this kit is absolutely amazing, and reflected in the molding of the turret
bits. Every seam is well thought out, and the main turret goes together like on
of those kits you remember from your childhood, before you really cared if the
weld seams were correct for the “panzerkampfwagen 19” or whatever.
The bottom of the barrel at the base is too scrawny, so I beefed mine up with a semi-circle of tube styrene.
| MORE PAINTING |
The use of zimmerit was not
discontinued due to the lack of effect, but because the manufacturing plants had
been hit by allied bombing, and it was just too time consuming. The germans were
trying to crank out as many tanks as possible and get them to
 the fronts.
In this scenario, since they had time to build this massive tank, they
would have had the time to apply the anti-tank mine compound.
the fronts.
In this scenario, since they had time to build this massive tank, they
would have had the time to apply the anti-tank mine compound.
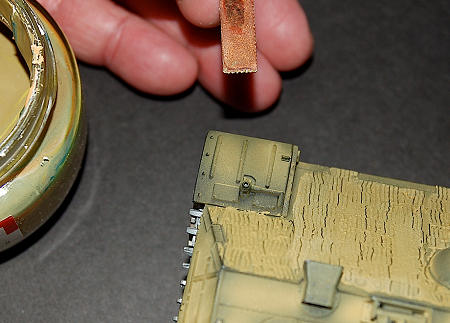
Just as I did with the Tiger 1, I mixed in yellow ochre to a patching compound,
and applied it to the flat surfaces using a small piece of a razor saw to make
the trowel lines.
Once this is completely dry, you can go ahead and put on all of the grab
handles, the shovels, and whatnot. Be careful applying the exhaust stacks, they
are extremely finicky, and the metal etch supports are really brittle, even
after annealing. There is a little diagram to show you how to bend them to fit,
you’ll need reading glasses, they are tiny. One of them sproinged away on me,
and I had to scratch up a second with a bit of PE, as the carpet monster refused
to give up the elusive prey.
Camouflage Time ! The tank right
now is mostly looking like a large chunk of bad cheese, so we need to start off
with the standard 3 tone ÜberJagerCamo.
The directions call for a blue/gray scheme that is pretty wild, perhaps
for city fighting? Once the scheme
is in place, I applied all of the little dots. Now my tank has acne !
The Panther II now looks factory fresh, but we want a war weary version, right?
A light misting of light gray will dull down the three-tone, and give it
a “rode hard, left wet” sort of feel. Perfect.
A quick spray of floor finish, and then onto the decals. There aren’t too many
of them, the German tanks were fairly simple in one respect, at least!
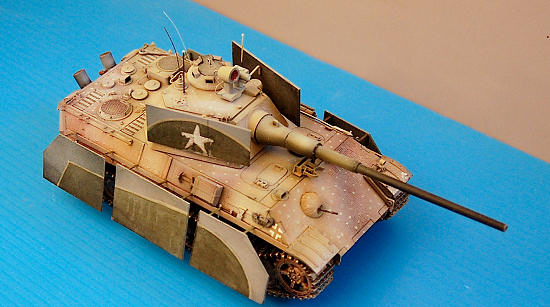 Fake Tank Panels: I made the side
panels out of thin sheet styrene. Staples were used for the attachment joints. I
wanted them to look fairly flimsy, like they could be ditched off the tank
easily by the crew. I also wanted
the paint job to look sketchy, as they would have been made out of scrap
material, and painted with a broad brush.
Fake Tank Panels: I made the side
panels out of thin sheet styrene. Staples were used for the attachment joints. I
wanted them to look fairly flimsy, like they could be ditched off the tank
easily by the crew. I also wanted
the paint job to look sketchy, as they would have been made out of scrap
material, and painted with a broad brush.
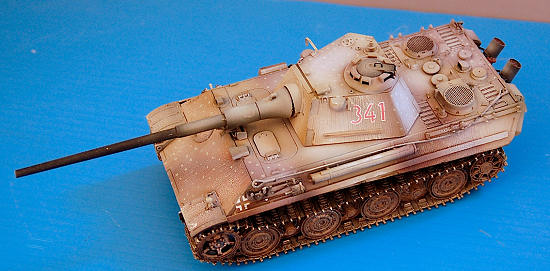
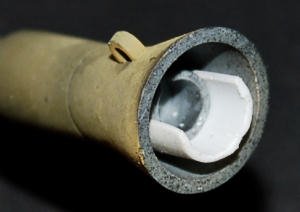
FG 1250 IR System: The infra-red passive
detection system was ingenious. While the larger Uhu mounted on a 251 lit up the
battlefield, each tank commander or SS troop armed with a Vampir could see the
combatants clearly on the darkest of nights.
With a hull down location, a night fighting group like this would be
extremely tough to take on, especially if they had a nearby place (ruined
building, etc) to hide in the daytime, when the Allied air attack craft were out
and prowling. I scratched up my
1250 system using some tube and square styrene. The illuminator was made from
the end of a bic pen, and some wires were added.
The lens was done using Krystal Kleer that was tinted red with acrylics.
Since this was the Panther II, not the G model, I think they would have figured
out how to mount the system to the turret itself, instead of the temporary
mounts for the cupola that were actually fielded on the Russian front.
| CONCLUSIONS |
If you are into German armor What-If’s,
this one is a definite must have. A simply beautiful kit, easy to put together,
with great figures too. Highly recommended.
(The figures are good enough to deserve their own separate review, so
you’ll have to wait for that one.)
Certainly, a four star kit. My only
complaints would be the lack of a turned barrel, and lack of great instructions.
For the cost, this is a winner.
| REFERENCES |
“My Tank is Fight” by Z. Parsons
If you want, google some panther 2 sites. It’s all fictional really.
Real stuff:
http://www.geocities.com/Area51/Capsule/2930/nightfightingpanthers/nightfightingpanthers.htm
http://en.wikipedia.org/wiki/Operation_Greif
Greg Ewald
September 2009
Copyright ModelingMadness.com
Thanks to www.dragonmodelsusa.com and your editor for the review kit.
If you would like your product reviewed fairly and fairly quickly, please contact the editor or see other details in the Note to Contributors.