Tamiya 1/35 Stug IV
| KIT #: | 87 |
| PRICE: | $ |
| DECALS: | yes |
| REVIEWER: | David Carley |
| NOTES: |
| HISTORY |
 As with most things, I was always confused by the seemingly vast array
of WW’2 German vehicles. There seemed to be no end to them, and they seemed
virtually the same, but with different names. I'm talking about the likes of the Marder family, the
Wespe, the Hummel, and the nashorn. Which to my untrained eye
all appeared to be a open top tank, virtually indistinguishable apart from the
name. Same sorta went for the Jagdpanzers, Jagdpanthers, and Stugs, all enclosed
tanks with various tops and bottoms. I didn’t have a clue!!!
As with most things, I was always confused by the seemingly vast array
of WW’2 German vehicles. There seemed to be no end to them, and they seemed
virtually the same, but with different names. I'm talking about the likes of the Marder family, the
Wespe, the Hummel, and the nashorn. Which to my untrained eye
all appeared to be a open top tank, virtually indistinguishable apart from the
name. Same sorta went for the Jagdpanzers, Jagdpanthers, and Stugs, all enclosed
tanks with various tops and bottoms. I didn’t have a clue!!!
Of course now I’m an expert! As we all are.!! The Stug IV was a way of utilising
some spare capacity of PzIV chassis production and mating it to spare Stug III
superstructures. Some had concrete armour added in front of the drivers box, and
I believe some late war versions had wire mesh schurtzen, as in the Pz IV Ausf
J. These assault guns came under the Artillery arm, and hence the crews had
different uniforms. Personally I think Stugs look great
| THE KIT |
Quite an early kit this, it comes in sand coloured mouldings, which are crisp and detailed. There are lots of ‘spares’ to cover the outside, and alternate parts to mull over before building. The kit comes with rubber type tracks, which I have to say I don’t mind at all. I believe this kit is re marketed by CMK, which really speaks for itself.
| CONSTRUCTION |
 Normal clear and helpful
instructions, (unless your reading the Japanese print)!! Anything
requiring pre painting is noted,
Normal clear and helpful
instructions, (unless your reading the Japanese print)!! Anything
requiring pre painting is noted,
and colours given. Lots of alternative choices for you to muse over. Build
quality is pretty good, I don’t think I used filler once on this kit. Assembly
is pretty straight forward, and in a logical order. The box artwork is pretty
good, and can be used as a further guide, both for construction and painting.
This kit was originally built by my
stepson, so its actually a rebuild. I found it in a sorry state at the bottom of
the wardrobe, and decided to tackle it!! I started by removing the tracks and
any loose parts, keeping them safe. I checked a few pics of Stug IVs and
decided to model it without the side skirts (I think it looks more purposeful
that way). Next I cleaned up the old paint job by sanding lightly, then washing
with mild soapy water. The barrel had been broken, so needed to be replaced.
Luckily the italieri jagd IV lang contains the early barrel on its sprues, so I
used that. The upper machine gun shield was missing, and this has been made by
using cardboard, cut and bent to the correct shape.
All in all I didn't have to change much on the kit. It builds into a nice
looking model straight from the box. Given that it was a rebuild I was very
pleased with the resuilts. Perhaps knowing this makes it easier to take risks
and try new methods.
| COLORS & MARKINGS |
 Ok, as far as I’m concerned, any colour
variation on sand, red brown and green can’t be ruled out. Paints were thinned
by petrol or water, and applied using spray, brush, or just thrown from
buckets!! Weather and terrain would have played their part as would the pace of
the unit.
Ok, as far as I’m concerned, any colour
variation on sand, red brown and green can’t be ruled out. Paints were thinned
by petrol or water, and applied using spray, brush, or just thrown from
buckets!! Weather and terrain would have played their part as would the pace of
the unit.
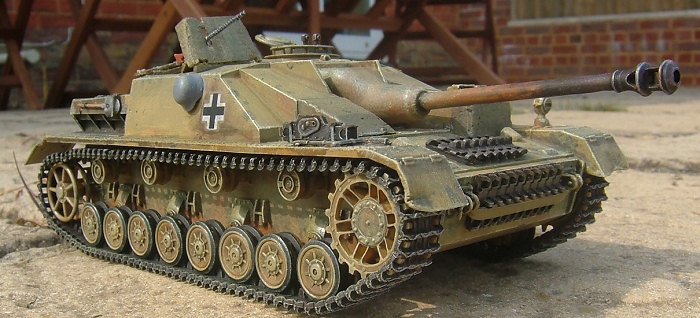
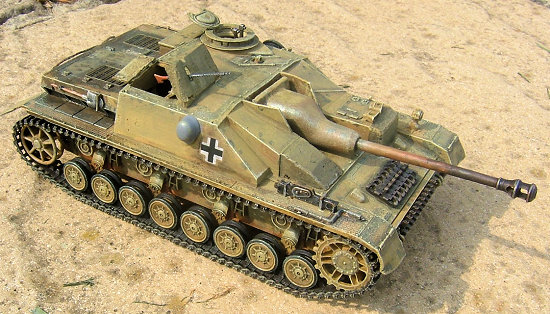
Here I’ve opted for a basic sand finish, weathered to portray an overworked, battle weary tank, probably fighting in Italy or the Balkans. Paints were Revell and Humbrol enamels. The basic sand colour has been mixed with other shades to show weathering on certain panel areas. I’ve deliberately kept the markings to a minimum, showing only crosses. It’s been heavily washed in black /brown /red with thinned turps, and dry brushed with light grey/beige.
| CONCLUSIONS |
 A very good kit, reasonably
priced. Easy enough for the beginner, but with enough scope to keep a
intermediate happy!! Over 1,000 of this variant were built so camouflage
variations are limited only by your imagination. This 'rebuild' was good fun,
and I was very pleased with the result. The kit generated quite a lot of
interest, when it was sold on evil-bay.
A very good kit, reasonably
priced. Easy enough for the beginner, but with enough scope to keep a
intermediate happy!! Over 1,000 of this variant were built so camouflage
variations are limited only by your imagination. This 'rebuild' was good fun,
and I was very pleased with the result. The kit generated quite a lot of
interest, when it was sold on evil-bay.
November 2007
Copyright ModelingMadness.com
If you would like your product reviewed fairly and fairly quickly, please contact the editor or see other details in the Note to Contributors.