Dragon 1/35 Night Fighting Panther
|
KIT #: |
9045 |
|
PRICE: |
$15 at a swap meet |
|
DECALS: |
probably |
|
REVIEWER: |
Jack
Bruno |
|
NOTES: |
|
You can never figure on what you might find at a
club swap. I was lucky enough to find a nice little kit of Dragon's "Night
Fighting Panther" sitting on one of the members tables. Originally, I had
only planned to steal the Night Vision Infra-Red to use on another project
but after looking the kit over I found you can build a late version ausf. G
out of it hassle free. So, on the build pile it went.
 The Panther G was a simplified version of one of the best tanks to come out
of WW II. It differed from the ausf. A & D by variation of the hull, which
featured a straight/angled side armor and non angled driver/machine gunner
hatches. Also, the exhaust got a make over with flame dampeners instead of
the pipes. Deleted from the bow was the pop open drivers vision hatch. The
"late" Panther introduced the chin mantlet for the turret as the "early" G
had a rounded mantlet that some say provided a shot trap for the Allied
Armor by deflecting a round right into the hull compartment. The same thing
found on Porsche built King Tigers. The Panther, in any form was a pretty
tank. It was also much larger that people would think. Further versions of
the Panther would include a Bergepanther (recovery tank), a Coeilion
(anti-aircraft Tank) and the deadliest tank destroyer ever built, the Jagdpanther, which mounted a 88 gun in a well designed turret-less
hull. So, I paid my money and let us see what we
have.
The Panther G was a simplified version of one of the best tanks to come out
of WW II. It differed from the ausf. A & D by variation of the hull, which
featured a straight/angled side armor and non angled driver/machine gunner
hatches. Also, the exhaust got a make over with flame dampeners instead of
the pipes. Deleted from the bow was the pop open drivers vision hatch. The
"late" Panther introduced the chin mantlet for the turret as the "early" G
had a rounded mantlet that some say provided a shot trap for the Allied
Armor by deflecting a round right into the hull compartment. The same thing
found on Porsche built King Tigers. The Panther, in any form was a pretty
tank. It was also much larger that people would think. Further versions of
the Panther would include a Bergepanther (recovery tank), a Coeilion
(anti-aircraft Tank) and the deadliest tank destroyer ever built, the Jagdpanther, which mounted a 88 gun in a well designed turret-less
hull. So, I paid my money and let us see what we
have.
This boxing is a real treat because on these older
Dragon kits you don't have the gazillion parts the new versions have at
twice the price, however, you get four times the magnificent detail in the
newer kits.
The chassis and wheels were first and there was no problem at all. Next came
the rear plate which was a breeze, just remember to fill seams and keep
things straight. Especially with the exhaust. It's not tricky, but needs
filling. I started to work on the upper hull and although I didn't realize
it at the time, there are a lot of fiddly fittings that need to be glued on.
Dragon informs you to trim some of these and the little hooks and such does
get boring. The raised interior heater was really cool (not on the Early G
version too) and Dragon did this well. Now, one of my gripes about early
Dragon Panther kits are the funky raised lines for the tool and spare track
racks. Out came the sanders and gone they went. I had a bitch kit of a Tamiya Jagdpanther
 and I replaced the kit racks with these. Hey, it's Tamiya.
The molds were a lot more detailed and crisper... like a salad. The Tamiya
"C" clamps were also used because I found these to look better and the
Dragon ones provided would not fit the Tamiya racks. I put
in the ball mount for the bow machine gun and added some strip plastic around
it. I then applied some liquid glue to melt it around the mount and took my
Xacto #11 blade and pressed into the melted sprue and made weld beads.
Anything extra only makes it stand out! I had a set of the Aber brass bow
Machine Gun 34's and I didn't hesitate to pop that into the ball mount.
Nasty! Another plus for Dragon is that the periscopes were already part of
the scope guard in the front for driver and machine gunner. Gun Travel Lock
was easy and that posed no issues at all. Tracks; some modelers fear
them, but I got used to them with the very first issues that featured them.
To me, they are easy, do not let them spook you. I simply cut them all
from the sprue, cleaned them up a bit and started to watch the Hawks. By
the end of regulation I had both runs done and mounted with the appropriate
Panther Sag, I use Testors liquid glue in the black long neck bottle for
this and before you know it, I had the Turret to do at last.
and I replaced the kit racks with these. Hey, it's Tamiya.
The molds were a lot more detailed and crisper... like a salad. The Tamiya
"C" clamps were also used because I found these to look better and the
Dragon ones provided would not fit the Tamiya racks. I put
in the ball mount for the bow machine gun and added some strip plastic around
it. I then applied some liquid glue to melt it around the mount and took my
Xacto #11 blade and pressed into the melted sprue and made weld beads.
Anything extra only makes it stand out! I had a set of the Aber brass bow
Machine Gun 34's and I didn't hesitate to pop that into the ball mount.
Nasty! Another plus for Dragon is that the periscopes were already part of
the scope guard in the front for driver and machine gunner. Gun Travel Lock
was easy and that posed no issues at all. Tracks; some modelers fear
them, but I got used to them with the very first issues that featured them.
To me, they are easy, do not let them spook you. I simply cut them all
from the sprue, cleaned them up a bit and started to watch the Hawks. By
the end of regulation I had both runs done and mounted with the appropriate
Panther Sag, I use Testors liquid glue in the black long neck bottle for
this and before you know it, I had the Turret to do at last.
As I said before, the late G had the chin mantlet. The
instructions were followed and the turret
 was assembled with extra care
given to gluing and sanding the gun barrel. I also added a canvas cover over
the muzzle using a small tissue soaked in white glue. Just so you know,
I'd rather put the extra time in doing extra work than going out to buy a
hundred bucks worth of stuff to save time. I fancy being a modeler, not an
assembler. More on this later. Be careful on the top of the turret because
there is a non-noted periscope with guard that needs to be put on. You can't
miss it and using pictures you can spot this right off. The detail is very
good and there are options at this time for the Modeler. Before painting and
dare I say building, decide what you wanna do!!! Do you want extra track
armor for the turret? You must make or grab those hooks from the Tamiya Kit
or aftermarket. Fittings for foliage in the form of small mounts for wire?
Schurzen???? Anti Aircraft mount with machine gun?? Now, all this starts to
come into play. Make your choice and then get ready for the paint shop.
was assembled with extra care
given to gluing and sanding the gun barrel. I also added a canvas cover over
the muzzle using a small tissue soaked in white glue. Just so you know,
I'd rather put the extra time in doing extra work than going out to buy a
hundred bucks worth of stuff to save time. I fancy being a modeler, not an
assembler. More on this later. Be careful on the top of the turret because
there is a non-noted periscope with guard that needs to be put on. You can't
miss it and using pictures you can spot this right off. The detail is very
good and there are options at this time for the Modeler. Before painting and
dare I say building, decide what you wanna do!!! Do you want extra track
armor for the turret? You must make or grab those hooks from the Tamiya Kit
or aftermarket. Fittings for foliage in the form of small mounts for wire?
Schurzen???? Anti Aircraft mount with machine gun?? Now, all this starts to
come into play. Make your choice and then get ready for the paint shop.
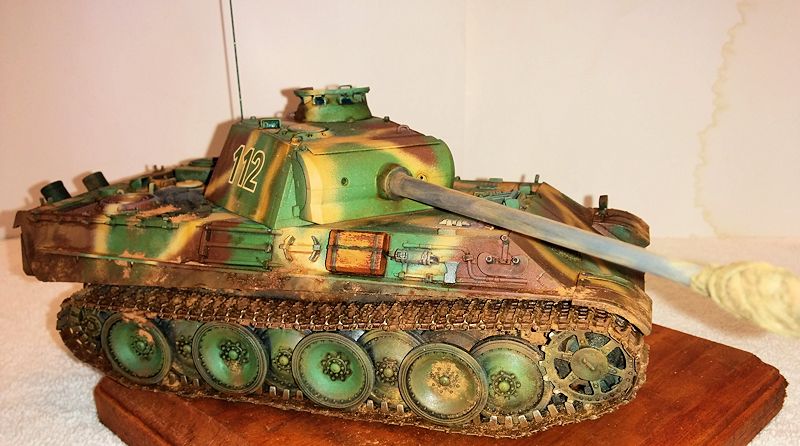
I wanted my Panther to pop!!!! I painted the entire
vehicle Tamiya Flat Black out of the can. For a late War Kitty, I opted for
overall Vallejo Green Splinter. It sprays great with my Grex from God!
Actually, I used my old Paache H (for the Green) that is older than my first
born, and he's 27 !!! I next used two different Red Browns (Vallejo)
and sprayed where I marked for it using a pencil. Next came a free hand
squiggle of Dark Yellow. and just broke up the pattern. Just a heads up, I
have a saying that "It looks like s&%t, then it's done". Trust YOUR vision
of what you want it to look like. The wash and weathering process will treat
you right. I went over the paint job again this time with the same colors
only with a brush to clean up some over spray (not much ) and make things
pretty. Next, I brush painted the gun barrel dark gray to break up the view
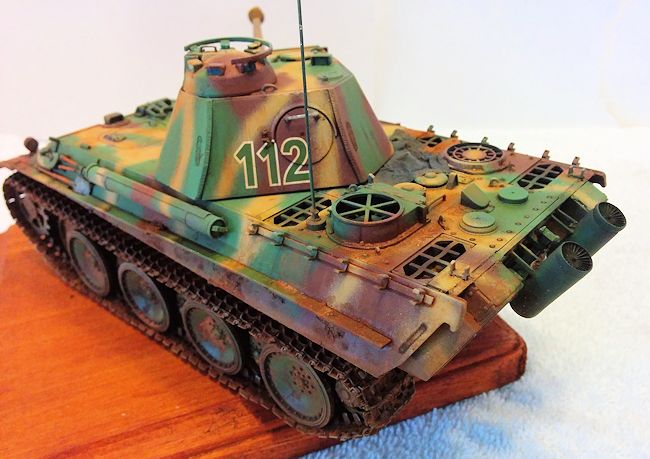
from the ground and air. Jabo's, remember??? OH, one more thing, I
forgot to add that Dragon did NOT issue the grill covers for the vents. This
is why they are not on the vehicle. It made me sad and I really didn't
realize it until the painting w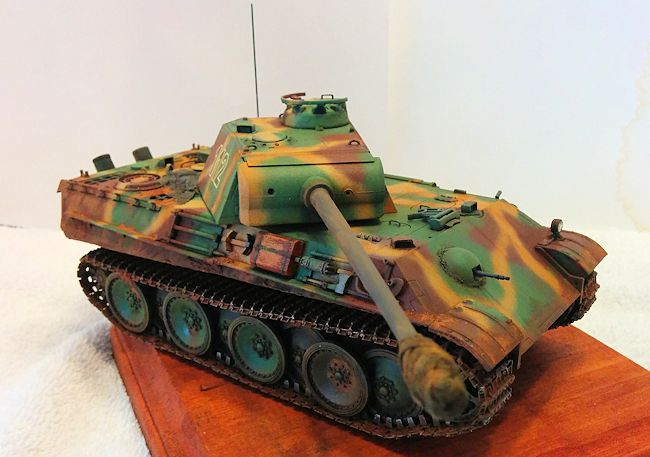 as done. Next came time to Future the
turret
and hull separately.
as done. Next came time to Future the
turret
and hull separately.
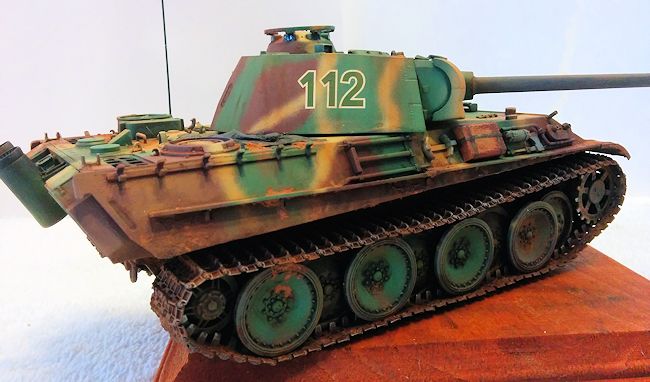
After the Future spray, I applied the decals that I wanted
which were taken from the spares box. These were set and I used Solvaset to
really melt them in. I used two applications for this. When they are set and
dry, a few hours, I brushed Future over them to seal the deal. This next
step is my favorite and you can really reach down and be artistic. I
started with a rusty wash this time around. Let it dry to a film and used
Q-Tips to remove the film around the fittings. Next I used my tried and true
Dick Van Dyke Brown wash, a little thin, and did the whole model. I repeated
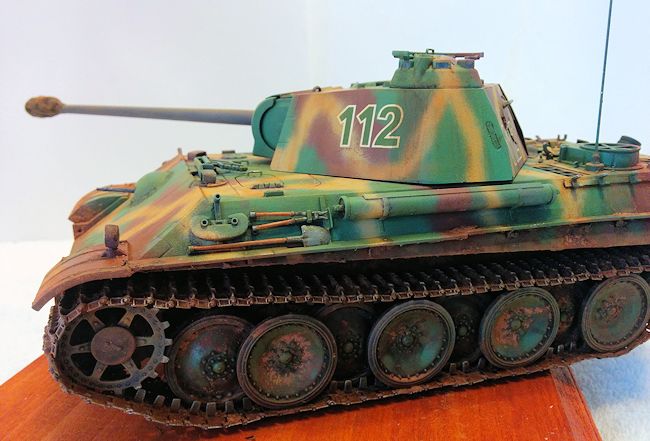
the process and I went thru some Q-Tips. I started to use a flat chisel
brush with ochre oil paint to highlight some of the fittings. I was liking
it. Now for the tools which the wooden handles were painted Tamiya Buff.
After this was dry I took a small brush and lightly hand painted burnt
sienna oil over the Buff. Streak it and wipe the brush and do it again. It
starts to leave a beautiful wood grain look. They turned out amazing
especially the jackblock. This is what you want and don't over do it! I
added a tarp which was tissue soaked in water with white glue. After it
dried it was painted Vallejo Canvas. It too was brushed with Future and
washed. I had pre-cut a brass rod for the radio mast and already had that
painted green. I glued it in place and moved on. Next I used Vallejo matte
and flated the whole thing. I used clear filler for the armored glass and I
put a coat of Tamiya clear over it when it dried. It was a Monster and I
was very Happy with it. But, I was not done yet! I got out my MiG Pigments
and started to work area's that would be worse for wear and started to apply
it. When I got one side done I sealed it with Tamiya thinner using pipettes
from Just Plane Stuff! (Love Ya Dave) Next came the running gear and
sponsons. Oh man, I love this stuff!!! I did the sides/front/back all at
separate times allowing Kitty to dry well. More tank wear and tear came in
the form of a pencil and I rubbed it along the grab handles and are'a most
affected by crew. For the headlight, I have a nice supply of MV Lenses and took
one of the appropriate size and put that in.....looking good! Last, I took
out my black pastel and did some soot for the exhaust........that was it!
Three days from start to finish and around 18 hours. I did not have the
opportunity to bring it to any shows as it now belongs to a collector!
I was very happy with this kit and I've gone on a little
bit of a Panther spree. The only thing I would tell you about kits like this
is that whenever you take your time, put in a little research and improvise
you'll end up with a nice kit for yourself. I found the best source of
information/pictures is the gallery sections of armor modeling sites, like
Tracklink. Never let a model intimidate you, especially link to link track.
The newer Magic track was a gift from the modeling Gods and the DS track I
prefer just to throw away. Use your imagination and trust your vision. Now,
go build something.
Jack Bruno
April 2014
If you would like your product reviewed fairly and fairly quickly, please
contact
the editor
or see other details in the
Note to
Contributors.
Back to the Main Page
Back to the Review
Index Page