Trumpeter 1/72 128mm Selbstfahrlafette auf VK2001(h)
|
KIT #: |
7210 |
|
PRICE: |
AUD $17.98
|
|
DECALS: |
one option |
|
REVIEWER: |
Michael Johnson |
|
NOTES: |
|
Well before World War 2,
the German ordinance bureau decided to develop heavy self propelled guns (100 –
128mm calibre) in order to destroy enemy fortifications. As a war with
France
was being planned such SP guns would be needed to bust the bunkers of the
Maginot Line. By the end of 1940, the s.10 Kanone was fitted to a modified PzIV
chassis.
 However
the more powerful and heavier 12.8cm Kanone 40 (derived from the flak 40 AA gun)
required a bigger chassis of which the prototype V3001 was available. These were
essentially scaled up PzIV chassis but provided the ideal mount for these big
guns. Ammunition was in two parts consisting of the cartridge and the shell
itself with the vehicle able to carry 18 rounds of ready use ammunition stored
separately within the fighting compartment.
However
the more powerful and heavier 12.8cm Kanone 40 (derived from the flak 40 AA gun)
required a bigger chassis of which the prototype V3001 was available. These were
essentially scaled up PzIV chassis but provided the ideal mount for these big
guns. Ammunition was in two parts consisting of the cartridge and the shell
itself with the vehicle able to carry 18 rounds of ready use ammunition stored
separately within the fighting compartment.
Armour
protection compared to later SP guns was rather good with 50mm frontal armour
and 20mm side armour
By
1941 two prototypes were completed and assigned the designation of Pz.Sfl V. It
was at this time Hitler had decided that bigger and heavier allied tanks were
inevitable and that the new SP guns must be able to have tank destroyer
capability as well as the artillery role they were originally designed for. Mass
production of the Pz.Sfl V was to commence in 1942.
The
new SP guns were assigned to Pz.Jg.Abt. 521, a special purpose battalion. (521
were mainly outfitted with PanzerJaeger PzJg 1), one heavy company received the
two s.10 cm Kanone auf Sfl IV (known as Dicker Max), and the other heavy company
the two Pz.Sfl V 12.8 cm SP guns. With the start of Operation Barbarossa the
unit was sent to the central section of the eastern front.
Because
of its huge gun and success in combat against Russian armour, German crews
nicknamed the Pz.Sfl V “Sturer Emil” (Stubborn Emil)
Unlike
its smaller brother which rarely saw action (and without great success) the
Sturer Emil saw extensive action during offensive operations. While Dicker Max,
because of the 10 cm guns slow muzzle velocity, had to be used in an artillery
role, the 12.8 cm K 40 of the Sturer Emil was a high performance gun with a flat
trajectory. Its armour penetration results were incredible. Eyewitnesses
reported that T-34 tanks were simply perforated, the shell passin g
right through the tank on the opposite side and causing more damage there.
Accuracy was good, but did not match the results of the famous 8.8 cm Flak 36.
The gun was able to engage targets up to 3500m.
Russia’s
vast steppes were a formidable battleground for the Emil.
g
right through the tank on the opposite side and causing more damage there.
Accuracy was good, but did not match the results of the famous 8.8 cm Flak 36.
The gun was able to engage targets up to 3500m.
Russia’s
vast steppes were a formidable battleground for the Emil.
Unfortunately
the SP gun suffered from poor mobility. Emil reached a maximum speed of 15 km/h
over rough terrain and the drivers were told to drive extremely
carefully in order
not to cause damage to the gun mount. For all its size the fighting compartment
of the new SP gun was cramped, with the loader having to load large and heavy
rounds over the box like structure that covered the engine bay. This engine
cover got very hot and burns were quite common.
As
a result of these shortcomings, like the Dicker Max SP gun, the ambitious
production plans for the Sturer Emil were dropped in favour of more economic
solutions.
Of
the two prototypes, one was destroyed in combat and one captured by the Russians
during the Battle of Stalingrad in January 1943. It is now preserved at the
military
museum of
Kubinka.
Preamble
Some
months ago one of our club armour modellers brought in his recently completed
1:35
Trumpeter Sturer Emil in for display and discussion. I was immediately
interested in this rare PanzerJaeger and noting my interest my wife sourced out
the Trumpeter 1:72 kit for part of my birthday present.
Comes in top opening box with all light grey sprue trees bagged sprues bagged in
plastic to prevent parts loss. All parts are crisply moulded with very little
flash, injector marks and mould lines. The tracks are of the rubber band type,
but are not of the same material as the Dragon DS track and will need to be heat
welded.
The
mandatory instructions are clear and concise with clear parts and assembly
breakdown. The rear page offers up either of the serving prototypes to model,
plus overall colour instructions. Both are overall panzer grey so there is not
much variation in schemes!
 I
started with construction of the huge 128mm cannon breech, which once assembled
and cleaned up looked excellent. All parts went together well, with only a small
amount of filler required to remove joins.
I
started with construction of the huge 128mm cannon breech, which once assembled
and cleaned up looked excellent. All parts went together well, with only a small
amount of filler required to remove joins.
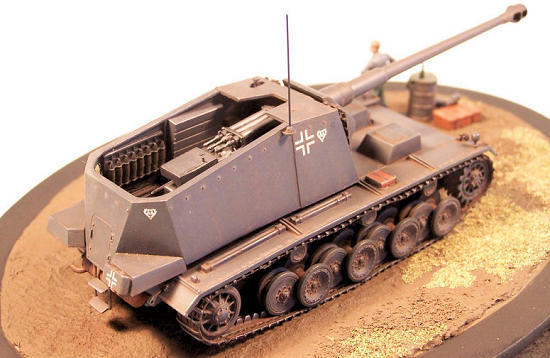
Once
the cannon breech assembly was completed, the next stage was to assemble the
lower chassis and paint the fighting compartment’s interior fittings. As I
wanted the track to sag between each return roller, I inserted trimmed pins cut
from piano wire midway between each return roller for the track to run under,
thus creating sag. The pins were painted black in order to make them “disappear”
against the tracks.
The
remainder of assembly proceeded quickly, with only faint mould lines being
needed to be removed from some parts. Construction was slower than a normal tank
build, as most of the detail needed to be painted before it went into the open
topped fighting compartment.
In
the end, I had 4 subassemblies ready to be painted.
Now
that construction was finished I could settle down to painting. Panzer grey
finished armour is notoriously difficult to do well, especially in small scale.
I started with a black Tamiya lacquer spray can undercoat and once dry added
Vallejo German grey. I then applied a series of progressively lighter glazes and
dry brushing towards the centre of horizontal and vertical areas until a subtle
fading affect was achieved. This is certainly visible when a naked eye looks at
it, but the camera cannot pick up the subtlety, so next time I will make the
effect more noticeable, with or without an airbrush.
I
then worked in some selective burnt umber oil pin washes to add depth to the
model surface, once this had dried overnight; I then weathered the exterior of
the fighting compartment plus the lower and upper chassis halves with a chalk
wash. This imparted a dusty used look perfect for high summer.
Finally
a very light dry brushing of Citadel Codex grey followed by Humbrol polished
steel was applied to all edges, high points and bolts.
 The
floor of the fighting compartment was painted panzer grey along with the
compartment insides. However research indicated that in actuality the floor
consisted of wooden floorboards not steel slats. After some thought, I washed
the floor with several coats of
Vallejo
burnt umber followed by some selective dry brushing of Citadel codex grey. This
was further washed in earth tone chalk washes to impart a scruffy, dusty wooden
floor. Finally, polished steel was used to wear the engine cover and steel deck
frames.
The
tracks were then sprayed with flat black lacquer, washed with burnt umber and
flat earth and the contact points were dry brushed with Humbrol polished steel
imparting a worn metal look. Humbrol metalcote polished steel also took care of
sprocket gear wear surfaces as well.
Once
the paint and washes had dried, I then used the ancient and venerable method of
using a hot blade to join each track end. This proved to be a wasted exercise as
the tracks proved to be too long, even with the sag between the return rollers.
Resorting to ancient and venerable method number two, I cut the coupled ends off
and sewed the track ends together with black thread. This resulted in a much
better fit that was not too tight or loose, with the added bonus of a near
invisible join that could be hidden neatly under a road wheel.
Pioneer tools and the jack
blocks were next to be painted. I used
Vallejo
buff as a base on the wooden handles and jack blocks and black for the metal
components of the tools. Once the buff was dry I carefully applied neat burnt
sienna using a stiff pointed brush and by going over the handles a number of
times exposed streaks of the underlying buff colour creating a realistic looking
wood grain finish. The jacks were done in the same way. I left alone for a day
then applied some more to “deepen” the wood finish and once completely dry, a
well thinned coat of Aeromaster flat clear was applied to seal the oils and
remove the slight sheen.
Like
the PzIV, the Sturer Emil has a prominent rear mounted drum type exhaust which
really needed to be painted carefully. The whole assembly was based in flat
black and then dry brushed with Modelmaster rust. A further wash of a black
acrylic was applied and then a selective and patchy orange brown and orange
chalk wash provided the rusty and patchy typical muffler look. Edges were then
 dry
brushed in codex grey. Mufflers are typically made of thin sheet metal and heat
up as exhaust gasses pass through. The constant heating and cooling of the metal
generates moisture which in turn rusts the sheet metal quite quickly and this
results in patches of old and new rust.
dry
brushed in codex grey. Mufflers are typically made of thin sheet metal and heat
up as exhaust gasses pass through. The constant heating and cooling of the metal
generates moisture which in turn rusts the sheet metal quite quickly and this
results in patches of old and new rust.
All
the subassemblies were then brought together and set aside to cure. This was
almost a click fit exercise. The fighting compartment to upper chassis assembly
actually required no adhesive at all, which is a testament to how nicely this
kit goes together.
There
are only six decals to apply which adhered beautifully with no silvering. Once
dry I painted a couple of thinned coats of Pollyscale flat followed by an earth
tone chalk wash to tone down the white of the decals.
I
then went back over the assembled model it with more chalk and pin washes in an
attempt to bring all the components together uniformly. Finally, some more
selective dry brushing of polished steel imparted even more wear to various
areas such as the top edges of the fighting compartment, driver’s compartment
and fender edges.
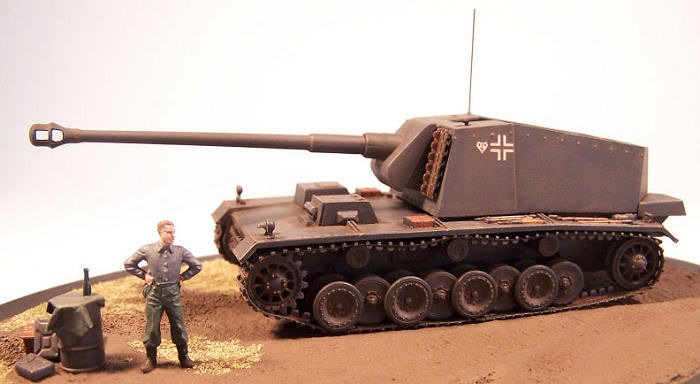
I
prefer to see an armour model set on a small base, so I selected a small oval
MDF base with a nice routed edge. I buy these from a large hardware chain for
under $2 and they really are perfect for 1:72 armour models. My Sturer was to
sit on the side of a hard packed dirt road cutting through the Russian steppes.
While the other members of his fellow crew attend to the necessities
of life during a hot day in late August 1942, the driver shares a laugh with
passing Tiger I and PzIV crews.
"Nennst
Du das eine große Kanone?" (Call that a big gun?)
With
this vignette idea firmly in place I sourced an Academy fuel drum, ammo crate,
fuel cans and a resin wine bottle. A rummage through my small stash of Preiser
figures turned up an appropriate figure. A pleasant evening or two was to be
had, getting all the pieces painted.
 Masking
a border and applying some Celluclay (mixed with acrylic paint and white glue)
took less than half an hour. I then used a surplus Revell Tiger track segment to
create tracks along the road edge. The Emil was then placed inside some Gladwrap
and pressed into the base to provide correct sit.
Masking
a border and applying some Celluclay (mixed with acrylic paint and white glue)
took less than half an hour. I then used a surplus Revell Tiger track segment to
create tracks along the road edge. The Emil was then placed inside some Gladwrap
and pressed into the base to provide correct sit.
The
base as then set aside for a few days to cure, was set aside to cure in
preparation for the next stage. This entailed adding “texture” to the base,
especially where the dirt track was to be located.
I
dry brushed the dirt track and roadside area with various shades of
Vallejo
earth tone acrylics blending the bare dirt areas into where the patchy grassed
areas that was to be added. I then used various pre mixed shades of Woodland
Scenic flocks for the grass. Once the base was completed, the tank was added and
more flock, crushed rock and earth tone pastels used to blend the tank and base
together.
I
then added the painted fuel drum, ammo case, figure and fuel containers to the
base, blending them in with diluted white glue mixed into the base colour.
Finally
the Sturer Emil was added, sitting into the depressions created when the
Celluclay was still soft.
Good
fun and it looks great though the tracks could be better. Recommended.
Internet
June 2008
Michael
Johnson
Copyright ModelingMadness.com
If you would like your product reviewed fairly and fairly quickly, please
contact
the editor or see other details in the
Note to
Contributors.
Back to the Main Page
Back to the Review
Index Page 2018