
| KIT #: | 35249 |
| PRICE: | £14-99 |
| DECALS: | Four options |
| REVIEWER: | Frank Reynolds |
| NOTES: | A test bed for Ammo paints and finishes. |
| HISTORY |
 The Universal Carrier is an often underestimated
armoured vehicle of World War 2. British designed, its origins lay in the Carden
Lloyd tankettes of the 1920s and 30s, but its true forte came as a battlefield
support vehicle for dismounted infantry. With about 112,000 produced, it lays
claim to being the most-built armoured vehicle in history. Its function was to
accompany infantry units into the battlefield, carrying supplies and ammunition,
to ferry small groups of soldiers when required and if necessary, to engage
opponents with the two .50cal Bren guns commonly fitted. The driver and
commander were seated in the front compartment with radio operator to the rear.
The vehicle was lightly armoured to give a level of protection against small
arms fire.
The Universal Carrier is an often underestimated
armoured vehicle of World War 2. British designed, its origins lay in the Carden
Lloyd tankettes of the 1920s and 30s, but its true forte came as a battlefield
support vehicle for dismounted infantry. With about 112,000 produced, it lays
claim to being the most-built armoured vehicle in history. Its function was to
accompany infantry units into the battlefield, carrying supplies and ammunition,
to ferry small groups of soldiers when required and if necessary, to engage
opponents with the two .50cal Bren guns commonly fitted. The driver and
commander were seated in the front compartment with radio operator to the rear.
The vehicle was lightly armoured to give a level of protection against small
arms fire.
In preservation, the Universal Carrier is much rarer than a Willys Jeep or Kubelwagen since it lacks the on-road flexibility of these wheeled vehicles, so had little to commend it for civilian use after World War2, and relatively few have survived. It is still a sought-after collector’s piece for re-enactors and when they do appear for sale, prices of £60,000 to £70,000 are not uncommon.
| THE KIT |
 First released in the mid-1970s, this kit has
been periodically offered by Tamiya over the decades, with minor variations
of boxing mainly related to the crew figures. It is supplied in a stout tray
type box, with colour illustrations to the top and edges. There are four
parts frames moulded in Dark Olive Green, a further frame for the five
figures is moulded in grey. Two are in desert uniform. The small decal sheet
gives four options for British Army units, one from Tunisia 1943, the rest
from NW Europe. A small piece of cord is provided to form the tow rope.
Tamiya’s instructions are in one multi-fold sheet in half tone. The only
paint references are to Tamiya Color.
First released in the mid-1970s, this kit has
been periodically offered by Tamiya over the decades, with minor variations
of boxing mainly related to the crew figures. It is supplied in a stout tray
type box, with colour illustrations to the top and edges. There are four
parts frames moulded in Dark Olive Green, a further frame for the five
figures is moulded in grey. Two are in desert uniform. The small decal sheet
gives four options for British Army units, one from Tunisia 1943, the rest
from NW Europe. A small piece of cord is provided to form the tow rope.
Tamiya’s instructions are in one multi-fold sheet in half tone. The only
paint references are to Tamiya Color.
This is one of Tamiya’s legacy kits and there are a few hard-edged mould lines, but nothing that cannot be fixed with a few swipes of a sanding stick.
| CONSTRUCTION |
This is part of my self-imposed training programme to use Ammo paints and finishing materials, so I have chosen a relatively small and inexpensive kit as a test mule. I have also succumbed to modeller’s temptation - which occurs when you have built one subject and are then drawn to get something else to go next to it on the display shelf.
 The parts frames were washed in a mild solution
of detergent and water to remove any mould release. I planned to paint all
the parts in base colours while still on the frames, so there followed a
coat of primer. Since this build forms part of my experimentation with a new
(to me) range of paints from Ammo/Mig of Spain, the primer came from their
“One Shot” range. They offer primer in six different colours, each selling
in the UK at £6-50 for a 60ml squeezy bottle. I am not inclined to lay out
£39-00 for primers to cover all the bases so I chose their Sand/Flesh which
would serve most of my needs. It was applied with my Iwata HP-C airbrush at
the recommended 20-30psi and provided decent coverage when misted on in
three or four coats at 20-minute intervals. Intriguingly the primer carries
a label that says “made in the USA” whereas everything else that I have seen
from the Mig range is labelled as made in Spain.
The parts frames were washed in a mild solution
of detergent and water to remove any mould release. I planned to paint all
the parts in base colours while still on the frames, so there followed a
coat of primer. Since this build forms part of my experimentation with a new
(to me) range of paints from Ammo/Mig of Spain, the primer came from their
“One Shot” range. They offer primer in six different colours, each selling
in the UK at £6-50 for a 60ml squeezy bottle. I am not inclined to lay out
£39-00 for primers to cover all the bases so I chose their Sand/Flesh which
would serve most of my needs. It was applied with my Iwata HP-C airbrush at
the recommended 20-30psi and provided decent coverage when misted on in
three or four coats at 20-minute intervals. Intriguingly the primer carries
a label that says “made in the USA” whereas everything else that I have seen
from the Mig range is labelled as made in Spain.
After 24 hours the parts frames were airbrushed in British Olive Drab 1944-45, part of a 4-pack of paints sold as a Smart Set of British ETO colours. Selling at £9-99 at my LHS this is a useful basic set and certainly helped my local shop phase in a limited range of these smart sets to see how the customers liked it. With 200 colours in the Mig range and their being supplied in 6’s, that’s 1200 paint pots for them to set up an initial stock of the full range. That requires commitment for such a commercial risk.
Construction begins with assembly of the running
gear and in typical Tamiya style it is logical and well-engineered. The
tyres to the eight wheels were brush painted with Mig 033 Rubber Tires
Grey/Black from their
 six-bottle Tires and Tracks set. The drive axle,
differential and drive sprockets were assembled at the same time.
six-bottle Tires and Tracks set. The drive axle,
differential and drive sprockets were assembled at the same time.
The vehicle body is built up on a flat floor. The sides incorporate the front and rear fenders and the two cross bulkheads fitted neatly into place. The front apron and front armour plating are added much later in the build to enable the figures to be assembled around the gun and steering wheel.
The interior of the rear body features a large central box that houses the engine. The side and top panels lined up neatly and almost clicked into place but the narrow recesses either side emphasised the advantage of pre-painting the body panels since it could have been tricky to reach into the depths to apply paint later.
The body shell was inverted to enable the running gear to be installed including the pair of exhaust pipes that exit rearwards from under the belly of the carrier. While the glue was drying, the one-piece vinyl tracks were clipped together and hand brushed with 035 Dark Tracks Brown. The tracks were stretched into place over the wheels then the entire underside and tracks assembly was dirtied with 073 Earth. This was left to dry for a couple of days and this provided an opportunity to get on with painting and finishing the assortment of ammo and fuel cans, ration boxes and items of personal equipment that would decorate the finished product. Tamiya had thoughtfully provided the distinctive flat sided British fuel tins of the period that proved to be demonstrably inferior to the German Jerrrican containers, since the British variety tended to split at the seams.
The figures were mainly painted before assembly.
I find that with my limited skillset it is easier to paint faces before the
tin helmets are added. The figures were first undercoated in Flat White,
then the faces built up in pr ogressive shades of Flesh. The basic uniform colour was achieved with Tamiya XF-62 Flat Earther with uniform webbing and
packs in Vallejo 023 Hemp. I dipped into the paint locker for complementary
colours to provide creases and highlight to the uniforms, since I did not
have a full range of Ammo paints to cover all requirements.
ogressive shades of Flesh. The basic uniform colour was achieved with Tamiya XF-62 Flat Earther with uniform webbing and
packs in Vallejo 023 Hemp. I dipped into the paint locker for complementary
colours to provide creases and highlight to the uniforms, since I did not
have a full range of Ammo paints to cover all requirements.
Returning to the body work the seats were installed, painted in Tamiya XF-10 Flat Brown, then the rear panel, carrying the tow hook assembly, was installed. The upper rear body work carries a very distinctive storage bag and roof canvas and these mouldings were painted and shaded in a mixture of green and khaki until I was satisfied with the result.
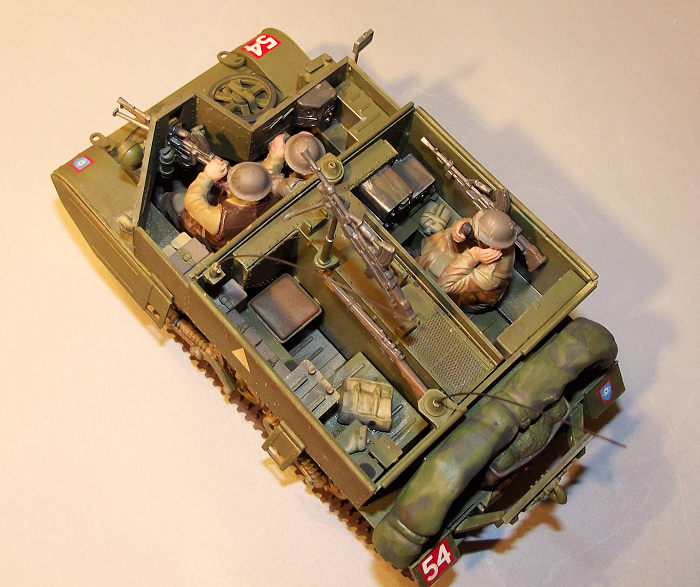
The rear compartment was filled up with the radio installation and an assortment of boxes and personal weapons. The dust shields and access ladders were fixed to the exterior of the bodywork. The front apron and vertical front armour shield were furnished with lights and brackets with the gun mount, steering wheel and small instrument cluster to the interior. Both panels were carefully test fitted around the front compartment without glue. The driver and gunner were juggled into position around the dry fitted steering wheel and Bren gun and once I was satisfied that they would line up the figures were secured with Revell Contacta cement that is slower drying and leaves scope to fettle the parts into position. The front apron and armour shield were eased into place and secured with the smallest amount of liquid cement applied with the tip of a brush. The last few external boxes were added around the front of the vehicle and the tow cable. Tamiya’s supplied thread was replaced with some aftermarket wire cable from a long-forgotten source.
| COLORS & MARKINGS |
The application of decals was a simple affair and they went on without fuss. The whole machine was left to settle and dry for a week before the finishing process. Using a small flat brush the exterior was gently dampened with Mig-1506 “Brown for Dark Green” filter, an enamel-based wash. After a further couple of days the whole was airbrushed with four or five misted coats of Mig 2051 Lucky Varnish which dries to a good matt finish.
| CONCLUSIONS |
 Even though this is such a small subject, barely
120mm long, it was surprisingly involving. It is also quite time consuming,
requiring breaks in construction and painting to let things dry. The preparation
and painting of the crew and accessories took longer than the vehicle build
itself. It is a well-engineered kit and a credit to Tamiya that it is still
buildable more than 40 years after its first release. It was a fun build and if
you do not like figures they can be omitted.
Even though this is such a small subject, barely
120mm long, it was surprisingly involving. It is also quite time consuming,
requiring breaks in construction and painting to let things dry. The preparation
and painting of the crew and accessories took longer than the vehicle build
itself. It is a well-engineered kit and a credit to Tamiya that it is still
buildable more than 40 years after its first release. It was a fun build and if
you do not like figures they can be omitted.
The whole process is beginning to fascinate me, for it is a different World from aircraft modelling. Friends and family are starting to joke about my new modelling habit as I acquire an ever-expanding stock of paints, washes, pigment, filters and thinners. This is aided, or perhaps not helped, by the fact that closely relate acrylics from the Vallejo and Citadel ranges are available from two fantasy gaming outlets in my hometown, as well as the basic Mig Ammo range at my LHS.
A refreshing change of modelling in my man cave.
6 December 2019
Copyright ModelingMadness.com
If you would like your product reviewed fairly and quickly, please contact the editor or see other details in the Note to Contributors.