| KIT #: | 35092 |
| PRICE: | £26.99. |
| DECALS: | Three options |
| REVIEWER: | Frank Reynolds |
| NOTES: | Kit includes extra figures by Master Box. Wheels replaced with aftermarket resin items from Panzer Art- RE35-355 Firestone type, price £11-99. |
| HISTORY |
The British Army was
familiar with desert operations in protecting their Empire supply lines between
the Mediterranean and the Eastern territories in the Indian Ocean and beyond,
with the Suez canal being a vital link. Between the two world wars a British
explorer, R.A. Bagnold, travelled extensively in the wastes of the
 North
African desert landscape and perfected methods of navigation and survival
suitable for an often featureless environment. In 1940 Italian forces based in
Libya began to threaten British territory in the Western desert and Bagnold was
drafted into the British Army to form a long range reconnaissance unit. It was
never intended to be an assault or raiding unit, but was tasked to carry out
covert observation of enemy troop movements. The unit had to be capable of
operating over long distances far behind enemy lines without any external
support. It was called the Long Range Desert Group. All personnel were
volunteers.
North
African desert landscape and perfected methods of navigation and survival
suitable for an often featureless environment. In 1940 Italian forces based in
Libya began to threaten British territory in the Western desert and Bagnold was
drafted into the British Army to form a long range reconnaissance unit. It was
never intended to be an assault or raiding unit, but was tasked to carry out
covert observation of enemy troop movements. The unit had to be capable of
operating over long distances far behind enemy lines without any external
support. It was called the Long Range Desert Group. All personnel were
volunteers.
Major Bagnold selected a suitable vehicle based upon the Canadian – built Chevrolet 15cwt truck in service with the Egyptian Army. Unusually for a North American-sourced truck in the British Army it had a right-hand drive configuration. Bagnall’s knowledge and expertise was put to good use in adapting a standard army troop transport to a specialised long range vehicle with uprated suspension, desert wheels/tyres and a condenser system to recirculate precious cooling water for the radiator. The glazed windshield was removed so that a concealed vehicle would not be betrayed by the sun reflecting off the glass. Everything they needed had to be carried on the trucks, fuel, food and ammunition.
| THE KIT |
 The kit was
first released in 1976 and reboxed a couple of times in the early 21st century.
This version includes a set of five figures by Master Box. Tamiya’s standard
tray-type box has full colour illustrations on the top and sides.
The kit was
first released in 1976 and reboxed a couple of times in the early 21st century.
This version includes a set of five figures by Master Box. Tamiya’s standard
tray-type box has full colour illustrations on the top and sides.
There are four main parts frames in a softish tan plastic. A few seam lines were evident but easily dealt with during construction by a swipe of a sanding stick or a little attention from a scalpel blade. Vinyl tyres are provided and poly caps to secure the wheels. No clear parts are supplied or needed.
The simple six page folded instruction sheet is printed in greyscale and shows eleven stages of construction. A small decal sheet provides a choice of three finishes, two in overall desert yellow and one in a shadow shading described by Tamiya as Middle Stone and Light Blue.
| CONSTRUCTION |
This project is the result of my gradual self-education programme in the use of the Ammo by Mig paints system had become a little more ambitious and the cost of the modelling subjects is beginning to creep up a little.
When building military vehicles that are essentially one colour, I find that it helps to paint all of the parts while they are still on the frames. The frames were first washed in a solution of water and domestic detergent to remove any mould release. After overnight drying the parts were primed by a series of lightly misted airbrushed coats of Mig 2027 Sand/Flesh base applied at 25 psi with my Iwata HP-C airbrush. After a further 24 hours drying the frames were painted with Mig acrylic 0-11 Dunkelgelb.
 Construction
begins with a one piece full length ladder frame chassis to which are added
three cross bars and pairs of leaf springs for the front and rear axles. The
chassis frame includes a half moulding for the lower part of the engine
crankcase as a simplified suggestion of the power unit in a typical fashion for
a kit of the period and that was fine for my purpose. The front and rear axles
were glued in next and simply attached to the leaf springs. The kit includes a
small correction slip for the instructions to ensure that the front axle is
correctly aligned. The resin wheels were set aside for installation later in the
build after the weathering of the bodywork. The front fender and support
brackets were glued in place, followed by the rear axle and drive shaft. The
chassis structure was set aside for a couple of days to cure.
Construction
begins with a one piece full length ladder frame chassis to which are added
three cross bars and pairs of leaf springs for the front and rear axles. The
chassis frame includes a half moulding for the lower part of the engine
crankcase as a simplified suggestion of the power unit in a typical fashion for
a kit of the period and that was fine for my purpose. The front and rear axles
were glued in next and simply attached to the leaf springs. The kit includes a
small correction slip for the instructions to ensure that the front axle is
correctly aligned. The resin wheels were set aside for installation later in the
build after the weathering of the bodywork. The front fender and support
brackets were glued in place, followed by the rear axle and drive shaft. The
chassis structure was set aside for a couple of days to cure.
The next sub assembly is the cab and hood. Tamiya has provided a chunky one piece unit that forms the cab floor, front fenders and grille. A one piece radiator slots in behind the grille but the hood is otherwise empty. The hood, instrument panel and hood sides fitted neatly into place over the curved fenders and the streamlined headlight units lined up on top of the fenders. The cab seat unit was painted dark brown and glued in place, adding the curved rear panel to the back of the driving compartment completed the basic build of the cab. Tamiya suggests that various external accessories, water cans, rifles, packs are added at this stage but I prefer to wait until the end of the build.
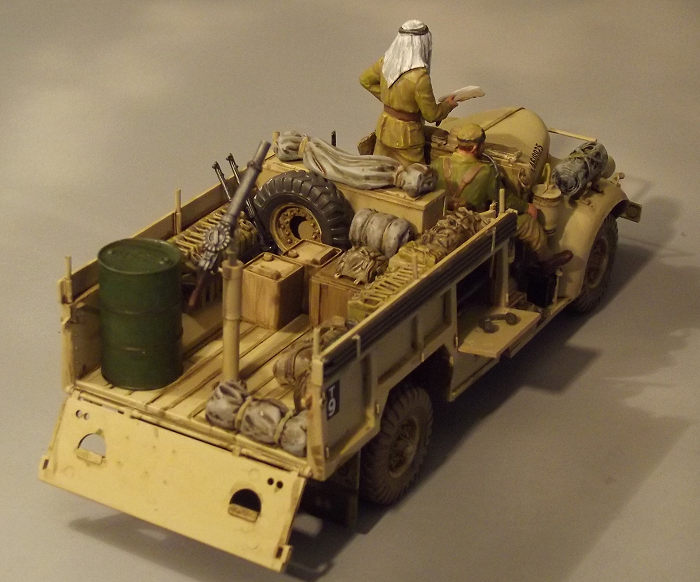
 The rear
body is formed as separate panels for floor, sides and back and with careful
assembly the drop down tailgate can be made to pivot. A radio box to the right
side of the body can be built with a fold down tray to add interest. The
construction of the rear body is completed with the installation of a storage
box to the front bulkhead and a pintle mount for a.303 Lewis gun. The rear load
section glues simply onto the chassis rails and basic construction is completed
with the installation of two underslung lockers to the rear body.
The rear
body is formed as separate panels for floor, sides and back and with careful
assembly the drop down tailgate can be made to pivot. A radio box to the right
side of the body can be built with a fold down tray to add interest. The
construction of the rear body is completed with the installation of a storage
box to the front bulkhead and a pintle mount for a.303 Lewis gun. The rear load
section glues simply onto the chassis rails and basic construction is completed
with the installation of two underslung lockers to the rear body.
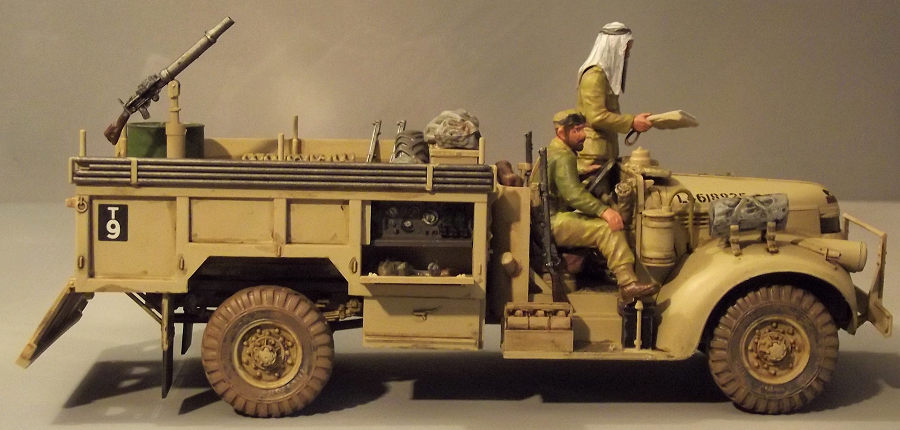
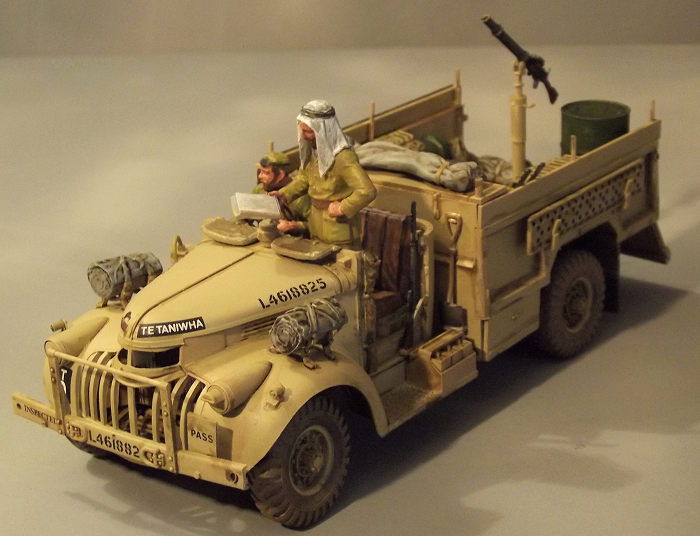
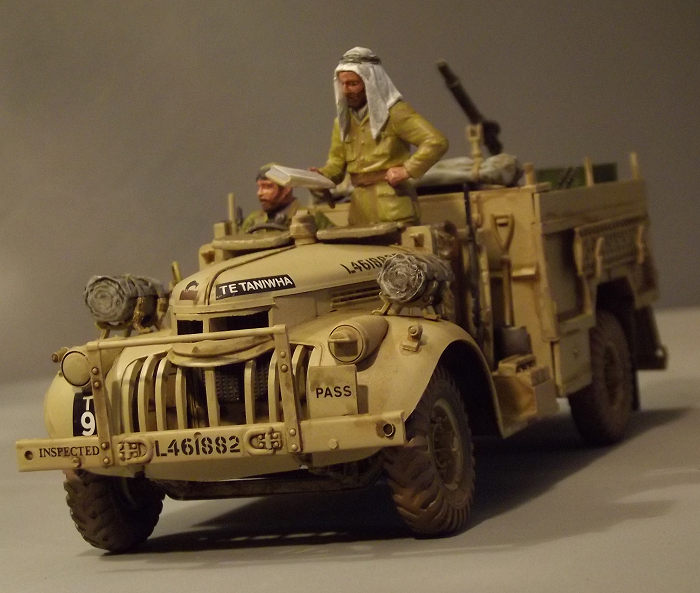
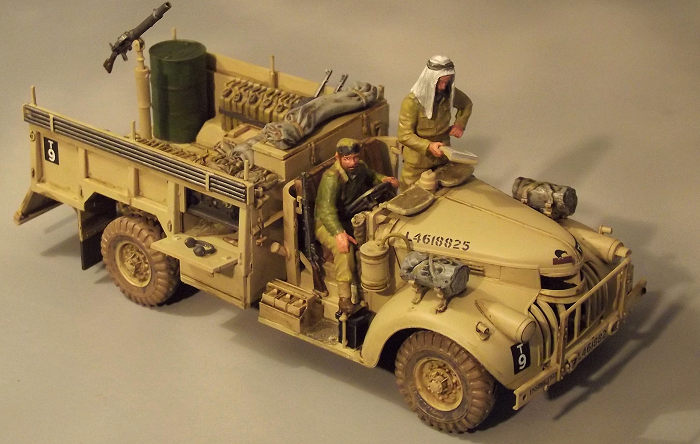
The fun now begins with the detail. The kit includes a rich selection of armament, boxes, water cans, sleeping bags and a spare wheel. The five figures are nicely sculpted by Masterbox and appear to be specifically made for the Tamiya kit. Painting, detailing and shading all of these elements took twice as long as the basic build. The resin wheels were fixed in place with medium setting cyano and they required some careful adjustment since they are not designed specifically for the Tamiya axles. The resin wheels were not critical to the build, it just happens that I do not like vinyl tyres and I always struggle to get a satisfactory finish with them,
| COLORS & MARKINGS |
 The basic
vehicle was touched in with brush painted Dunkelgelb to cover any scratches and
imperfections where parts had been trimmed and the paintwork highlighted with
the same colour modified with a little White. Then the various brackets and
fittings were added, including the unusual fold down canvas windscreens and
rolled up side screens for the cab door openings
The basic
vehicle was touched in with brush painted Dunkelgelb to cover any scratches and
imperfections where parts had been trimmed and the paintwork highlighted with
the same colour modified with a little White. Then the various brackets and
fittings were added, including the unusual fold down canvas windscreens and
rolled up side screens for the cab door openings
The minimal decals went on without fuss so the whole model was then over sprayed with matt finish Mig Lucky varnish and a series of misted coats provided a satisfactory dull matt finish.
A wash of Mig 1000 Brown and a filter of 510 Tan was applied to dirty the paintwork. The cab steering column and controls were juggled into place to accommodate the figures. The stores and weapons were positioned to complete the build with an oil drum from the spares box added to the load.
| CONCLUSIONS |
The truck is a reasonably simple kit and builds easily in spite of its years. It provides a useful canvas for messing around with washes and filters and I was surprised to find that it had taken about 30 hours to build spread over a couple of months.
Tamiya’s legacy mouldings are simpler than many 21st century state of the art military subjects but this one makes for a fuss free build.
| REFERENCES |
The Battle of Egypt, His Majesty’s Stationery Office/Ministry of Information, Britain, 1943.
The Army at War, Tunisia, His Majesty’s Stationery Office/Ministry of Information, Britain, 1944
April 2020
Copyright ModelingMadness.com
If you would like your product reviewed fairly and fairly quickly, please contact the editor or see other details in the Note to Contributors.
Back to the Main Page Back to the Review Index Page Back to the Previews Index Page