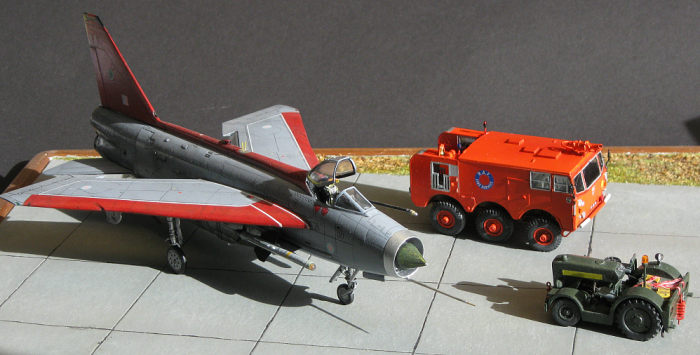
Ace 1/72 FV.651 Mk 6 Crash Truck
| KIT #: | 72434 |
| PRICE: | €16.00 from a vendor |
| DECALS: | Yes |
| REVIEWER: | Johan de Wolf |
| NOTES: |
| HISTORY |
At
the end of the second world war the British army started looking for a
replacement for its AEC heavy armoured car. The Alvis car and engineering
company responded with a design that would become the very successful F600
series. This was based on a modular 6x6 chassis 6x6 with independent torsion bar
units. The rear wheels are fixed and the front two are steered, which gives
these vehicles are remarkably short
 turning
circle. It was designed for off road performance. Use on hard surfaces however
can cause rapid wear on the transmission system. It is powered by a 6 liter
straight eight Rolls Royce engine of around 200 HP, and this is located at the
back. Production started in 1952 with the Saracen Armoured personnel carrier,
this was followed by the Saladin heavy armoured car, the Salamander crash tender
and finally the Stalwart amphibious cargo vehicle. When production ceased in
1971 a total of around 5000 vehicles, all versions included, had been produced.
Several of these where exported, and while they are long out of service with the
British armed forces, some continue to be used by other forces to this day.
Several examples are also in private hands.
turning
circle. It was designed for off road performance. Use on hard surfaces however
can cause rapid wear on the transmission system. It is powered by a 6 liter
straight eight Rolls Royce engine of around 200 HP, and this is located at the
back. Production started in 1952 with the Saracen Armoured personnel carrier,
this was followed by the Saladin heavy armoured car, the Salamander crash tender
and finally the Stalwart amphibious cargo vehicle. When production ceased in
1971 a total of around 5000 vehicles, all versions included, had been produced.
Several of these where exported, and while they are long out of service with the
British armed forces, some continue to be used by other forces to this day.
Several examples are also in private hands.
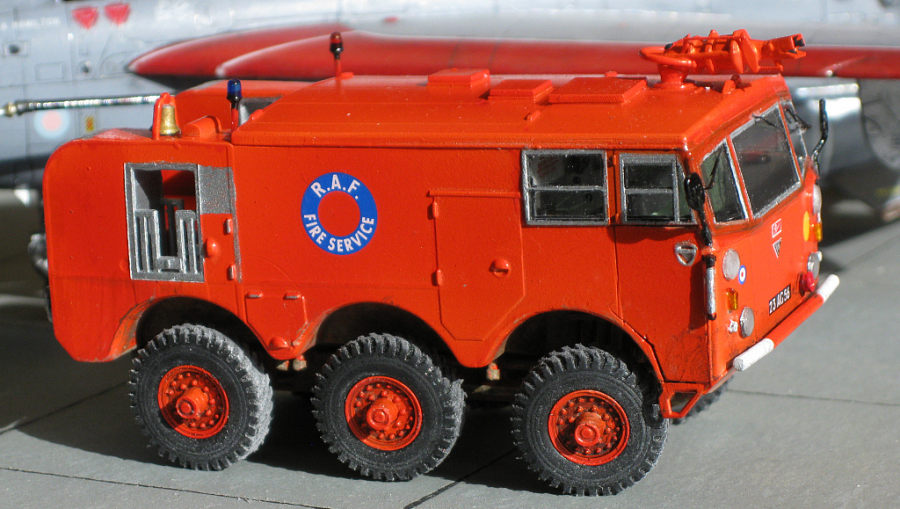
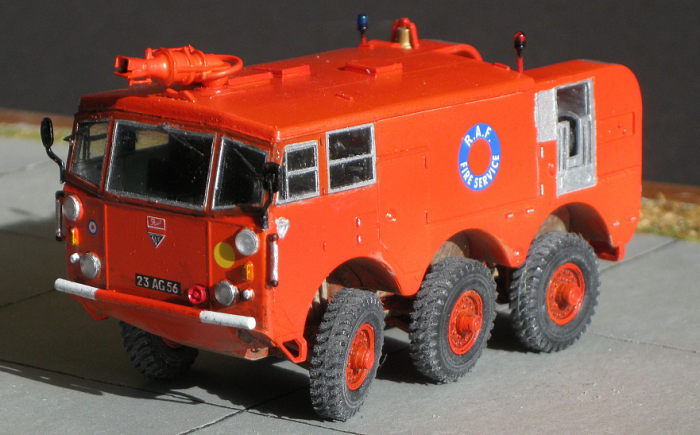
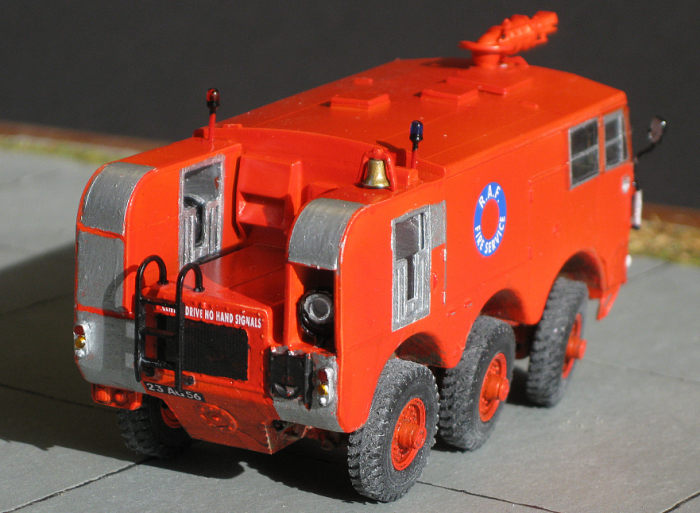
The Salamander Mk.6 Crash tender was in production from 1958 until 1963 by which time about 125 examples were built. They remained in RAF service until 1978. They served in coastal, fighter and transport commands, with the last ones being active in maintenance command. The Mk6. was produced in A, B, D and D version. The earlier versions can be recognized by a smaller foam gun with round nozzle on the cab roof. This makes the kit one of the later models, as it has the larger gun with square nozzle.
| THE KIT |
The kit
comes in standard, somewhat flimsy, top opening box.
The ziplock bag inside contains 4 light grey and 1 transparent sprue, making up
a whopping total of 173 parts. 5 of these are marked not for use. In a separate
smaller bag there are 6 rubber tires, a small etched fret with the windshield
wipers and the decal sheet. Finally there is an double sided A3-size leafet
making up 4 pages with the instructions. Al parts are
 finely cast
with raised and engraved detail where appropriate. First impressions are of
excellent quality. However be aware that this is a short run kit. A thorough
clean up and dry fitting will be the order of the day. Having said that, there
is no flash and mold miss match is minimal. Even though the sprue gates are
commendably small, the parts are tightly packed within the sprues. This will
make removing some of the parts rather difficult. The instruction leaflet starts
with a parts location diagram. This turned out to be indispensible for finding
some of the smaller parts. Next are just 12 construction steps in exploded
diagram form. The last page contains three 3-view drawings with painting and
decal placement instructions. Up on inspecting the decal sheet I noticed that it
was a misprint and most decals would be unusable. A quick message on facebook
and two weeks later I had a replacement in my letterbox. Great customer care
from the people at ACE.
finely cast
with raised and engraved detail where appropriate. First impressions are of
excellent quality. However be aware that this is a short run kit. A thorough
clean up and dry fitting will be the order of the day. Having said that, there
is no flash and mold miss match is minimal. Even though the sprue gates are
commendably small, the parts are tightly packed within the sprues. This will
make removing some of the parts rather difficult. The instruction leaflet starts
with a parts location diagram. This turned out to be indispensible for finding
some of the smaller parts. Next are just 12 construction steps in exploded
diagram form. The last page contains three 3-view drawings with painting and
decal placement instructions. Up on inspecting the decal sheet I noticed that it
was a misprint and most decals would be unusable. A quick message on facebook
and two weeks later I had a replacement in my letterbox. Great customer care
from the people at ACE.
| CONSTRUCTION |
Construction starts with steps Z
and Y which are the crew seats. Next is step A with the chassis pan, consisting
of 4 pieces. Step B then lets you add the forward bulkhead, the cabin floor and
the rear motor decking followed by the complete suspension. I chose to go
another way. On its own the chassis pan is not all that stable. So I saved the
suspension for later. I continued with step C that will ad the mudguards. The
whole structure is still rather flimsy at this stage, so I bypassed steps D and
E and continued with putting t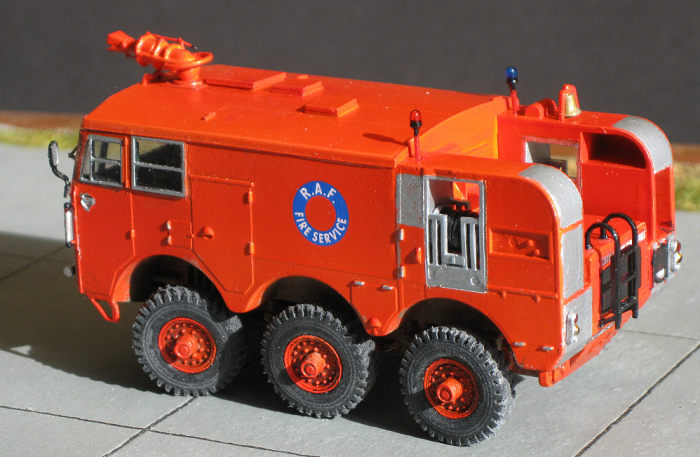 he
rear super structure together. This added another 16 parts, but did not help
much with the stability. So I skipped the rest of the parts to be added in step
F as well, and put on both side walls. Although these fitted well there were
still a few gaps that needed to be filled. Not putting the suspension on earlier
really helps here as everything is still easy to reach without the risk of
breaking off details. So with the main body mostly complete and sturdy enough to
handle, it was time for the suspension. This consist of no less than 23 parts
per side, some of which are truly tiny. It took quite a bit of cleaning up and
adjusting to get a good fit. This is really a job where having four hands would
be very helpful. But I managed to get it together with just two in the end and
once the glue was dry it proved to be quite strong. The cabin details were now
installed, adding another 30 parts. With the interior complete the cabin front
and windows can be added. These fitted very well, and are very clear. So most of
that lovely detail inside can still be seen. The cabin was now closed by adding
the roof and roof hatches.
he
rear super structure together. This added another 16 parts, but did not help
much with the stability. So I skipped the rest of the parts to be added in step
F as well, and put on both side walls. Although these fitted well there were
still a few gaps that needed to be filled. Not putting the suspension on earlier
really helps here as everything is still easy to reach without the risk of
breaking off details. So with the main body mostly complete and sturdy enough to
handle, it was time for the suspension. This consist of no less than 23 parts
per side, some of which are truly tiny. It took quite a bit of cleaning up and
adjusting to get a good fit. This is really a job where having four hands would
be very helpful. But I managed to get it together with just two in the end and
once the glue was dry it proved to be quite strong. The cabin details were now
installed, adding another 30 parts. With the interior complete the cabin front
and windows can be added. These fitted very well, and are very clear. So most of
that lovely detail inside can still be seen. The cabin was now closed by adding
the roof and roof hatches.
| COLORS & MARKINGS |
Before painting, I made my own masks for the windows, which wasn’t to difficult
as they are all flat. I started with spraying the cabin area in duck egg green,
the interior colour. This was followed by Vallejo white primer from a rattle
can. Now most of the machine was masked leaving only the parts that were to be
painted aluminium exposed. After this had dried for a few days, the masking was
reversed, covering only the aluminium bits. Then several layers of MRP-184
signal red where sprayed on until I had a reasonably even finish. This was left
to dry. I wasn’t to sure about the decals, but I need not have worried. They
performed flawlessly, without the need for a solvent agent. Masking was removed
at this stage. To seal
 everything in
I decided I’d try MRP super clear. Thinking it would be ok I just sprayed it on
an everything looked fine. That is until it had fully dried. To my horror I
discovered the laquer had attacked the clear plastic, and all windows where
frosted. After it had been sitting on my desk for a few weeks I decided I could
not live with it in this state, and I carefully removed the windows. Thanks to
the wood glue I used, this was possible without damaging any of the details
inside. I tried to polish the windows back to their former transparency, but to
no avail. So I once again sent a message to the good people at ACE asking if it
would be possible to buy the transparent sprue separately. They told me they
didn’t sell these separately themselves, but directed me to a dealer in the
Ukraine. Long story short, three weeks later I had a new transparent sprue.
everything in
I decided I’d try MRP super clear. Thinking it would be ok I just sprayed it on
an everything looked fine. That is until it had fully dried. To my horror I
discovered the laquer had attacked the clear plastic, and all windows where
frosted. After it had been sitting on my desk for a few weeks I decided I could
not live with it in this state, and I carefully removed the windows. Thanks to
the wood glue I used, this was possible without damaging any of the details
inside. I tried to polish the windows back to their former transparency, but to
no avail. So I once again sent a message to the good people at ACE asking if it
would be possible to buy the transparent sprue separately. They told me they
didn’t sell these separately themselves, but directed me to a dealer in the
Ukraine. Long story short, three weeks later I had a new transparent sprue.
After several masking and painting sessions, the new windows where ready to be installed. Sadly I could not get them to fit as well as the first set did. But still it looks a lot better than the frosted ones. With total disaster averted an a few paint touch ups later, it was time to add the last bits to the outside of the Mk.6. All in almost another 50 parts like the foam gun, the head lights, signal lights, the steps on the back, rear view mirrors and finally the etched windshield wipers. Before putting on the wheels I dirtied up the suspension and underside of the body, but I kept the upper body mostly clean of weathering. Judging from photographs, this, like other fire fighting equipment, was generally kept in an excellent state.
| CONCLUSIONS |
Some sections of the body have been broken down into more parts than I would have liked, causing the less than stable first construction steps. This will surely be down to the limitations of short run technology, but I recommend everyone that want to build this kit to divert from the construction sequence like I did. The instructions might also have been broken down into more steps to make certain aspects of construction clearer. To keep track and make sure I did not forget any of the small parts, I crossed each installed part of the construction drawing, and the sprue diagrams, and this saved me quite a few times. This is most certainly not a slap together kit for a beginner. However if you treat it with respect and have some patience, you will be rewarded with an amazing little model that packs a lot of detail. And it certainly looks every bit as quintessential British as its original.
| CONCLUSIONS |
I thoroughly enjoyed putting this kit together and I am very tempted to buy another one and do it in the later green scheme with yellow band.
7 September 2021
Copyright ModelingMadness.com. All rights reserved. No reproduction without express permission.
If you would like your product reviewed fairly and fairly quickly, please contact the editor or see other details in the Note to Contributors.