
| KIT #: | MT-26 |
| PRICE: | AUD$ 9.00 |
| DECALS: | Two options |
| REVIEWER: | George Oh |
| NOTES: | A beautifully fitting kit |
| HISTORY |
I am an Australian soldier, so I can
appreciate the vital role that camouflage and deception play for an Army
deployed in the field. And I am a
modeller who enjoys building WWII and thinking outside the square.
While doing some more private research (= reading books) about
camouflaging, I happened on photos and a description of how the British could
disguise a WWII Crusader tank to make it look like a truck to a distant casual
observer. This was done by putting
a camouflage kit, code-named a ‘SUNSHADE’, over the tank.
As an aside, tanks were often seen still with the disguise kit still in
place because of the shade it provided.
| THE KIT |
 I
read Tom Roskelly’s review of this kit in MM, and as Tom’s review made it seem
like an easy build, and as I knew I had one of these in my stash, I extracted it
and set to work. In fact, I found
that I had two. But I like
something different, so I decided to extend my two Crusaders.
My idea was to build six dummy tanks being towed by the two Crusader
tanks. But I got bogged-down with
the soldering side of the project, so I reduced my build to two (or one) dummy
tanks behind one Crusader tank (but that is another story).
This left me with a spare tank.
So I concentrated on this one, and decided to build it disguised as a
truck - besides, the execution sounded easier to do.
I
read Tom Roskelly’s review of this kit in MM, and as Tom’s review made it seem
like an easy build, and as I knew I had one of these in my stash, I extracted it
and set to work. In fact, I found
that I had two. But I like
something different, so I decided to extend my two Crusaders.
My idea was to build six dummy tanks being towed by the two Crusader
tanks. But I got bogged-down with
the soldering side of the project, so I reduced my build to two (or one) dummy
tanks behind one Crusader tank (but that is another story).
This left me with a spare tank.
So I concentrated on this one, and decided to build it disguised as a
truck - besides, the execution sounded easier to do.
| CONSTRUCTION |
The assembly entailed a lot of too’ing and
fro’ing between construction and painting.
Suffice to say that all painting was done on parts or assemblies, but it
was completed prior to final assembly.
Still, a little touch-up painting was needed before completion.
(I built the other tank at the same time).
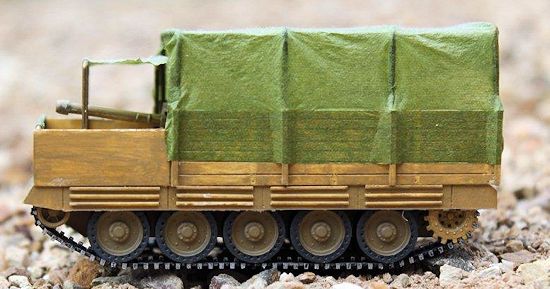
I built her in a buttoned-down format.
 The kit instructions and the photo of the
disguised tank showed full length track guards along the sides of the tank hull,
but the kit didn’t provide them.
Pity, because these are what some of the pieces of the disguise kit rested on.
Fortunately, they were easily fabricated from plastic card.
For structural strength (and because I’m lazy) I cut each track guard and
its two disguise side boards as a single piece of card.
Detail was scribed on, or glued.
The track guard element was painted as often as the tank hull while the
side boards received fewer coats to give them a lighter shade.
The kit instructions and the photo of the
disguised tank showed full length track guards along the sides of the tank hull,
but the kit didn’t provide them.
Pity, because these are what some of the pieces of the disguise kit rested on.
Fortunately, they were easily fabricated from plastic card.
For structural strength (and because I’m lazy) I cut each track guard and
its two disguise side boards as a single piece of card.
Detail was scribed on, or glued.
The track guard element was painted as often as the tank hull while the
side boards received fewer coats to give them a lighter shade.
Painting.
As per the kit instructions, the tank was
painted Desert Sand – the Citadel Miniatures Desert Sand was a near-enough shade
to midstone. The hardened tissue of
the ‘truck’ canopy wasn’t painted as it was already a colour that resembled the
bronze green of a standard canvas.
| CONSTRUCTION CONTINUES |
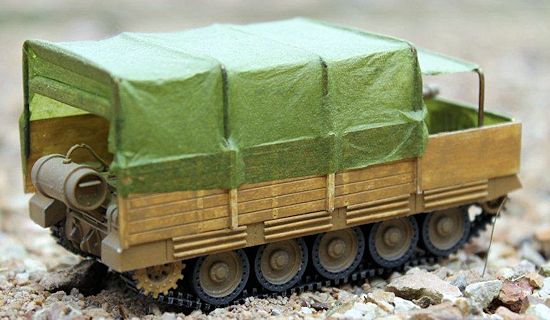
The completed tank and the camouflage kit
were brought together. With the
tracks in position, I glued the track guards into place with plastic cement.
This positioned the side boards onto which I superglued the bows
(with a few adjustments). Over
this, I placed the 4 canvas pieces - made of wrapping tissue soaked in
diluted whiteglue. There were
three longitudinal pieces and a transverse piece.
At the rear of the first l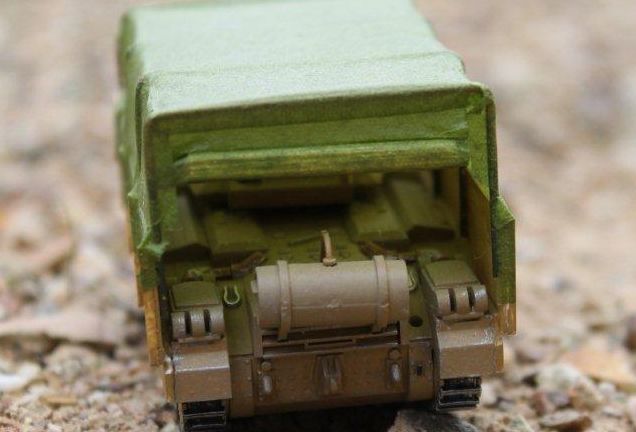 ongitudinal piece, the tail flap was
rolled-up for the benefit of people looking at my model, and the front flap
was folded up under the roof of the “canvas cover” for the benefit of the
tank crew (they could see out).
The other longitudinal (but short) canvas pieces were the “roof of the cab”
and the “front of the truck”.
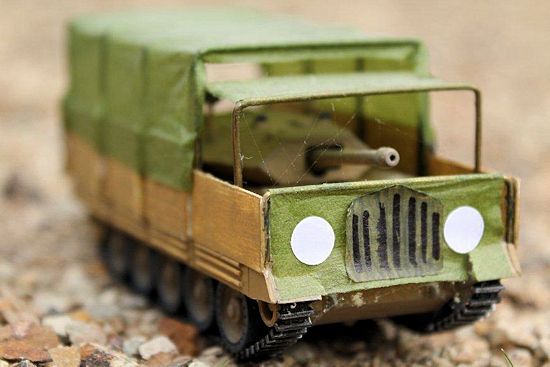
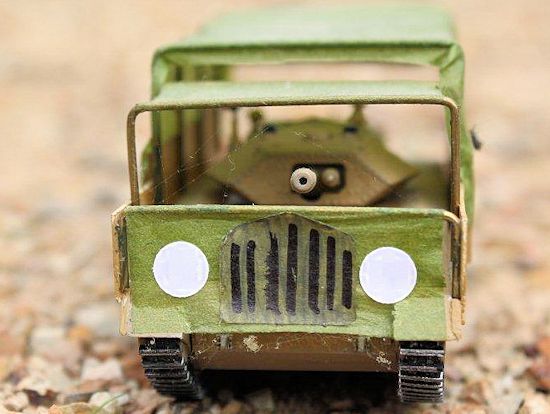
This last piece hangs vertically, and received some paint to replicate the
headlights and the radiator. I
left-off two pieces from the ‘cab’ of the ‘truck’ – the vertical
‘windscreen’ and the horizontal ‘bonnet/hood/engine cover’.
There were reasons for these omissions -
my own sanity, so the tank crew
would have some air circulation (= cooling), so the crew could see to drive,
and so they could quickly deploy the main gun.
But to the casual observer, and you, she still looks like a truck
(doesn’t it?).
ongitudinal piece, the tail flap was
rolled-up for the benefit of people looking at my model, and the front flap
was folded up under the roof of the “canvas cover” for the benefit of the
tank crew (they could see out).
The other longitudinal (but short) canvas pieces were the “roof of the cab”
and the “front of the truck”.
This last piece hangs vertically, and received some paint to replicate the
headlights and the radiator. I
left-off two pieces from the ‘cab’ of the ‘truck’ – the vertical
‘windscreen’ and the horizontal ‘bonnet/hood/engine cover’.
There were reasons for these omissions -
my own sanity, so the tank crew
would have some air circulation (= cooling), so the crew could see to drive,
and so they could quickly deploy the main gun.
But to the casual observer, and you, she still looks like a truck
(doesn’t it?).
| CONCLUSIONS |
| REFERENCES |
The kit instructions, a profile photo, a description, and extracts of the (WWII) War Office Technical Instruction.
July 2013 If you would like your product reviewed fairly and fairly quickly, please
contact the editor or see other details in the
Note to
Contributors.