
Roden 1/35 British Armored Car
| KIT #: | 801 |
| PRICE: | $51.00 at www.greatmodels.com |
| DECALS: | Two options |
| REVIEWER: | Bill Koppos |
| NOTES: | Neat Subject |
| HISTORY |
Hey!
Guess what? Another Bill Koppos favorite is the subject of a mainstream kit. "Tis
a Golden Age of modelling were living in. This time it's the 1920 pattern
Rolls-Royce Armored car. I've been into this one since I read the old Ballantine
book "Beda Fomm", concerning the British victories against the Italians in
Libya, 1940. This was a truly amazing campaign, where the Brits practiced their
own little Blitzkreig against a much less mobile, but much larger Italian Army.
Seems the armored Rolls played a part in this as part of the 11th Hussars, often
in a recon but also a combat role. Turns out these hard-to-kill relics of the
First War were found all over the middle East, from Libya to Iraq. Others did
patrol duties on English beaches in the dark days after Dunkirk, one of the few
armored vehicles left in the British Isles. It is, to me, a neat looking thing,
it's squarish, jalopy body festooned with rivets, looking for all the world like
a throwback to Jules Verne. So as soon as Roden's new kit appeared on the LHS
shelf, I took it home.
me, a neat looking thing,
it's squarish, jalopy body festooned with rivets, looking for all the world like
a throwback to Jules Verne. So as soon as Roden's new kit appeared on the LHS
shelf, I took it home.
The design of course dated back to 1914. All Rolls- Royce "Silver
Ghost" chassis were requisitioned, up-engined, and an Admirality Air Department
(!) designed armored body and turret installed. The massive armament of one
Vickers .303 machine gun was in the turret. The armor was proof against normal
rifle rounds, shell fragments, and not much else. As long as the Western front
in France was fluid, they were useful for scouting, but when the trenches closed
in they were done. Better employment was found in the desert arenas, where they
served until war's end. Plenty were left to upgrade in 1924, solid wheels
replacing the elegant spoked ones, and the armor thickened slightly.
A new War in 1940 found about 75 of the 110 cars made in Middle East
Service, some in Egypt facing the Italians and in Iraq, helping to quelch an
attempted pro-Axis coup which would have landed all the oil there in Hitler's
lap. Part of this was a Squadron of Royal Air Force cars at Habbinaya Air Base
outside Baghdad which played a large part in the defense of the outpost. Another
part of the Rolls-Royces involved here were converted onto heavier-duty Fordson
chassis, with modified turrets mounting twin Lewis guns and a Boyes anti-tank
rifle. When hostilities ended in Iraq, these poor things were actually driven
back to North Africa and used some more. Their last hurrah was during the
Crusader offensive, finally being used up. However cars continued in service in
India and the U.K. until there were just no parts left, and the old soldiers
faded away.
| THE KIT |
 Roden's
first armor kit has a weird box art featuring a buttoned-up car in an apparent
English countryside scene with two gentlemen, a Rolls Silver Ghost, and a
bulldog. I guess there was liscensing problems for it is called a "World War 2"
British Armored car. Once past the box one finds 8 sprues, 2 being wheel and
rims. Also in there are 2 sets of rubberlike tires, which we will discuss and
cuss later. There is a well done engine , which is not provided with any open
hatches to see it with. The plastic is greenish, similar to Zvezda tank stuff.
Sink marks are few, but ejector pins and marks abound, some in bad places.
Molded detail is generally OK, the characteristic rivets are done well.
Roden's
first armor kit has a weird box art featuring a buttoned-up car in an apparent
English countryside scene with two gentlemen, a Rolls Silver Ghost, and a
bulldog. I guess there was liscensing problems for it is called a "World War 2"
British Armored car. Once past the box one finds 8 sprues, 2 being wheel and
rims. Also in there are 2 sets of rubberlike tires, which we will discuss and
cuss later. There is a well done engine , which is not provided with any open
hatches to see it with. The plastic is greenish, similar to Zvezda tank stuff.
Sink marks are few, but ejector pins and marks abound, some in bad places.
Molded detail is generally OK, the characteristic rivets are done well.
A decal sheet provides markings for two machines, a U.K. patroller, and a desert car in Iraq. (You know which one I'm doing). The roundels for the turret top are given in decal form. There is also an acetate sheet to cut out for the head/searchlights.
| CONSTRUCTION |
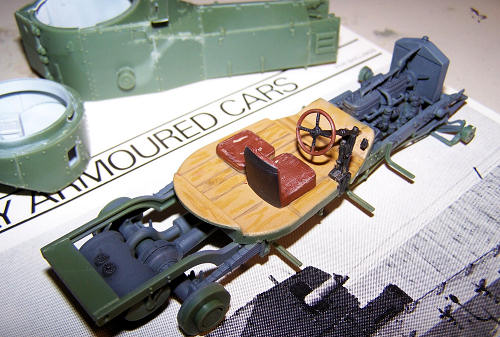
The engine you'll never see is built first. I assembled it all on the chance
you'll see some from underneath. Also this unit serves as part of the frame,
holding the front part together. There are many parts to align in the frame
assembly, but it works out well and squares up. There are many steps in the
picture-only plans but most of these are sub-assemblies like fuel tanks, muffler
 and seats. The front and rear axles are built now and attached under the frame.
I veered from the plans here and left the wheels/tires off till after painting,
just installing the axles with their springs and shafts etc. It's a shame about
the engine as it is quite nicely done, someone more ambitious might cut open the
hood and show it. I decided to paint up the interior, as turret removal allows
some of this to be seen. I assumed the floor to be wood and painted it thusly,
with leather seats (it IS a Rolls-Royce you know) and light grey walls and
turret sides. I sprayed the underside and engine with a dark grey mix at this
time. I took a picture of the chassis, engine and interior before close-up.
and seats. The front and rear axles are built now and attached under the frame.
I veered from the plans here and left the wheels/tires off till after painting,
just installing the axles with their springs and shafts etc. It's a shame about
the engine as it is quite nicely done, someone more ambitious might cut open the
hood and show it. I decided to paint up the interior, as turret removal allows
some of this to be seen. I assumed the floor to be wood and painted it thusly,
with leather seats (it IS a Rolls-Royce you know) and light grey walls and
turret sides. I sprayed the underside and engine with a dark grey mix at this
time. I took a picture of the chassis, engine and interior before close-up.
At this point the armored body can now be put together, all the large parts fit well. NOW I got ambitious and decided to open the drivers visor, and ,as many pictures show, the radiator shutters (armor plate does not let in much cooling air). This looked easy enough to do, I just opened them and left the brackets all the way out of the slots provided. The driver's visor was a separate part, I thinned it, glued it in an "up" position, and made a small prop rod as per pictures. Simple and easy. (Oh, yeah? More on that later).
Time to put the body to chassis, this fit surprisingly well, sitting just right.
On this kit the small parts can be a right pain, but the large assemblies give
no trouble. I'll take it. The turret parts fit well too. A hanging seat for the
gunner is in there, and some Lee-Enfield rifles are to be in the turret, but
these are poorly molded, and no kind of rack is given anyway so I omitted these.
I left out the Vickers main armament till after painting to make masking easier.
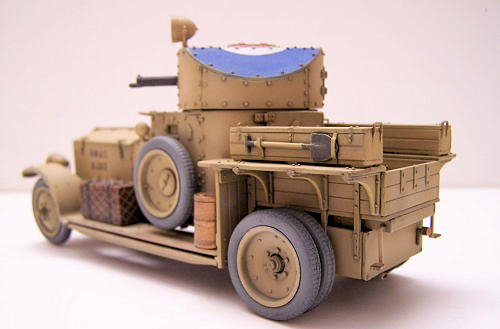
The pick-up truck rear body is now assembled and
 installed, having many flat
panels and stowage boxes. Follow the drawings with care to get these right.
The front fenders are next, these having bad ejector marks on the underside. I
did some sanding on them but it won't win any AMPS Gold Medals. Now, the running
boards go on, and underneath these are what I take to be ditch-crossing ramps.
The kit shows the left side stowed under the running board, with the right
stowed sideways against the armored body, a larger spacer for the spare tire
given to allow for this. I could not find a single photo that showed this
arrangement, so I just did as per the left side, under the running board. I
shaved down the spare spacer to suit. Sure hope I'm right.
installed, having many flat
panels and stowage boxes. Follow the drawings with care to get these right.
The front fenders are next, these having bad ejector marks on the underside. I
did some sanding on them but it won't win any AMPS Gold Medals. Now, the running
boards go on, and underneath these are what I take to be ditch-crossing ramps.
The kit shows the left side stowed under the running board, with the right
stowed sideways against the armored body, a larger spacer for the spare tire
given to allow for this. I could not find a single photo that showed this
arrangement, so I just did as per the left side, under the running board. I
shaved down the spare spacer to suit. Sure hope I'm right.
Around now I'm getting ready to paint my Rolls, and went to attach the headlight buckets to the chassis. Remember those radiator shutters I cleverly opened? Yup, that came around and bit me in the ass. It seems the headlights will NOT fit where they belong with the open shutters, despite MANY pictures showing this quite possible. Geometry trouble? A mirage? The gods of plastic giving me the finger? At any rate I broke the shutters off, redid the actuator brackets, cleaned up the glue-smeared doors and shut them up tight. Go ahead and overheat. See if I care.
| COLORS & MARKINGS |
First I removed the turret and masked the driver's opening from inside, and closed of the M.G. hole and put the turret back on. I set up the wheels to be painted as well ,taping them to a board. First I gave the whole thing a coat of Flat Black. I'm not sure what color British "Sand" is, so I started with good old Model Master RLM 79 Sandgelb, slightly lightened with white. I went easy on seam areas and undersides, trying to get a "pre-shaded" look, letting just a hint of the black base show through Then I applied a lightened coat of MM "Afrika Braun '42", which is a lighter sand, to the centers of the panels and wheels to get a variance of color on a single-color machine.
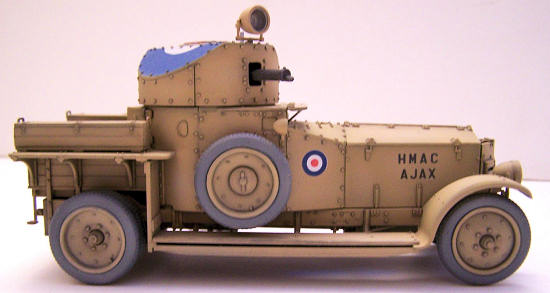 The areas for the decals was now glosscoated with MM Metallizer Sealer. Decals
consist of the air-recognition turret top roundel, two small side roundels and
the individual car I.D., jaunty names being give appropriate to the theatre,
such as "Adder", "Euphrates", or "Explorer", preceded by "HMAC", His Majesty's
Armored Car, of course. The decals worked fine, not really needing any setting
solution, but I applied some Solvaset anyway. I wanted to paint the turret top
roundel, as there were too many large rivets here for any decal. First I masked
the sides, then shot the Flat red center, masked this using a circle template,
then the white was sprayed, masked and the True Blue outside laid down. I was
very happy with it at this point.
The areas for the decals was now glosscoated with MM Metallizer Sealer. Decals
consist of the air-recognition turret top roundel, two small side roundels and
the individual car I.D., jaunty names being give appropriate to the theatre,
such as "Adder", "Euphrates", or "Explorer", preceded by "HMAC", His Majesty's
Armored Car, of course. The decals worked fine, not really needing any setting
solution, but I applied some Solvaset anyway. I wanted to paint the turret top
roundel, as there were too many large rivets here for any decal. First I masked
the sides, then shot the Flat red center, masked this using a circle template,
then the white was sprayed, masked and the True Blue outside laid down. I was
very happy with it at this point.
Now about those gosh-darned rackety frack tires. I hate rubber tires to begin with, as many of you do. But Roden compounded the problems by putting the sprue gates on the tire's OUTSIDES, leaving 3 impossible to remove blemishes on each one. I tied to clean up the damaged treads with a new # 11 blade as carefully as possible with poor results. After considerable fooling around and cursing, I went to paint them, settling on Neutral grey based on pictures. I laid them out, sprayed one side and went back the next day to flip them. I found them still totally tacky and gooey, as if just sprayed. Another day made no difference. Grrrrrr. I set them up on a stick and did the other side, then gave them a flatcoat. This helped a little. A day later and they were STILL tacky, but we must move on. Attempting to mount them on the wheels was fun, some of them still show fingerprints. In fact to this day they still are slightly tacky. Next time, plastic tires please, Roden.
| FINAL CONSTRUCTION |
Let's put our car on it's tacky wheels. The fronts are supposed to be toed in
quite a bit according to the plans and pictures. On our British workhorse we
have some sort of valise/footlocker with surrounding ropes and a brass Oil (?)
can to mount on the left running board. These were painted and installed. I used
rust for the valise and buff for it's ropes. The Turret was
 properly armed with
it's gun metal painted Vickers gun, and top mounted searchlight attached. The
Vickers is shown with a small shield in the kit, but few pictures show this so I
left it off.
properly armed with
it's gun metal painted Vickers gun, and top mounted searchlight attached. The
Vickers is shown with a small shield in the kit, but few pictures show this so I
left it off.
I applied a wash of burnt umber to each rivet, hinge and armor plate seams, then drybrushed with very lightened Afrika Braun, to pop out the rivets and contrast the Umber. All desert vehicles I see are very bleached looking, I would rather make my vehicles on the lighter side. I mixed Testor's dullcoat, Afrika Braun and White as a final dustcoat, mostly on lower areas and tires. I just don't see that much chipping on desert vehicles as is the current fad, so mine is chip free. Turning the car over, the muffler was slightly rusted and some oil goop applied to the engine undersides, various washes trying for a dirty look and some scratches applied.
The final touch was a trick I picked up on an Armor site, the headlight and searchlight shells were filled with 5-minute epoxy to be lamps. This came out a bit uneven but looks OK. I'll do better next time.
| CONCLUSIONS |
 After all those books I needed a base, and the Osprey "Iraq 1941" had a dandy,
showing the sign outside RAF Habbaniya airbase, with the bottom half in Arabic
and a roadsign for Baghdad and London. How cool! Googling "RAF Habbaniya" showed
more with several variants, so mine is a composite. I found a proper looking
font and size and printed myself a set of signs, carefully hand painting the
Arabic part with Vallejo black. The big sign is just two sheets of comp paper,
the roadsign backed with sheet styrene. Frames are Evergreen HO 1x2's, and I
used a piece of railroad landscape wall.
After all those books I needed a base, and the Osprey "Iraq 1941" had a dandy,
showing the sign outside RAF Habbaniya airbase, with the bottom half in Arabic
and a roadsign for Baghdad and London. How cool! Googling "RAF Habbaniya" showed
more with several variants, so mine is a composite. I found a proper looking
font and size and printed myself a set of signs, carefully hand painting the
Arabic part with Vallejo black. The big sign is just two sheets of comp paper,
the roadsign backed with sheet styrene. Frames are Evergreen HO 1x2's, and I
used a piece of railroad landscape wall.
All in all a good kit, as with most it has it's issues but the bottom line is a darn nice Rolls-Royce British WW2 armored car can be made from it, if you have some experience in armor building. So I call it a winner.
| REFERENCES |
Thanks to If you would like your product reviewed fairly and quickly, please contact me or see other details in the Note to Contributors.