| KIT: | Airfix 1/72 RAF Refueling Set |
| KIT #: | 03302 |
| PRICE: | $8.98 |
| DECALS: | one option |
| REVIEWER: | Greg Ewald |
| NOTES: | Second model in the set. |
| HISTORY |
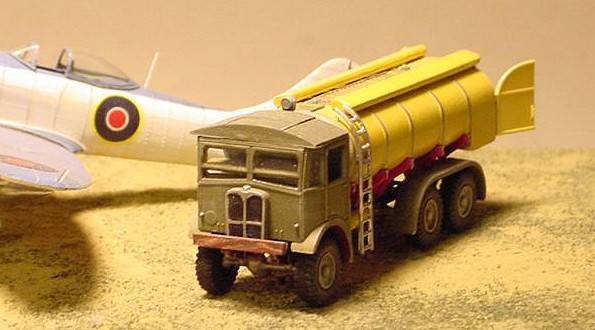
With the need for heavier bombers, there came the need for a heavier refueling truck, and the Matador AEC filled the bill. Capable of carrying over 2,000 gallons of fuel and driven by six wheels, the Matador served at a variety of airfields during, and after, world war two. It’s drive train was so strong that it could even be used to tug Sunderland flying boats ashore ! Field modifications were common, and the chassis was used as the base for many different versions, including mobile cranes and hauling platforms.
| THE KIT |
The second half of the Airfix kit is a little less impressive than the first, with a lower number of parts that build into a larger vehicle. Once again, the interior cab detail is so sparse as to be almost non-existant, but with plenty of room for superdetailers and scratchbuilders to have a field day!
The instructions are compromised of four steps, with exploded diagrams, just below the first vehicle we discussed in the earlier review.
| CONSTRUCTION |
 The first thing to tackle is
the assembly of the cab, 13 pieces being glued together without any locating
pins…a little bit tricky, but the fit of the parts is quite fine, and I found
that by putting on the back panel (66) initially, and then the side panels and
front, it went together fairly well, and required no putty at all. There
is a driver figure included in this step, (one of those amputated jobs) if you
would like to have someone behind the wheel.
The first thing to tackle is
the assembly of the cab, 13 pieces being glued together without any locating
pins…a little bit tricky, but the fit of the parts is quite fine, and I found
that by putting on the back panel (66) initially, and then the side panels and
front, it went together fairly well, and required no putty at all. There
is a driver figure included in this step, (one of those amputated jobs) if you
would like to have someone behind the wheel.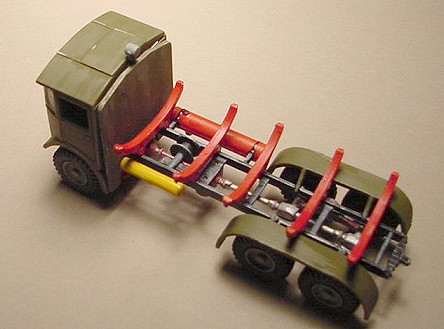
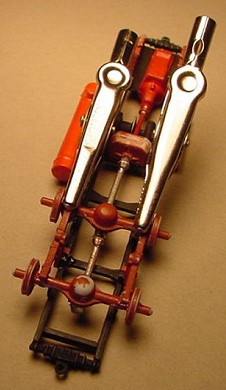
The drive train assembly is rather odd, and does require some finagling to get each part to snug with the fit, especially the rear leaf springs and differential casts. Using four alligator clamps, I was finally able to get the rear mounts to sit correctly, adhering it all together with CA glue…this would be a nightmare with anything else.
I had to remove the front leaf spring assembly from the lower chassis to get the cab to sit straight in step 7, as the radiator bumped into it. A little bit of filing, and I reattached it with gap filling glue, no harm done! At the same time, I added on a basswood bumper, to replicate the wooden push bars often used on these vehicles.
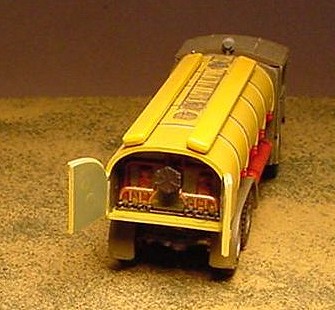
Building the tank was simple, and required just a little bit of putty along the horizontal seams to make it look right, much unlike the previous molding (Bedford). Unfortunately, the interior detail is sparse, you may want to glue the doors in a shut or semi-open position.
| COLORS & MARKINGS |
 I used black and
field drab (model master, testor’s acrylic) for the base colours of the chassis
and cab, and insignia yellow muted with a little orange for the tank.
I used black and
field drab (model master, testor’s acrylic) for the base colours of the chassis
and cab, and insignia yellow muted with a little orange for the tank.
Weathering was done with several thin washes of oily black and olive drab, then the metal highlights were punched up using a silver sharpie marker.
Krystal Klear provided the windows, but you could also use sheet plastic. (save those blister packages!)
| FINAL BITS |
Details were picked out with some chrome paint and a toothpick, and a semigloss black went on the tires for a bit of a rubbery look.
| CONCLUSIONS |
No where near as neat of a kit as
the Bedford, but still suitable for conversion to different platforms, and would
work out well in small scale dioramas.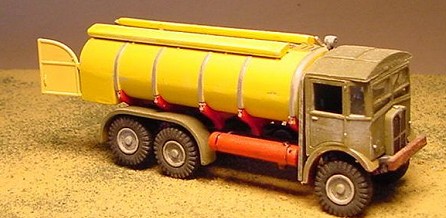
December 2005
| REFERENCES |
http://www.nationaltransportmuseum.org/mv002.html
Review kit courtesy of: Me
If you would like your product reviewed fairly and quickly by a site that has over 300,000 visitors a month, please contact me or see other details in the Note to Contributors.