| KIT #: | 32516 |
| PRICE: | $18.00 MSRP |
| DECALS: | Four options |
| REVIEWER: | Mike Dudek |
| NOTES: | 2 crew figures included |
| BACKGROUND |
Check out the preview for some background and a look inside the box.
| CONSTRUCTION |
My usual routine for building an
armor model is to assemble as much as I can before doing any painting. This
usually means that I 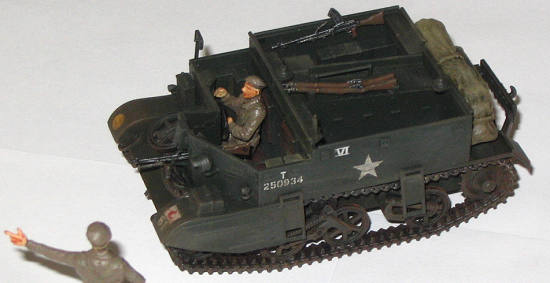 will
build the hull and turret up, and leave off small details like tools,
machineguns, suspension & tracks, until after painting. I decided to follow this
approach with the Universal Carrier, except, of course, it has no turret.
will
build the hull and turret up, and leave off small details like tools,
machineguns, suspension & tracks, until after painting. I decided to follow this
approach with the Universal Carrier, except, of course, it has no turret.
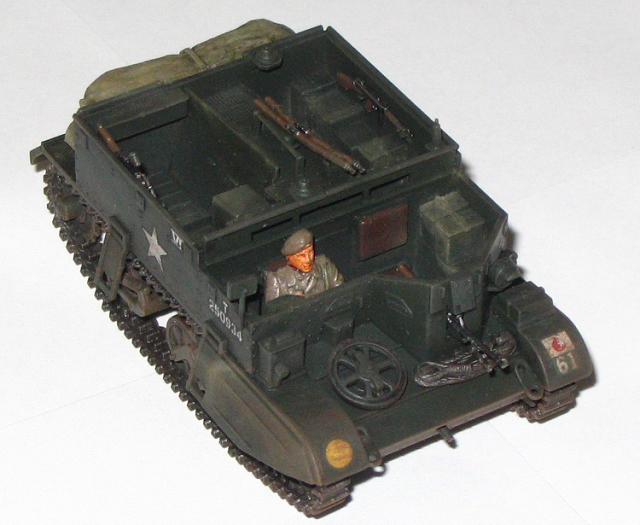
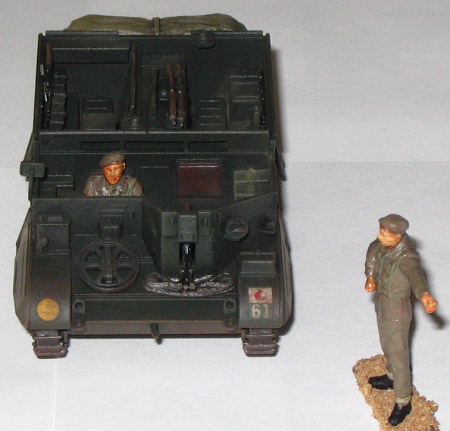
Being from Tamiya, you would expect an excellent fit, and this kit was no exception. Although the hull was multi-part, with a separate floor, side panels, rear panel, and 2 piece front armor, they all fit well with a little care during assembly. One choice I had to make during assembly was whether or not to use the crew figures, as the driver is a tight fit into his compartment if you decide to do it later. I decided I would use the figures, even though I’m not much of a figure painter, as I felt they were important to show the diminutive size of the Carrier (in 1/48 scale, the Carrier is no bigger than a lot of 1/72 armor!). Once I had the major hull components together, I was able to see that you could get driver in later, if you left off his separate arm.
I assembled pretty much the entire kit, leaving off only the radio, small arms, and track units/side skirts, as I felt they would be easier to paint and attach later. Then it was time to head off to the paint shop.
| COLORS & MARKINGS |
The Carrier is overall green, and Tamiya recommend their own XF-61 Dark Green for the base color. Upon reflection now that the project is over, I think the green was too dark; Tamiya usually recommend this shade for German armor camouflage. Lesson learned for the next time. I sprayed the Carrier and the still separate track units with this green color. Then I used other Tamiya acrylics to paint the radio and weapons, and the rubber tires and gun metal tracks. It was bit of a challenge to paint the track units, as they are all molded in one piece. But the black tires and green wheels were close in final shade, so I didn’t have to be too picky there in the end. Once that was done, I could move on to final assembly, and the markings and weathering.
| FINAL BITS |
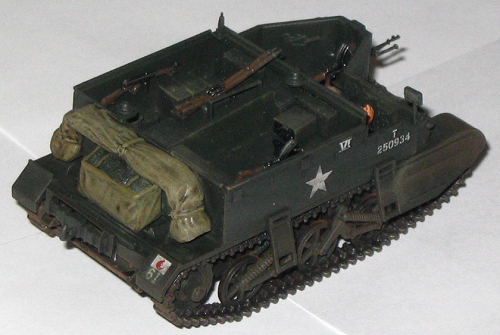 I added the track units and
the weapons, radio, and side skirts to the kit. After some touch up painting,
the model received a gloss coat from a Testor’s spray can to prepare it for
decaling. I ultimately chose the markings for the 7th Armoured
Division from the 4 choices offered, mostly for the unit’s fine overall
reputation, despite its’ disappointing performance in the Normandy campaign. The
decals went on well, and I had no problem with them settling down on the finish
with a bit of Solvaset. Now a flat coat from a Testor’s spray can was applied to
protect the finish and decals from the weathering stages, a three step process.
I added the track units and
the weapons, radio, and side skirts to the kit. After some touch up painting,
the model received a gloss coat from a Testor’s spray can to prepare it for
decaling. I ultimately chose the markings for the 7th Armoured
Division from the 4 choices offered, mostly for the unit’s fine overall
reputation, despite its’ disappointing performance in the Normandy campaign. The
decals went on well, and I had no problem with them settling down on the finish
with a bit of Solvaset. Now a flat coat from a Testor’s spray can was applied to
protect the finish and decals from the weathering stages, a three step process.
First, I applied a black wash to the
overall model, made with black oil paint and turpentine substitute. I like oil
paints for washes, as I find it very easy to change the density of the effect.
If used too heavily and without a protective overcoat, you need to be careful,
though, as they can attack glued joints and paint finishes. Second was a light
drybrushing with a couple of lightened shades of the XF-61 Green. Finally, a
couple of shades of artist’s pastel chalk were ground up and applied to the
model to simulate dust and dirt. A clear overcoat was again applied to model to
protect the finish. This usually greatly reduces
 the effect of the pastel
weathering, so you need to go very heavy with them, or apply a little more after
the final coat and be careful handling the finished model.
the effect of the pastel
weathering, so you need to go very heavy with them, or apply a little more after
the final coat and be careful handling the finished model.
The two figures were painted with Tamiya acrylics per the kit directions, and had a dark wash and some highlighting as well. In this scale, some Citadel Chestnut Ink left over from my gaming days was enough to make a wash to give some detail to the faces and hands. The officer will stand on his own, but is easily knocked over. So I made a small base from scrap plastic and then applied some sand over it held down by some thinned white glue. With that, my Universal Carrier was done.
| CONCLUSIONS |
I was still disappointed with the one piece track units, as I noted in my preview. But it still makes an interesting, if tiny, addition to a 1/48 armor collection. A British infantry and tank crew set has been released by Tamiya in Japan, but hasn’t yet made its way to the U.S. as I write this. Should be any time now. Also announced additions coming to the 1/48 armor line are a Sherman Firefly, Cromwell, and Russian SU-122 self propelled gun, if you’re looking for something non German or US to model. I’ll be looking forward to them.
May 2006
Copyright ModelingMadness.com
If you would like your product reviewed fairly and fairly quickly, please contact the editor or see other details in the Note to Contributors.