Hobby
Boss 1/35th 152mm ShkH DANA vz.77
| KIT #: | 85501 |
| PRICE: | $99.00 SRP |
| DECALS: | Two options |
| REVIEWER: | Greg Ewald |
| NOTES: | This is a LARGE kit, with quite a lot of detail. |
| HISTORY |
 Guns just
keep on getting bigger and bigger on mobile chassis, don’t they?
The thought of seeing this thing lumbering over a hill
is enough to make your blood run cold.
The Czechs borrowed a bit of the design (well, most of
it really) from the Russki’s version …………., and added on some stabilizers, threw
on a really massive gun, and called it good.
It must be, as a fair number of satellite countries have
purchased them for defense.
Hey, the turrets even have AC units, so that the gunners
and drivers can stay cool while they are deafened by the roar of the massive 152
shells. Now, we just need a sound system like Oddball’s to make it perfect,
right?
Guns just
keep on getting bigger and bigger on mobile chassis, don’t they?
The thought of seeing this thing lumbering over a hill
is enough to make your blood run cold.
The Czechs borrowed a bit of the design (well, most of
it really) from the Russki’s version …………., and added on some stabilizers, threw
on a really massive gun, and called it good.
It must be, as a fair number of satellite countries have
purchased them for defense.
Hey, the turrets even have AC units, so that the gunners
and drivers can stay cool while they are deafened by the roar of the massive 152
shells. Now, we just need a sound system like Oddball’s to make it perfect,
right?
The gun
fires a number of different shells, probably the most effective being the
anti-personnel/light vehicle HE round.
It can also fire a dedicated anti-tank round, which
would really be useless in a true battle, as a main battle tank would take out
this very lightly armored truck in no time at all.
Putting on
an AA machine gun is sort of like placing a scoop of crème fresh on a horse
dropping, but they did it anyway. Maybe for crew morale? I can’t imagine wildly
firing at incoming attack aircraft in a whirling turret while the loaders are
using the crane (yes, the CRANE) to load another monster bullet into the
chamber. It is a nice big HMG though.
In the pantheon of modern military vehicles, the DANA is an interesting take on just how big of a field piece one can actually place on something with tyres.
| THE KIT |
 Just the
instruction manual alone will leave you a little adrift. The 34 step book (!) is
filled with exploded diagrams.
Read through this several times, and avoid the mistakes
I made.
There are a lot of plastic pieces that are used in order to bend the PE
bits, set these aside in a safe place. I painted mine bright orange so I
couldn’t lose them.
I have also fallen into the habit of remarking the
sprues with a piece of tape and the letter or number of the sprue hanging off
about an inch or so. This saves you the time of looking for “L” or “k” when you
want to work.
Just the
instruction manual alone will leave you a little adrift. The 34 step book (!) is
filled with exploded diagrams.
Read through this several times, and avoid the mistakes
I made.
There are a lot of plastic pieces that are used in order to bend the PE
bits, set these aside in a safe place. I painted mine bright orange so I
couldn’t lose them.
I have also fallen into the habit of remarking the
sprues with a piece of tape and the letter or number of the sprue hanging off
about an inch or so. This saves you the time of looking for “L” or “k” when you
want to work.
The amount
of parts that go into this kit are simply staggering, but all are cleanly
molded. I saw limited amounts of flash or dimpling, and all of those were on
parts that would be invisible upon completion. Awesome engineering.
Other than the normal “wtf?” factor that is inherit in overseas kits, the directions are great, as stated above…just read the directions completely a few times. Perhaps take a soak in a tub and peruse it for a while? Have a nice Geisha scrub your back while you are doing so? Hey, you can’t go wrong with those instructions !
| CONSTRUCTION |
Honestly, I
thought about writing this in two different reviews, as the carrier and the
turret are almost separate kits in and amongst themselves.
Then I thought, “who the hell wants to wait to read PT.2
?”
So, here we go:
 Cab:
The driver’s section of the chassis goes together pretty
well, though I did leave off part P24, as it interfered with the upper and lower
cab halves going together well, and is virtually invisible when the kit is done.
I would also recommend waiting to put on the “storm shutter” windows until final
assembly, as they can be easily knocked off as you move this monster around on
your bench. There about a zillion fiddly bits that get adhered to the main cab,
but get used to it…there are several billion more to come.
Cab:
The driver’s section of the chassis goes together pretty
well, though I did leave off part P24, as it interfered with the upper and lower
cab halves going together well, and is virtually invisible when the kit is done.
I would also recommend waiting to put on the “storm shutter” windows until final
assembly, as they can be easily knocked off as you move this monster around on
your bench. There about a zillion fiddly bits that get adhered to the main cab,
but get used to it…there are several billion more to come.
Flatbed:
I would recommend using a slow setting glue for this
bit. You have to finagle a lot of pieces into place with very limited attachment
points, so the ability to move something after a minute or two is rather
important. Set this assembly aside to completely dry. Do not bend, fold, or
otherwise harm it !
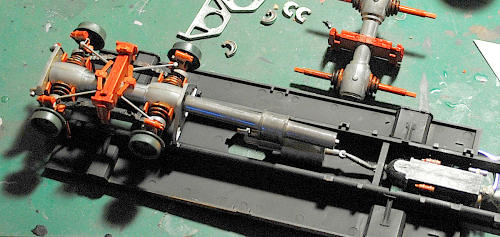
The model
sports a very nice drivetrain (including the engine, Yay!) and goes together
rather quickly. Don’t get your hopes up, we coming into the danger zone…
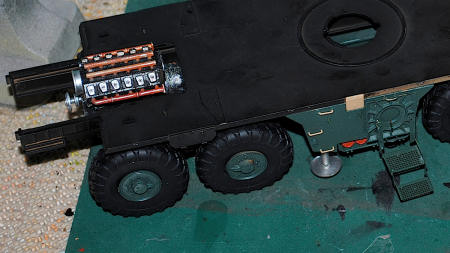 Main
Chassis:
Don’t assemble the tyres according to the instructions. Glue the
interior wheel onto the hub, then put on the vinyl tyre, THEN glue on the
exterior wheel half. Sort of like a sandwich.
A lot of PE bits go onto the subassemblies now, and in
just an hour or two, you have the main chassis built up.
Caution !
Danger Will Robinson, Danger !!!!
Main
Chassis:
Don’t assemble the tyres according to the instructions. Glue the
interior wheel onto the hub, then put on the vinyl tyre, THEN glue on the
exterior wheel half. Sort of like a sandwich.
A lot of PE bits go onto the subassemblies now, and in
just an hour or two, you have the main chassis built up.
Caution !
Danger Will Robinson, Danger !!!!
Do NOT glue
in the subassemblies as they would have you do it in the instructions.
Don’t.
Trust me.
Dry fit everything and tape it in place. When I say
“everything” , I mean it.
This kit is like one of those LEGO thingy’s that kids
like…everything has to be completely in synch, or it will not work out at all.
When you have all of the ducks (and there are a lot of them) in a row, then use
a fast C/A glue with a capillary tip to spot weld the bits into place. Let that
dry, make sure that everything is where it should be, and then glue normally
with a thin C/A.
Now that we
have the massive wheeled veeee-hickle finished, it is time to move onto the
second challenge of the kit:
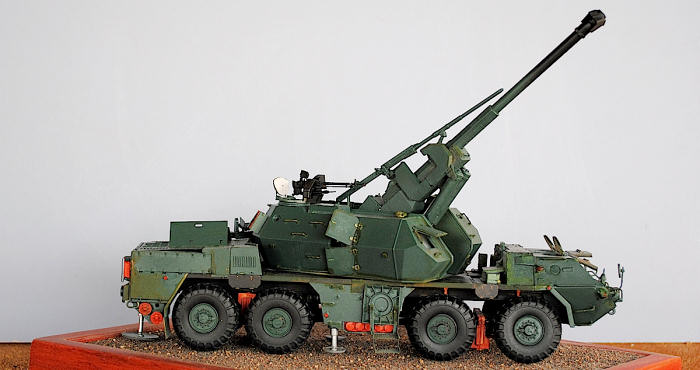
Gun and
Turrets:
The 152mm is so large that the turret is actually made up of two
separate housings, on the same base plate. There are all sorts of windows and
doors everywhere, presumably so that the soldiers can look at all of the
destruction, etc. surrounding this beast.
Again, the
exploded view diagram in the instructions can be a bit confusing, so read twice
or more prior to assembly!
All in all, the gun goes together well, though I am not
sure if I would use the supplied springs in the shock absorber/elevators…there
is no way to keep the gun in any position but completely elevated on my kit.
The moving parts are held in place with plastic pins,
which are a real bugger-all to put in. Use metal rod of the same thickness to
make your life easier.
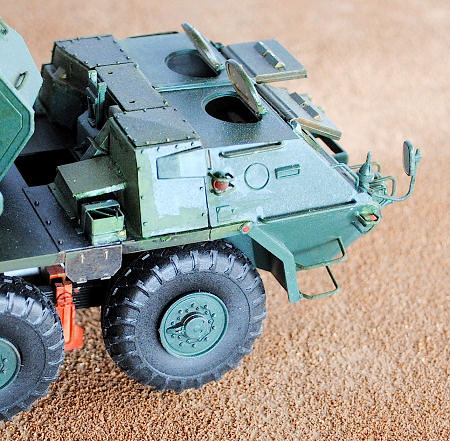
 While the
turrets have no interior detail, the exterior has a LOT of PE on it, as well as
rungs, rails, snails, pipes and more do-dads than a doll house. A PE bending jig
is included with the model for the small cable tie downs, which is a nice touch.
The kit is obviously meant to built “buttoned up”, but
if you give me a door, it is going to be open at least a bit. Those of you who
have a penchant for scratching up an interior will have a field day here…lots of
possible detailing to do !
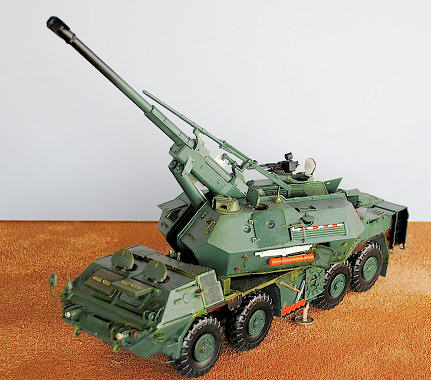
The heavy machine gun that goes on the starboard turret
(using nautical terms here, as this thing is as big as a ship) is really nice,
though made up of more than ten parts. Don’t drink any Jolt Cola prior to
putting it together. Why such a land dreadnought would have a machine gun is
beyond me, to be honest. If enemy troops or air support are that close, you have
some serious problems, and it would be useless for AA. Ah well, the designers
didn’t ask me. I know, I am harping on this point.
While the
turrets have no interior detail, the exterior has a LOT of PE on it, as well as
rungs, rails, snails, pipes and more do-dads than a doll house. A PE bending jig
is included with the model for the small cable tie downs, which is a nice touch.
The kit is obviously meant to built “buttoned up”, but
if you give me a door, it is going to be open at least a bit. Those of you who
have a penchant for scratching up an interior will have a field day here…lots of
possible detailing to do !
The heavy machine gun that goes on the starboard turret
(using nautical terms here, as this thing is as big as a ship) is really nice,
though made up of more than ten parts. Don’t drink any Jolt Cola prior to
putting it together. Why such a land dreadnought would have a machine gun is
beyond me, to be honest. If enemy troops or air support are that close, you have
some serious problems, and it would be useless for AA. Ah well, the designers
didn’t ask me. I know, I am harping on this point.
Mounting the two turret parts onto the base plate is a little tricky, once again test fit and sand as necessary to ensure a tight fit. You will not be able to clamp these down when you glue them, as they are covered with the little bits mentioned above. I did not use the kit supplied tow cable, as it looks terribly out of scale, and really detracted from the nice mean look of the gun assembly. The auto loading escalator (?) goes into the turret halves without a hitch, and now, with all of the little pieces on, you can finally mount that gun onto the chassis. Viola !
| COLORS & MARKINGS |
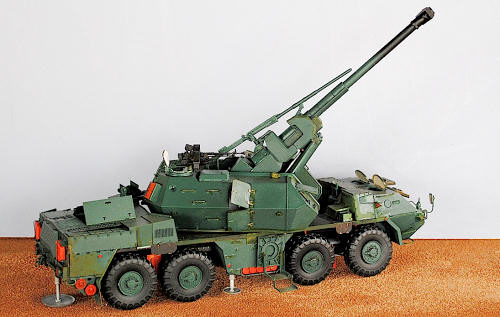
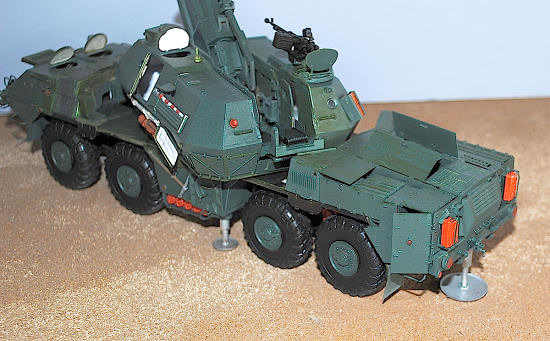
 As with
most armor kits, you have to paint and decal as you go. In this case,
everything was primed in a light gray, and then sprayed a standard green as
necessary. The interior of the turrets and the cab were done in a flat
white, which is of course invisible if you do a buttoned up version.
After spraying everything, I did a light dry brush
of the same dark green with just a bit of white added to it, to bring out
the detail. I did not do a wash over the vehicle, as this one is supposed to
look factory fresh. The decals are extremely well printed, and go on with no
silvering at all, though you will never see most of them.
As with
most armor kits, you have to paint and decal as you go. In this case,
everything was primed in a light gray, and then sprayed a standard green as
necessary. The interior of the turrets and the cab were done in a flat
white, which is of course invisible if you do a buttoned up version.
After spraying everything, I did a light dry brush
of the same dark green with just a bit of white added to it, to bring out
the detail. I did not do a wash over the vehicle, as this one is supposed to
look factory fresh. The decals are extremely well printed, and go on with no
silvering at all, though you will never see most of them.
There is a very nice colour chart included with the instructions, one for an all over dark green vehicle, and one for a camouflaged version. Honestly, camo-ing a vehicle this large is rather ludicrous…sort of like a fat person wearing a thong at the beach. Maybe they just wanted to give the Chinese Paint Department something to do? Anyway, it is a standard 3 colour wave pattern. I went with common sense, and left the LandWagon green.
| FINAL CONSTRUCTION |
Mating the turret bit to the chassis is somewhat nerve wracking, as it is hard to hold onto any part of the kit without hitting PE. I did lose a mirror to the carpet monster during this installation, I am sure it will turn up someday.
| CONCLUSIONS |
One of the
finest armor kits I have ever built, though it will eat up your time…definitely
not a weekender.
Highly recommended if you like massive modern armor.
| REFERENCES |
http://www.globalsecurity.org/military/world/europe/dana.htm
September 2011
Thanks to Squadron Products and Modeling Madness for the review kit.
If you would like your product reviewed fairly and fairly quickly, please contact the editor or see other details in the Note to Contributors.
Back to the Reviews Index Page