
| KIT #: | 01505 |
| PRICE: | $39.95 SRP |
| DECALS: | One option |
| REVIEWER: | Dale Rannals |
| NOTES: |
| HISTORY |
The 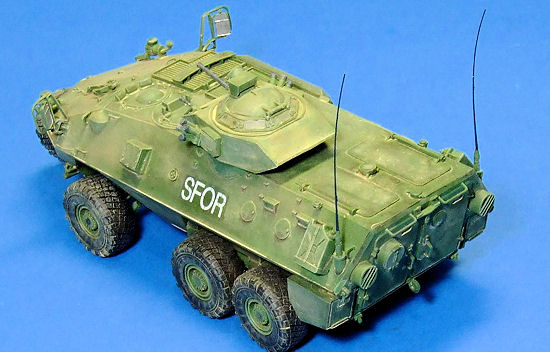 other
variants of the Piranha family.
other
variants of the Piranha family.
The most basic member of
these three was the Grizzly.
It was fitted with a twin-gun Cadillac-Gage 1-meter turret mounting one .50cal
and one .30cal machine gun. The
Grizzly had a crew of three (driver, gunner, crew commander) plus a rear
compartment seating eight dismounts, in theory anyway.
This was one of the main complaints of the vehicle: it was cramped.
In reality 6 lightly-equipped soldiers (or 4 in winter gear) could be
carried. The
Grizzly's 10mm armor was good
for stopping shell splinters or rifle bullets and this was considered adequate
for training. Of course, once deployed operationally (
The
Since about 2005, the
| THE KIT |
 The
kit contains slightly more than 220 crisply detailed parts molded in light gray.
No flash was noticed on anything, nor any ejector pin marks.
Also inside the box are a sprue of 17 clear parts, 7 soft rubber tires,
and a small PE fret of three pieces.
The
kit contains slightly more than 220 crisply detailed parts molded in light gray.
No flash was noticed on anything, nor any ejector pin marks.
Also inside the box are a sprue of 17 clear parts, 7 soft rubber tires,
and a small PE fret of three pieces.
The
instructions are a full page booklet of 12 pages containing 16 steps and a parts
layout drawing. They are well drawn
and pretty straight-forward.
Instructions
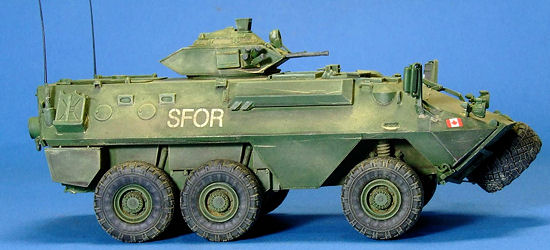
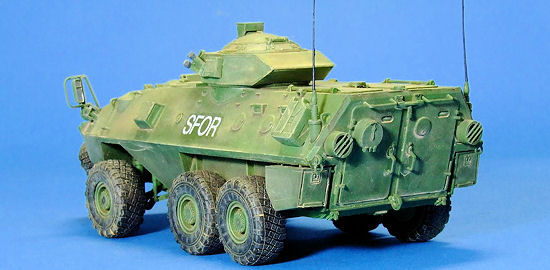
are for one vehicle: SFOR,
| CONSTRUCTION |
This is a pretty simple kit of a very neat looking vehicle.
It took a couple months working on it to finish it up, but only because I
was working on many other projects at the same time.
I believe if one had a weekend to kill, this kit could easily be
completed by Monday. There are no
individual tracks to fret over, nothing overly complicated in assembly, and
everything is pretty much one color …. Green.
So the whole thing can be slapped together and then painted.
 The first
four steps deal with the drive-train, suspension and wheels/tires.
The drive train is quite complex and well represented, but not difficult
to assemble. It all goes together
very well and is quite sturdy at the end.
The tires I left off until after painting, they can be popped on easily
anytime.
The first
four steps deal with the drive-train, suspension and wheels/tires.
The drive train is quite complex and well represented, but not difficult
to assemble. It all goes together
very well and is quite sturdy at the end.
The tires I left off until after painting, they can be popped on easily
anytime.
Once this
was done I deviated from the instructions a bit and mated the upper and lower
hull halves together. The
instructions would have you do this toward the end which to me sounds like a
good way to break things off the kit that you just put on.
I then added the rear bulkhead and doors.
This, however, was the one area I really goofed up on.
It is possible….. trust me on this….. to assemble the bulkhead inside
out. I realized this after the
glued had dried and the hull proper was a nice sturdy structure.
At that point I was not going to destroy things trying to get it back
apart. All the parts still fit on
the inside of it (which was now the outside) and the difference is minimal, so I
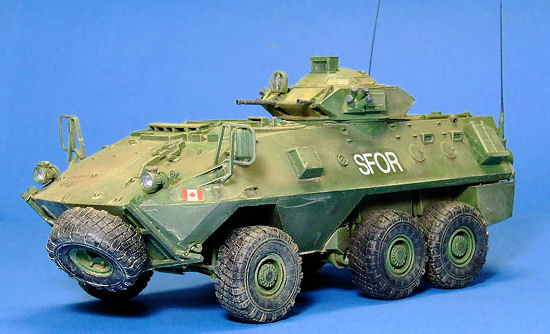
just rolled with it. Headlights,
mirrors, and upper hull detail in general come next, and nothing here is
complicated or fiddly.
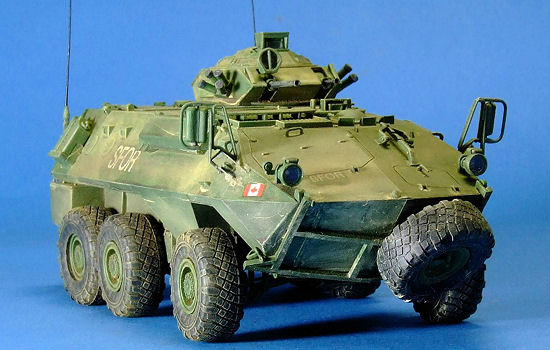
The
turret comes next, and here the instructions could be a bit better in showing
how things fit together. The turret
front bottom is the one area where I needed some putty.
Here too is the place for most of the clear parts …. Eight visors in the
turret top. Once again these were
left off until the painting was complete.
The spare tire mount is the last assembly to complete, if you want to. It is optional. I like the look of that big tire hanging off the front, so I proceeded with it. The mounting of the tire is a poor design. A small piece of plastic that you cut and glue two small pieces of wire to, which then is suppose to support the weight of the tire hanging off it. Boo Trumpeter. A single post of plastic would do this much simpler and be much sturdier and, being inside the wheel/rim, very easily hid.
| COLORS & MARKINGS |
 Doesn’t get
much easier than this: overall green.
I used some Model Master 34102 medium green that I had already had mixed
up. This was sprayed over
everything and allowed to dry. The
few decals were next and these went down okay but tended to want to stick as
soon as they hit plastic. Got them
positioned but they were reluctant to move.
Then a thin black wash was thrown on it all to dirty things up and pop
out some detail. The plan here was
to follow this up with some brown washes, but while shaking up the bottle…… a
bit too enthusiastically I fear …..the bottle flew out of my hand and did a
straight shot right into the kit. (and yes, I did feel incredibly stupid….)
Surveying the damage, I found both mirrors and the windscreen were
knocked off. Fortunately that’s all that happened: it could have been much
worse. I reattached the mirrors,
but the windscreen was no-where to be found.
I didn’t think it hit hard enough to be instantly vaporized, but after a
half hour of fruitlessly searching the area I gave up.
Where do these things go?
This was not a small piece either, a couple centimeters square easily.
Anyway, I threw some brown washes on it and called it good.
Doesn’t get
much easier than this: overall green.
I used some Model Master 34102 medium green that I had already had mixed
up. This was sprayed over
everything and allowed to dry. The
few decals were next and these went down okay but tended to want to stick as
soon as they hit plastic. Got them
positioned but they were reluctant to move.
Then a thin black wash was thrown on it all to dirty things up and pop
out some detail. The plan here was
to follow this up with some brown washes, but while shaking up the bottle…… a
bit too enthusiastically I fear …..the bottle flew out of my hand and did a
straight shot right into the kit. (and yes, I did feel incredibly stupid….)
Surveying the damage, I found both mirrors and the windscreen were
knocked off. Fortunately that’s all that happened: it could have been much
worse. I reattached the mirrors,
but the windscreen was no-where to be found.
I didn’t think it hit hard enough to be instantly vaporized, but after a
half hour of fruitlessly searching the area I gave up.
Where do these things go?
This was not a small piece either, a couple centimeters square easily.
Anyway, I threw some brown washes on it and called it good.
| CONCLUSIONS |
This is a pretty simple kit of a pretty neat looking military vehicle.
I am sure if one wanted to, it could be assembled and painted in a
weekend, as there are no real issues in assembly and painting can’t be easier.
Highly recommended for those with an interest in wheeled
| REFERENCES |
 The
Internet
The
Internet
December 2012
Thanks to Squadron Products via Modeling Madness for the review kit. You can find this kit at your favorite hobby shop or on-line retailer.
If you would like your product reviewed fairly and fairly quickly, please contact the editor or see other details in the Note to Contributors.