Alan Hobbies 1/35 BA-20 Armored Car
| KIT #: | 002 |
| PRICE: | $10.00 MSRP |
| DECALS: | Several options |
| REVIEWER: | Rick Brownlee |
| NOTES: | Injection molded styrene |
| HISTORY |
Paraphrasing from the page one portion of the kit instructions, (The brief history, printed in Russian-English-German) it states that in the 1930s the Soviet Union, and other countries besides, used civilian light vehicles for reconnaissance sorties, but it was soon was apparent that combat environs made armor plating and automatic weapons necessary for these vehicles. Circa 1936, in light of the previously designed vehicles of this genre; i.e. Ba-3, Ba-6, etc., the Ba-20 light armored vehicle was developed on the chassis of the civilian GAZ-M1 automobile. Thin armor plates were welded to the body and the DT tank machine gun was installed. The gunner also performed as commander. The Ba-20 — in production for five years, with minor upgrades — was to become the most widely operated armored car of the Soviet Army. And it's first combat role was in 1939 against the Japanese, in Mongolia.
| THE KIT |
 The molded parts are pressed in light gray plastic, easy to cover with even very
light shades of paint. All parts are numbered and those numbers correspond to
two pages of explosion drawings — these drawings are broken down into 6
sub-assembly groups. Although a 1:35th kit, the price is quite reasonable and,
in my opinion, offers quite a bit of detail for the money. But you realize this
is only my second vehicle model I've built. Duh? So my opinion re armor kits is
nil, zilch, zero. Where was I? Some minor putty work will be required with
seams. However, the seams and gaps were quite small and easily taken care of. No
resin or PE parts come in the kit.
The molded parts are pressed in light gray plastic, easy to cover with even very
light shades of paint. All parts are numbered and those numbers correspond to
two pages of explosion drawings — these drawings are broken down into 6
sub-assembly groups. Although a 1:35th kit, the price is quite reasonable and,
in my opinion, offers quite a bit of detail for the money. But you realize this
is only my second vehicle model I've built. Duh? So my opinion re armor kits is
nil, zilch, zero. Where was I? Some minor putty work will be required with
seams. However, the seams and gaps were quite small and easily taken care of. No
resin or PE parts come in the kit.
The interior features parts for two seats, dash board, steering wheel (no accelerator, brake or clutch pedals in the kit, however), floor mounted gear shift knob and drum canister machine gun that is positioned in the turret. You can rotate or cant the turret to any position within 360 degrees, if you desire. The turret hatch can be mounted in the closed or open position. Both passenger and driver's side doors can be mounted opened or closed, as well. No engine comes with the kit — although RPM has a kit of same that come with engine parts. There is a decal sheet with white symbols and large numerals —several sets of numerals to chose from. However, I did not use the decals so I can't speak about ease of applying same.
| CONSTRUCTION |
 I
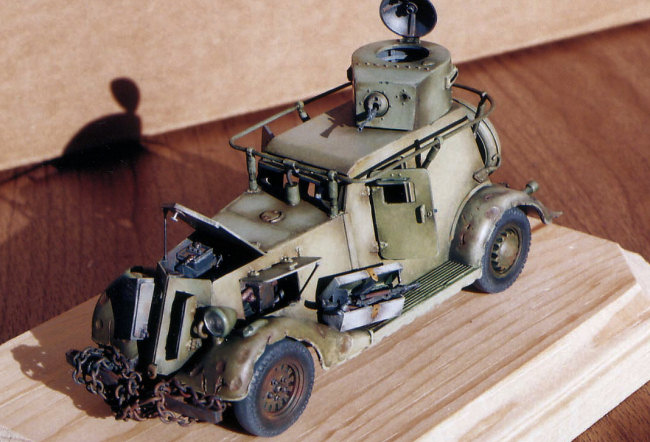
scratch-built the engine as I wanted to see if I could pull it
off as I wanted to raise the hood of the vehicle to display the scratch-built engine
compartment. The chassis kit part had the crank case and lower portion of
the transmission delineated and attached to the frame. I sawed that
portion of the chassis with the crankcase and transmission off the frame.
And I used that part as the "foundation" to scratch-build the four cylinder
flathead engine over. In fabricating the engine, which internet research
indicates is very much like the old Ford Model A flat head engine of the
mid 1930s, I used bass wood, sheet styrene, plastic tubing, Apoxysculpt two
part putty and solder wire of various diameter thicknesses for radiator
hose, battery cables, spark plug wires going into the coil, starter motor
connector wire, etc.. The battery and its side wall box was scratch from
sheet styrene. But I did use the kit radiator provided. In the interior, I fabricated drum
canisters for the machine gun and the drum racks, a parking break between
the two seats — made from brass rod and piano wire — clutch, break and
accelerator pedals. Odometer and other dials on the dash came from a 1/32nd
aircraft instrument panel decal. The steering column was made from plastic
tubing. (Many Evergreen and Plastruct packs of various sizes, I have on
hand)
I
scratch-built the engine as I wanted to see if I could pull it
off as I wanted to raise the hood of the vehicle to display the scratch-built engine
compartment. The chassis kit part had the crank case and lower portion of
the transmission delineated and attached to the frame. I sawed that
portion of the chassis with the crankcase and transmission off the frame.
And I used that part as the "foundation" to scratch-build the four cylinder
flathead engine over. In fabricating the engine, which internet research
indicates is very much like the old Ford Model A flat head engine of the
mid 1930s, I used bass wood, sheet styrene, plastic tubing, Apoxysculpt two
part putty and solder wire of various diameter thicknesses for radiator
hose, battery cables, spark plug wires going into the coil, starter motor
connector wire, etc.. The battery and its side wall box was scratch from
sheet styrene. But I did use the kit radiator provided. In the interior, I fabricated drum
canisters for the machine gun and the drum racks, a parking break between
the two seats — made from brass rod and piano wire — clutch, break and
accelerator pedals. Odometer and other dials on the dash came from a 1/32nd
aircraft instrument panel decal. The steering column was made from plastic
tubing. (Many Evergreen and Plastruct packs of various sizes, I have on
hand)
There was a lot of dry
fitting of the engine components — repeat,
 LOTS of dry fitting — and other
parts during these early phases of the build, to make sure everything was
made the right size so it would fit down in there. Map pockets in the
doors were made from sheet styrene. Very small color maps were
made on my Macintosh 'pooter using Adobe Il
LOTS of dry fitting — and other
parts during these early phases of the build, to make sure everything was
made the right size so it would fit down in there. Map pockets in the
doors were made from sheet styrene. Very small color maps were
made on my Macintosh 'pooter using Adobe Il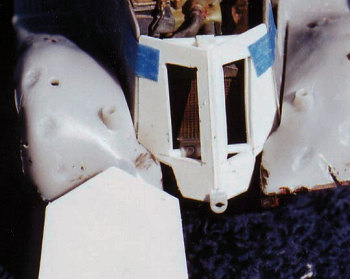 lustrator
— to be folded and placed in the car. I could copy the maps and reduce or
enlarge them all on the same page before it was printed. Also, the interior of
the turret and turret hatch has been detailed with bracing made from sheet
styrene. Also, I fabricated a gunners adjustable seat, that would traverse
along with the turret. Spanky McFarland, an armor modeler friend in N. Carolina,
suggested I make radiator hose clamps so I added those later using lead foil.
lustrator
— to be folded and placed in the car. I could copy the maps and reduce or
enlarge them all on the same page before it was printed. Also, the interior of
the turret and turret hatch has been detailed with bracing made from sheet
styrene. Also, I fabricated a gunners adjustable seat, that would traverse
along with the turret. Spanky McFarland, an armor modeler friend in N. Carolina,
suggested I make radiator hose clamps so I added those later using lead foil.
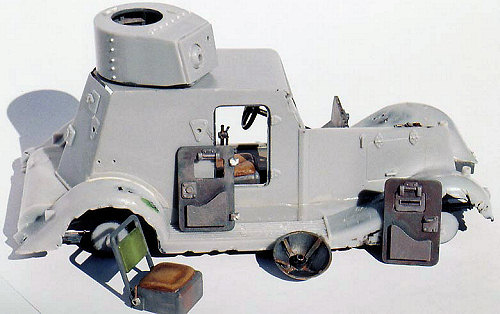
I don't own a digital camera
. . . I am STILL paying for my daughter's wedding. So the quality of
the photo's are not the best. I put it here to show the white sheet styrene
pieces fashioned for the raised hood piece and for the vehicle front with
the openings or wind ows, for the two hatches on that front piece. With all
the dry fitting, I realized much earlier, that the kit part would not work
for the front piece. More room was needed to fit all the scratchbuilding
in the engine area. So I cut new pieces that would mate with the side walls
in front without big gaps, and at the proper angle. That also meant the kit
hood wouldn't be long enough in front either to mate up with the front, so
a pattern was made from paper for that new hood part. I always make a
pattern from stiff paper first, for these kinds of jobs. In my view, it is
much easier to cut the part smaller, a little at a time, with a hobby
knife. Dry fit, dry fit, dry fit the paper pattern until it is just right.
To cut and fit the actual plastic sheet styrene a number of times til it's the
right size is more difficult and time consuming. In reference to time consumed,
I worked on this model off and on over a 20 month period. I mixed enamel light green, yellow,
white and dark green together for the faded Russian Tank green I wanted and
applied the paint with a brush. But more about that enamel san air gun and
oil paints below in the Colors & Etc. section . . . if you're not bored to
tears by now, that is!
ows, for the two hatches on that front piece. With all
the dry fitting, I realized much earlier, that the kit part would not work
for the front piece. More room was needed to fit all the scratchbuilding
in the engine area. So I cut new pieces that would mate with the side walls
in front without big gaps, and at the proper angle. That also meant the kit
hood wouldn't be long enough in front either to mate up with the front, so
a pattern was made from paper for that new hood part. I always make a
pattern from stiff paper first, for these kinds of jobs. In my view, it is
much easier to cut the part smaller, a little at a time, with a hobby
knife. Dry fit, dry fit, dry fit the paper pattern until it is just right.
To cut and fit the actual plastic sheet styrene a number of times til it's the
right size is more difficult and time consuming. In reference to time consumed,
I worked on this model off and on over a 20 month period. I mixed enamel light green, yellow,
white and dark green together for the faded Russian Tank green I wanted and
applied the paint with a brush. But more about that enamel san air gun and
oil paints below in the Colors & Etc. section . . . if you're not bored to
tears by now, that is!
| COLORS & MARKINGS |
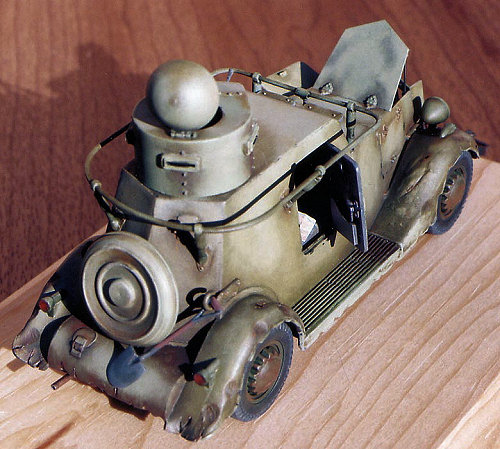
Photos K thru P show
the model nearing completion. During the build, I wrote notes as to what
steps should be done next, so as not to get ahead of myself. You know my
meaning, right? Like. . . you read this and say, "been there, done that,
and bought the T-shirt". As in glue on a door and it gets broken off as you
try to glue on the high gain antenna? Shoulda' done the high gain antenna
work, first! Now that I'm an old retired person, I work a lot slower and
give each build a lot more thought before, during and afterwards. Also, I find
that "mental" part of the hobby — the planning what to do and the problem
solving thought processes during the build — almost as muc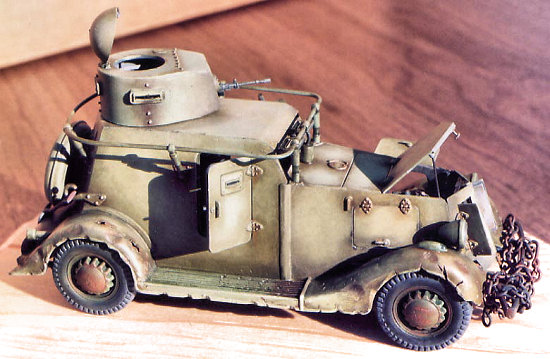 h
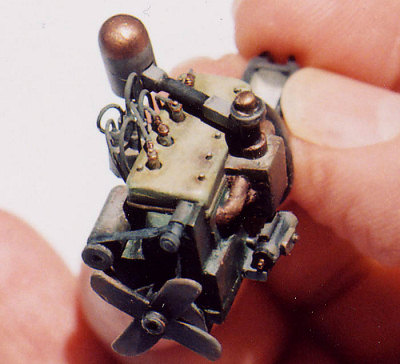
fun as the "physical" part. Other modelers have told me the same thing. Also, I
think I'm noticing that my discipline is improving; i.e. I made the set of
sparkplug wires and their loops that fit over the top of the sparkplugs four
different times before I got them finished to my satisfaction scale-wise, and
done with a kind of wire that would make those tiny bends without bad kinks in
the wire. The trick was using solder wire.
h
fun as the "physical" part. Other modelers have told me the same thing. Also, I
think I'm noticing that my discipline is improving; i.e. I made the set of
sparkplug wires and their loops that fit over the top of the sparkplugs four
different times before I got them finished to my satisfaction scale-wise, and
done with a kind of wire that would make those tiny bends without bad kinks in
the wire. The trick was using solder wire.
As stated above, I painted the vehicle exterior base coat a mix of lighter green Humbrol enamel to indicate fading and aging. All enamel painting was done with Humbrol. My idea was to show that this car made it all thru the years of the war and took a beating while doing so. I brushed on artist tube oil paints over the Humbrol enamel mixture. (I use a piece of auto safety glass as a palette, to mix the oil colors, which are Winsor Newton. However, since the oils are applied in such very thin layers, any brand of oils would do, I feel.) The deeper greens in oils were made from a mix of dark green labeled "Oxide of Chromium" — altho any dark green would be fine — Paynes Gray, Burnt Umber and Yellow Ochre. The rusted areas were Yellow Ochre and Indian Red mixed together. In the interior, the gray Humbrol enamel was the first coat I painted. I went over that Gray enamel with mixes of Paynes Gray, white, a smidge of Ultramarine Blue remembering how shadows affect walls with an opening to the sunlight above — in this case the turret opening. The area of the wall near the floor was darker gray in oils, and as I moved upward, closer to the opening where the turret would be, the oil colors of gray were lighter. The tools for the tool box were painted in Humbrol dark gray on metal parts and brown on wood handles. Then I used an oil mix of gray with a hint of silver applied lightly over the gray metal areas as highlights. The tools came from the Italeri Field Tool Shop set #419 and the Tamiya German Tank Engine Maintenance Crew Set, Item #35180.
| FINAL CONSTRUCTION |
 The kit parts for the
headlights are fine. Also, the two clear plastic lenses (they have a
pattern in them) fit in the openings quite nicely with no sanding. I made
light bulbs from clear sprue and glued them inside before attaching the
lenses. However, the parking lights were poorly molded. I tried to save
them with putty and sanding, but finally used clear sprue to carve two new
tear drop shaped pieces, flat on the bottom. (I have learned that I no
longer need to polish out the sanding marks in clear styrene when I work
with it. Woodland Scenics Realistic Water will take care of it. I use a
toothpick to apply the liquid clear acrylic over the parking light that has
been roughly sanded. And the Realistic Water layer makes everything shine
like glass, right before my . . . your eyes, dude.) Then I painted the
portion of the parking lights that would naturally be metal leaving the
clear part of the sprue to indicate the glass portion. After that base
color of light green enamel was dry and the two parking lights installed, I
went over the enamel painted areas of those installed parking lights, with
oil paints, to match the hue and tone of the rest of the vehicle front
fenders. After the last picture was taken I lightly dusted the model with
pastels to indicate dust from the road.
The kit parts for the
headlights are fine. Also, the two clear plastic lenses (they have a
pattern in them) fit in the openings quite nicely with no sanding. I made
light bulbs from clear sprue and glued them inside before attaching the
lenses. However, the parking lights were poorly molded. I tried to save
them with putty and sanding, but finally used clear sprue to carve two new
tear drop shaped pieces, flat on the bottom. (I have learned that I no
longer need to polish out the sanding marks in clear styrene when I work
with it. Woodland Scenics Realistic Water will take care of it. I use a
toothpick to apply the liquid clear acrylic over the parking light that has
been roughly sanded. And the Realistic Water layer makes everything shine
like glass, right before my . . . your eyes, dude.) Then I painted the
portion of the parking lights that would naturally be metal leaving the
clear part of the sprue to indicate the glass portion. After that base
color of light green enamel was dry and the two parking lights installed, I
went over the enamel painted areas of those installed parking lights, with
oil paints, to match the hue and tone of the rest of the vehicle front
fenders. After the last picture was taken I lightly dusted the model with
pastels to indicate dust from the road.
| CONCLUSIONS |
I enjoy building something out of the ordinary or a subject that is "oddball interesting" as I like to call it. When I first saw this kit at a contest raffle and didn't win it, I thought it would be fun to try. So I purchased the kit via mail order. And I decided to go all out w/ a scratchbuilt engine compartment. However, to build it OOB, without all that scratchbuilding, I feel it would be a rather easy project. And still look nice on your shelf . . . and a lot different from all those 1:35th German vehicle/Panzer kits, right?
April 2007
Copyright ModelingMadness.com
Editor's Note. It is probably not surprising at all that Rick has been very successful on the show circuit this year with this model. Some people are just too talented......... ;o)
If you would like your product reviewed fairly and fairly quickly, please contact the editor or see other details in the Note to Contributors.