
Revell 1/480 USS Toledo (CA133)
|
KIT # |
0370 |
|
PRICE: |
$8.00 |
|
DECALS: |
A set of flags |
|
REVIEW BY: |
Robert Shockley |
|
NOTES: |
Added 1/500 Gold Medal Models photo etch set # 500-5 ($20.00) |
IMPOSSIBLE MISSION FORCE Control Center, 0700hrs Zulu..."Your mission Gentlemen, should you decide to take it, is to take a Revell 1964 issue of a Baltimore Class cruiser and create a 1990's worthy model out of it...good luck!, you're going to need it!!" That's how I undertook this project in a sense, because I was going to need the humor-aspect to get thru it. Being such an old issue, I got out of the box just what I paid for (though believe me, I'm not complaining about the price of the kit itself): tons of flash, sink marks and poor casting.
|
CONSTRUCTION |
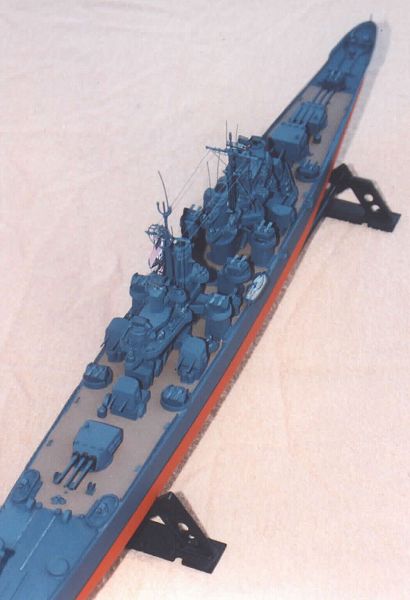
Assembly began with mating the main deck to the hull, which necessitated putty around the entire seam-line. Baltimore's had wood decking, so I used masking tape to protect the raised planking-lines while sanding down the putty. A molded-in rail surrounded the ship and was removed with X-acto knives and files. Then it was time to remove the molded-in single 20mm cannons with a Dremel tool. They looked more like little letter 'Y's', than cannons and had to go. The same applied to the view-ports on top of the 5" secondary battery turrets, which looked like letter 'T's', and were hugely out of scale in any case. The last items to be discarded were the main-battery gun director dishes and the molded-in life rafts on the sides of the 8" & 5" turrets. Speaking of turrets, one of the 5-inchers was incompletely molded and was about half the height of the rest of the turrets. I added layers of sheet styrene to the bottom until I got it to the same height as the others. I also replaced all of the 5" barrels with stretched sprue after I mangled 3 or 4 of them trying to remove excess flash. Also, each 8" turret had to have styrene & putty work from where the rafts were removed. The rafts, single 20mm & twin 40mm cannons, launches, searchlights and the radar dish on the aft smoke-stack all came courtesy of an old 1/700 scale Skyways Cleveland class light cruiser that my dog had chewed on. Surprisingly, the scale difference wasn't a factor, especially with the cannons, which says a lot about Revells casting ability of that era.
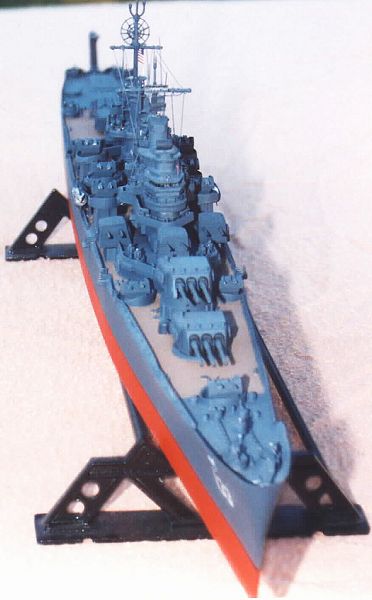
In assembling the superstructures, very nasty seam-lines had to be filed down, which provided quite a challenge, especially around the directors and the stacks. I removed molded-in railing & ladders from the searchlight platforms and smoke stacks, and then cut-out the main-bridge windows. The quad 40mm mounts had barrels that resembled angle-iron, so I replaced them w/ stretched-sprue...not too happy with how they turned out, but that's the way it goes with my modeling projects...there's always something I'm not happy with. I guess that's the process for achieving proficiency. Anyway, continuing, the Main mast was missing the top above the yard arms, so I replaced it with the barrel off a 1/35 scale German rifle. I decided to paint the gray first, as it seemed it would be easier to later mask off the turret supports and superstructure bases than to have to mask off the entire deck (it was!). I used Testors Panzer Gray. An odd choice, I'm sure you're thinking, but there's a method to my madness here; if you watch the History Channel, those ships on the old black and white shows look much darker gray than they do in real life.....actually, the truth is, darker colors conceal 'goof-ups' much better than lighter colors do,,,an old modelers trick to be sure, but it works, and actually, I sorta like the look on this one...it looks 'meaner' than light naval gray, and if Baltimore's are anything, they are one mean-looking mother of a Cruiser. Continuing with the 'darker is better' theory, I painted the deck Testors 'Dark Earth', which complements the gray very well. Masking of the turret bases was done with regular masking tape cut into thin strips so it could be worked around the angles more easily. Than the hull red was added, followed with a black demarcation line separating the gray and red.
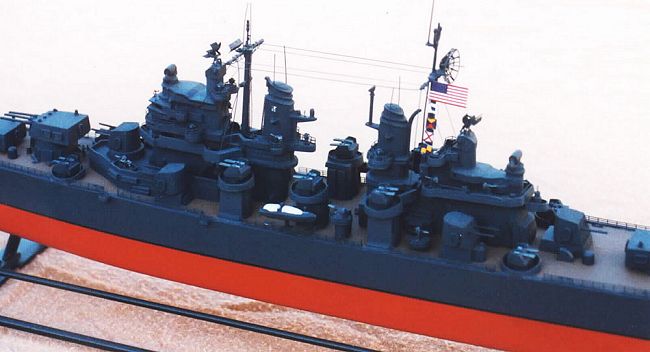
Now it was time to fire-up the ol' electron microscope and add the photo-etched brass items. The edge railings presented one problem; the longer the rails, the more messy in appearance they were. This was due to the fact that by the time I was applying glue to the end of the rail, the glue I'd applied to the beginning of the rail was already drying, resulting in gaps between the rail and the model that had to be filled with glue using a sprue applicator. All this glue then dries into a nice white mess that has to be later touched-up with sanding and painting. The shorter rails were no problem. The Mk. 37 gun director radar shields were a bit of a pain, getting them to fit onto the tops of the gun director turrets without mangling them, which I did to the aft one. The Mk. 3 Radar on the fore mast was no problem, though the SK-2 Radar on the aft mast tried my patience to the max. The thing is comprised of 11 parts and came out a bit larger in scale than I would've liked, but after all the work it would've been a crime not to put it on. Several Radio Direction Finder antenna's and an anenomometer vane were added to various spots on both superstructures. 4 cable reels were added to the main deck (I'd removed the molded-in kit ones); fairly easy to assemble little things, though the instructions suggest using thread to simulate cable wrapped around the axles...I don't think so!...mine are cable-less and look fine. The rigging and antennae are all stretched-sprue.
|
DECALS |
As for decals, The "Efficency 'E' " on the forward stack came from a 'Goodyear' model car decal and the hull numbers came from the spares box. The kit provides hull numbers but the things reach from the anchors to the waterline. Another problem with the kit decals was that (1), no instructions are provided to let you know which numbers correspond with each ship in the class (a dozen or so ship names are provided); (2), only two sets of numbers are provided, so if your ship is a '133' or '122', you'll wind-up short one number for each side; and (3), the stern ship name is in black, which may not be a problem if in fact the names were painted-on in black, instead of white like I thought they were. The kit provides a flag for the bow, but no decal. Research showed that the National insignia was flown off the rear mast, just below the SK-2 radar. The kit provides a paper sheet of signal flags and a rather large National insignia so I rigged those off the rear mast (I guess the Germans captured a Baltimore because a German insignia is also provided :). I'm depicting a Korean War-era Toledo, so the catapults and aircraft were not used (they are out of scale in any case). I also decided not to use the gangways. The kit-provided base has added-on styrene tubing for stability and to later provide a place to mount a plaque. Oddly enough, no propellers are provided.
|
CONCLUSIONS |
That's it. I love Cruisers and have found you can make a decent model of one using one of Revells' old issues. It's a rough kit to work with but really provides a challenge. For research, you can see Baltimore's on many Television shows. Just about any documentary showing the Pacific war will include a Baltimore somewhere in it...you just need a magnifying glass to see them! They were tasked to provide carrier anti-aircraft support, so any show of carrier Kamikaze action is likely to have Baltimore's in the background hammering away. Another source is the internet, though some surfing is required. There used to be a "U.S. Cruiser Sailors Assn" website that had many fine photo's. Typing in "Regulus Cruise Missile" into your search engine may give you some dynamic shots of the Toledo firing off Regulas missiles (she was the first ship of the line to do so). I'd provide the links that I have but haven't checked them in awhile so I'll leave that little quest up to you, my fellow modelers.
Copyright ModelingMadness.com. All rights reserved.
Back to Reviews Page 2018