| KIT #: | 83532 |
| PRICE: | $35-50.00 |
| DECALS: | One option |
| REVIEWER: | Donald Zhou |
| NOTES: | Advantages: Well detailed, simple, some options given Disadvantages: the anechoic tiles on the hull maybe overstated for some and need some serious work in order to display the missile bays open. |
| HISTORY |
The Russian Akula class submarines, or “shark” in Russian (ironically, NATO would name a class of Russian attack subs the “Akula” class, and not this boat) was developed as a direct counter to the American Ohio Class SSBN, or Submarine launched Ballistic missile submarine, Nuclear. Now, even today, an Ohio class is something no one would want to mess with! Equipped with 24 Trident II D-5 sub launched ballistic missiles, each carrying 8 MIRV, or Multiple Independent Re-entry Vehicles (basically, each missile carries 8 nuclear warheads, with a max yield of 455KT. In fact, a Trident can carry even more warheads, up to 14 with a max yield of 100KT but the SALT II treaty limit the missile to only 8 and can guide each warhead independently to eight different targets), a single Ohio can obliterate a small nation if it’s allowed to fire all 24 of its payload! Even though the first four, Ohio, Michigan, Florida, and Georgia have been modified to SSGN, or cruise missile submarines, each with a max payload of up to 144 Tomahawk cruise missiles, the 14 that are still left is still THE premier nuclear deterrent arsenal in the U.S.! Obviously, the Russians needs a response.
 When the first Akula
appeared, it was a doozy. At least twice as wide as an Ohio, and taller, the
sub, now called Typhoon by NATO is still the world’s largest submarine ever
build. Weighting in at a full load of 47,230 tons submerged, it weight almost as
much as a WW II battleship. It is designed to carry the R-39 sub launched
ballistic missile, NATO code name SS-N-20 Sturgeon, the ship has to be large
since the SS-N-20 reportedly has far better range than the Trident I (which
forced the U.S. to quickly develop the Trident II) and thus, far larger (during
the ‘80’s it was reported the SS-N-20 had as much range as 16,000 KM or 9940
miles, 1300 more than the Trident II). A single Typhoon can carry as much as 20
Sturgeons, each with 9 warheads for a total of 180. Secondary armaments include
six 533mm (21inch) torpedo tubes with at least 20 torpedoes stored inside. The
sub features a double hull construction (basically two pressure hulls wielded
together, with the inner wall removed to form the typhoon hull. Hence the very
distinctive oblong shape), another reason why it was so wide and heavy.
Basically, as one American officer commented, the Russians basically took two of
their Delta II missile subs, slapped them together to form the Typhoon! This
also meant it had two nuclear reactors like the Oscar II SSGN. The double hull
is then surrounded by the separate outer water hull. This meant the sub would be
every hard to sink in combat, capable taking on one or even two torpedo hits and
still survive. The most notable thing about the Typhoon is that unlike its
former Russian, American and current American counterpart, or even its future
replacement, it has all its missiles forward of the “sail”. All the rest of the
subs have the missile bays aft of the sails instead, leading to one of its most
distinctive, if not the most distinctive feature of the ship.
When the first Akula
appeared, it was a doozy. At least twice as wide as an Ohio, and taller, the
sub, now called Typhoon by NATO is still the world’s largest submarine ever
build. Weighting in at a full load of 47,230 tons submerged, it weight almost as
much as a WW II battleship. It is designed to carry the R-39 sub launched
ballistic missile, NATO code name SS-N-20 Sturgeon, the ship has to be large
since the SS-N-20 reportedly has far better range than the Trident I (which
forced the U.S. to quickly develop the Trident II) and thus, far larger (during
the ‘80’s it was reported the SS-N-20 had as much range as 16,000 KM or 9940
miles, 1300 more than the Trident II). A single Typhoon can carry as much as 20
Sturgeons, each with 9 warheads for a total of 180. Secondary armaments include
six 533mm (21inch) torpedo tubes with at least 20 torpedoes stored inside. The
sub features a double hull construction (basically two pressure hulls wielded
together, with the inner wall removed to form the typhoon hull. Hence the very
distinctive oblong shape), another reason why it was so wide and heavy.
Basically, as one American officer commented, the Russians basically took two of
their Delta II missile subs, slapped them together to form the Typhoon! This
also meant it had two nuclear reactors like the Oscar II SSGN. The double hull
is then surrounded by the separate outer water hull. This meant the sub would be
every hard to sink in combat, capable taking on one or even two torpedo hits and
still survive. The most notable thing about the Typhoon is that unlike its
former Russian, American and current American counterpart, or even its future
replacement, it has all its missiles forward of the “sail”. All the rest of the
subs have the missile bays aft of the sails instead, leading to one of its most
distinctive, if not the most distinctive feature of the ship.
For years during the ‘80’s, the brinkmanship between the U.S. and Russia was carried out beneath the waves between the Ohios and Typhoons. In fact, the Typhoon became legendary when Tom Clancy (RIP one of my favorite writers) wrote the famous The Hunt for Red October. In it, the Russian had built a modified Typhoon with hydrodynamic drive and equipped with 26 missiles instead of 20. The book went on to be a best seller and modified into a movie (which I both saw and read multiple times). In the book, Tom described the sub a being very austere, with no crew mess and everything devoted to weapons and missiles offering no creature comfort to the crew. Then came the shellshock of 1991 and all of a sudden POOF!!!!! The old USSR went no more. Because of this, it allowed the West to glimpse into Russian technology for the first time. The first shock was the Typhoon wasn’t nearly as prevalent as the Ohios. With its double hull, double redundancy, double reactor and too big of a pole of a missile, the sub was expensive to build and a hell to maintain….Hence one of the reason for the USSR collapse…In fact, only six Typhoons were ever made before Russia ran out of money, compare this to total of 18 Ohios. Hence, why the U.S. decided to agree to limit Ohios to 14 and modified the first 4 to SSGN standards.
The second was the missile.
As it turned out, the Sturgeon only had range comparable to the Trident II D-5.
The reason why the Russians had always lagged behind the West in some important
technologies, computers for ex. and rocket science another. In order to achieve
the same range, Russian missiles needed to be bigger due to poorer metal quality
and fuel qualities among others. Hence why the Sturgeons we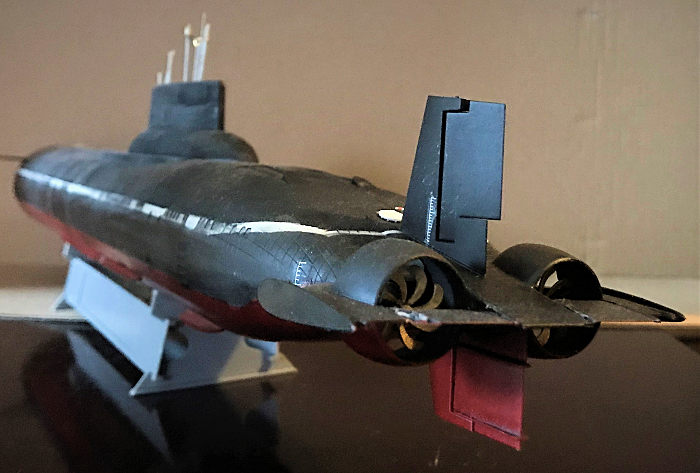 re so big and reason
why the “Red October” with its 26 missile will never happen! The sub would’ve
been way too big for the Russians to afford to build and maintain!
re so big and reason
why the “Red October” with its 26 missile will never happen! The sub would’ve
been way too big for the Russians to afford to build and maintain!
The third is creature comfort…Unlike depicted in the famous book, Typhoon was one of the most lucrative jobs in the Russian Navy! Why? Simple, the food was the best because the sub contains some of the best refrigeration and storage spaces. The personal space for the 164 people onboard were the most spacious among the fleet and the sub even had enough space for an exercise room, a swimming pool and a spa!!!! As any submariners will tell you, space is always at a premium on subs…Not this big fella it seems…And yes, unlike what Tom thought, the sub’s mess is one of the largest in WORLD for a sub! Able to seat every single enlisted men in that room!!
But all of that came at a huge price. As stated, the sub was so hard to maintain that its readiness was already atrocious even in the ‘80’s. When the USSR fell, it hit rock bottom! By 1996 and 1997, two of the sub were already decommissioned. There once was a crazy plan to convert the subs into a submarine oil tanker capable of carrying 10,000 tons of raw oil, under the ice caps to Siberia in the dead of winter….That plans of course fell through due to the costs. One of the sub eventually was used as a test bed for the new Bulava missiles that is now in service on the new Borei class missile subs. In fact, there was a planned to modify at least 4 Typhoons to carry the new missile since the Sturgeons were retired long before the subs. However, After the Russians found out the money it took to modernize a Typhoon could be used to build two Boreis, the plans were shelved. In 2012, the Typhoons were completely replaced by the Boreis. In 2018, plans were underway to begin scrapping two of the Typhoon, closing out a chapter in the history of the Cold War
| THE KIT |
See my preview here: http://www.modelingmadness.com/review/misc/ships/previews/83532.htm
Whatever I said remain true. Overall, if you just keep everything shut, it should be easy. The only big tripping point is the painting, due to the multiple sessions and different colors involved.
| CONSTRUCTION |
This is easy. Submarine
constructions have always been easy. Just top and bottom together…Well, before
that, I had to cement a bottom piece to the bottom of the ship. Why didn’t
hobbyboss mold this onto the bottom is beyond me, as it creates a series of
seams I needed to putty up and sand. Then I added some platicards to the top to
blank off all the missile tubes. Again, there is no interior structure and if
you leave the missile hatches open, daylight can be seen through and so not
really accurate. I would guess Hobbyboss got a close look at the outside of a
Typhoon but couldn’t get sources to the inside of the missile tube structure so
left it blank. The most important structure inside are the bow planes. A series
of 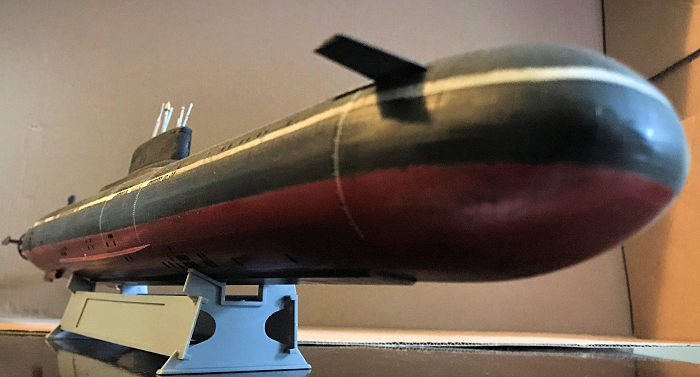 pieces, akin to the ancient Monogram F-14 Tomcat swing wing, are built so the
bow planes can be swung in and out. However, as said in the preview, these are
pretty measly and look like a few swings, will break them so I cemented the
plane in the open position shut and then used plasticards to blank off the open
vents. It was only afterwards, after the top have cemented onto the bottom, that
I realized that the right plane was cemented too “outwards” and have to break it
off and then cement it right. No big deal.
pieces, akin to the ancient Monogram F-14 Tomcat swing wing, are built so the
bow planes can be swung in and out. However, as said in the preview, these are
pretty measly and look like a few swings, will break them so I cemented the
plane in the open position shut and then used plasticards to blank off the open
vents. It was only afterwards, after the top have cemented onto the bottom, that
I realized that the right plane was cemented too “outwards” and have to break it
off and then cement it right. No big deal.
Next are the missile hatches. This was an ordeal as several parts goes in to it before it is cemented flat against the platicards. I had to do this twenty times. Strangely, Hobbyboss provided you with enough parts to build 24 hatches. This means you can lose some parts to the carpet monster and still be ok. I spent most of the construction time on the hatches. This was the most tedious aspect of the kit.
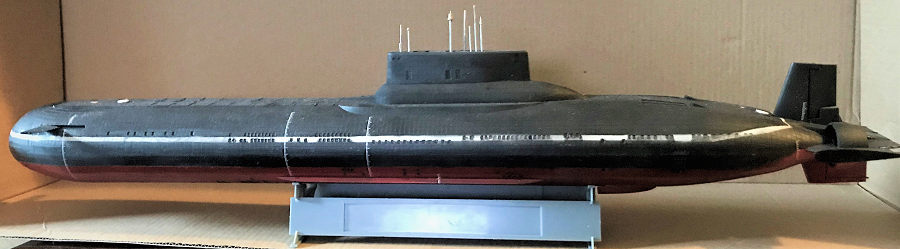
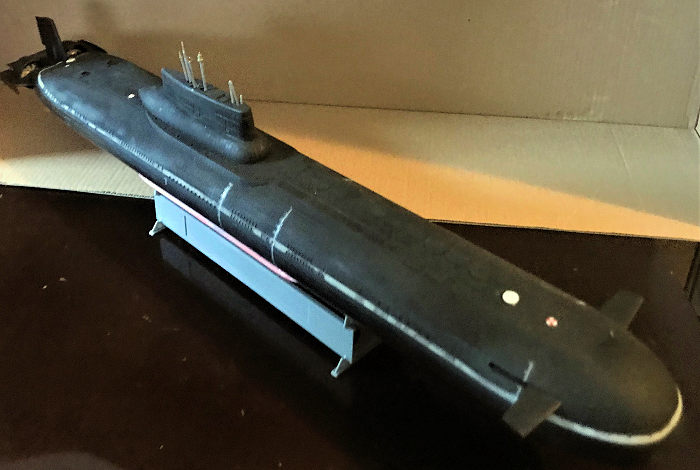
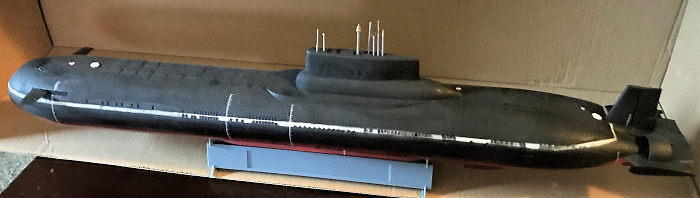
The sail was next. It’s in three pieces. I cemented the two halves together, then cemented the top. The top is separate cause there are two different versions. One is where all the antennas and the bridge is open. The other as you may have surmised, is all closed. I chose the open version and put it on but left all the antennas out for now as they are all silver. After this, I placed on the rudders. Be judicious with the glue and the rudder should be movable. I left off the horizontal tail planes cause they need to place on after the propellers were cemented into their perspective rings first and the props are all brass so I saved them after painting. Afterwards, I putty up the seams. Now, the model fit is alright but there were still seams where the sail joint against the hull, the top and the two ship halves. Other than that, it wasn’t very painful, unlike the Sea wolf kit, which the two hull halves warped and took some major doing to bring it up to speed. To the paint shop we go!
| COLORS & MARKINGS |
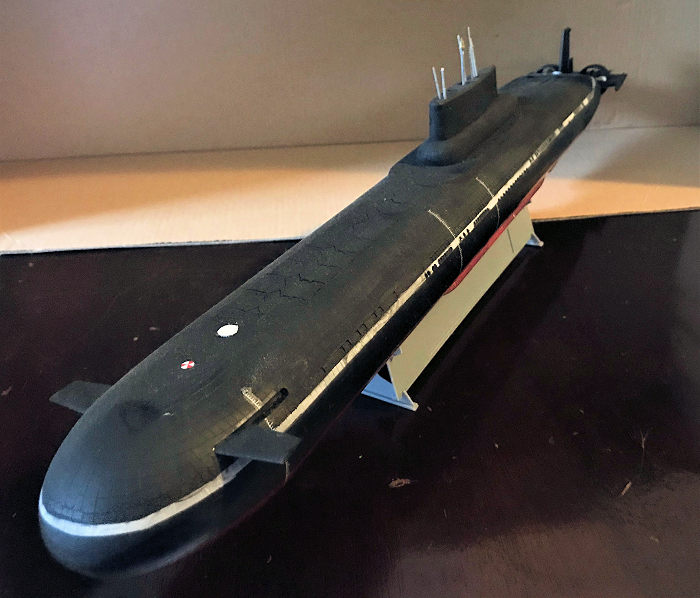
Painting is complex. Checking photos on the web, they are exactly what they called out in the painting diagrams. Bottom is hull red, then flat black to the water line, the next part is slight band of white to denote the water line before finally, black on top of that line. I nearly crossed my eyeballs just to mark down where the dividing line is among all the colors on the ship itself. Luckily, you can use the anechoic tiles as a counter to see where all the dividing lines are. After marking it all down, I tape up the bottom and spray it with Tamiya’s hull red from a spray can. UGH! This was not pleasant as I learned quickly you have to keep the model at least 24 inches from the can or else the color will clog everything up! The color is also a bit bright for my tastes. I should have gone with Testor’s Chryslers Engine Red instead. It’s a close match to hull red and not nearly as bright. Sigh, Rustoleum, why? WHY? After that is dried overnight, I taped up the next section, black and used Testor’s Flat Black. Just a note, do not use Lacquer Thinner on Testor’s flat black. Learned quickly it turns the paint into a smoky blackened smoldering mess that when dried, will easily come off if you simply touch it. Just use regular paint thinner.
 After that is the white
water line. I used light grey instead cause nothing is ever white for long,
especially after a ship hits the water, especially salt water for long periods.
It was tough to determine just how wide the water line is, but I got through.
Also, the tail section where the line bent upwards took some doing but I cut the
tape to small pieces and got it that way. After that dried out, I used flat
black again for the top side.
After that is the white
water line. I used light grey instead cause nothing is ever white for long,
especially after a ship hits the water, especially salt water for long periods.
It was tough to determine just how wide the water line is, but I got through.
Also, the tail section where the line bent upwards took some doing but I cut the
tape to small pieces and got it that way. After that dried out, I used flat
black again for the top side.
Once all the colors are dried, I ripped off the tape….And to my horror, found out Testor’s flat black reacted badly to the lacquer thinner and became a sooty, smoky black mess that instantly stick to your fingers if you touch it and I was forced to respray the area with paint thinner this time. Also, time to weather, I used acrylic black, thinned just tiny bit with water to further cover up the brouhaha. It worked well. The paint is still very flat, but don’t stick to my fingers anymore, as if the ship has just came back from deployment and ready to hit the docks, perfect in highlighting the anechoic tiles on the model. It’s at this point that I also put up the decals. I forgot just how thin trumpy-boss decals are and after lost one, I remembered to just wait until almost all the backing films are gone before touching them and then zap it shut with Mr. Marks. Then several coats of acrylic jet black was washed over the model to depict heavy use. This is especially true towards tail end of the Typhoon career, as the old USSR started to run out of money to keep it spic and span. Heavy jet black were especially washed down the water vent holes to depict these areas being heavily used and not washed clean. No rust, or very very little since the hull itself don’t rust at all since its covered in plastic anechoic tiles and last time I checked, plastic don’t rust. Whatever little rust would’ve came from inside the ballast tank vent ways. After that is all dried, final assembly can begin.
| FINAL CONSTRUCTION |
First are all the little antennas and periscopes on top of the sail. These are mostly silver except what looks like a weather radar vanes. Now, these are in photo etch and measly small. I lost one half to the carpet monster due to the fact the space to insert it in is so tight, you can’t get it jammed into the other half! Wish hobbyboss would make the space a little wider!
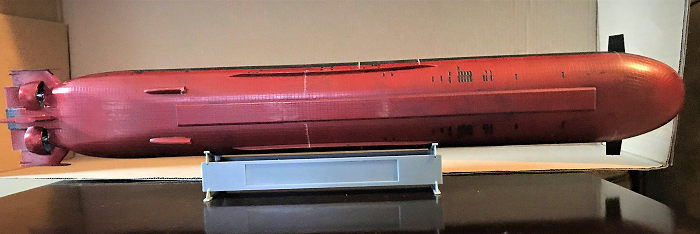 The other part are the
props and rear tail planes. I painted the props brass and inserted them in the
correct spots inside the housing. The planes, since I didn’t insert them in
before the hull halves were joined, I cut off the location tabs and cemented
them in, As it turns out, this was not a good idea as the spaces were too wide
and the plane had no places to attach to if you place them in the center.
Shoulda left a bit of tabs present. Sighing, I used superglue and carefully
glued the planes to one side of the housing. The spaces on the other side is
close enough that you can’t really tell (but wide enough that you can’t cement
the planes in the center).
The other part are the
props and rear tail planes. I painted the props brass and inserted them in the
correct spots inside the housing. The planes, since I didn’t insert them in
before the hull halves were joined, I cut off the location tabs and cemented
them in, As it turns out, this was not a good idea as the spaces were too wide
and the plane had no places to attach to if you place them in the center.
Shoulda left a bit of tabs present. Sighing, I used superglue and carefully
glued the planes to one side of the housing. The spaces on the other side is
close enough that you can’t really tell (but wide enough that you can’t cement
the planes in the center).
Finally, I made the display stand. It’s simple but will do. I didn’t color it since I do not want the stand to distract from the model. Project complete!
| CONCLUSIONS |
 There were few rough spots, but as Tom Cleaver would say,
nothing that “a few good modeling skills” will get over. Even in 1/350 scale,
this thing is a bit intimidating! It’s much bigger than an Ohio and look like a
black Loc Ness Monster sitting next to my model of the said American SSBN…Too
bad in reality, it was just wasn’t up to par to its American counterpart! If you
like a ship model, but is leery of all the top side superstructure and all the
confusing number of parts, then subs definitely fit the bill. This monster
certainly will get you started on ship building kits! It’s simple enough that
you can easily get over the hump and don’t suffer hissy fits, but still complex
enough that you don’t get bored, like some ship kits out there!
There were few rough spots, but as Tom Cleaver would say,
nothing that “a few good modeling skills” will get over. Even in 1/350 scale,
this thing is a bit intimidating! It’s much bigger than an Ohio and look like a
black Loc Ness Monster sitting next to my model of the said American SSBN…Too
bad in reality, it was just wasn’t up to par to its American counterpart! If you
like a ship model, but is leery of all the top side superstructure and all the
confusing number of parts, then subs definitely fit the bill. This monster
certainly will get you started on ship building kits! It’s simple enough that
you can easily get over the hump and don’t suffer hissy fits, but still complex
enough that you don’t get bored, like some ship kits out there!
Donald Zhou
29 September 2020
Copyright ModelingMadness.com. If you would like your product reviewed fairly and fairly quickly, please
contact
the editor or see other details in the
Note to
Contributors. Back to the Main Page
Back to the Review
Index Page
Back to the Previews Index Page